Introduction
In the world of React, efficient State Management is one of the most important things a developer has to perform in order to produce a solid website and Redux is one of the best ways of achieving this.
In this article we are going to see how you could get started with Redux and use it to easily manage state in your React apps.
What is Redux?
Redux is a predictable state container for JavaScript apps.
Redux is used for managing and updating state in an immutable way.
This means that when changes are done to the state, the existing state isn't updated to a new value, instead a new reference of the existing data is created, changes are made and the old state is replaced with this.
Why Redux?
Redux helps to create a single source of truth. Redux allows you to maintain all your data in one place, making life easier. All your data storage and manipulation happens in one place.
What are we going to build?

We are going to build a simple app where we can manage two entities, Posts and Todos. You can take a look at the finished website here. We will be
Loading Posts and Todos from the JSON PlaceHolder APIAdding a Post or TodoDeleting a Post or Todo
The main packages that we are going to use in this project are
-
redux: Official React Package -
react-redux: Official React bindings for Redux -
redux-thunk: Thunk middleware for Redux
Setting up the Project
-
You can clone the project from this repo
The master branch uses Class based Components. If you are fond of hooks, just clone the hooks branch. Once cloned, run senshiii
/
React-Redux-101
senshiii
/
React-Redux-101
An introduction to state management using React Redux
npm install. Install Redux Dev Tools as an extension in your browser. Redux Dev Tools provides an interface to track your state changes, state info, actions, allows us to revert back to previous state versions, etc.. All in all, its a must have tool.
Understanding the Redux Flow.
The main three components of a redux flow includes the:
Store - The store is the hub of data and logic and this is what your application subscribes to.
Actions - Actions are basically events which are "dispatched" from your application. Actions are uniquely identified by their "type" and this is used to trigger a specific change in the store data. An action is basically an object with a type property. We can also send additional data in this object to the reducer which will be available in the action paramater in the reducer function.
const action = { type: 'ACTION_TYPE_1' }
const anotherAction = {
         type: 'ACTION_TYPE_2',
         data: 'ANY TYPE OF DATA: OBJECT, STRING, ETC...'
}
3.Reducer - A Reducer can be thought of as an event listener which listens for actions and then updates the state ( if necessary ) and returns the new and updated state. A Reducer is a function which takes in the old State and an Action object and returns the updated/new state.
const reducer = (prevState, action) => {
       /* STUFF HAPPENS */
       return updatedState
}

A Redux Flow begins with an action of a specific "type" being dispatched from the App UI due to some event. The action is taken up by the Reducer and then the Reducer changes the state according to the "type" of the action. It might change only a certain part of the state. The rest of the data is recreated and retained.
In the diagram above ,there are two small Reducer blocks in the Root Reducer block. This is because a Store can have multiple slices/pieces of state. Each slice of state has its own list of actions and has its separate reducer. However, it is important to note that the Store can accept only one Reducer i.e. the Root Reducer.
So the individual slices are combined to a Root Reducer and the individual slices are made accessible by mapping them to an object as we will see later.
Another SUPER IMPORTANT concept to understand is the redux flow when async tasks are involved.

A Redux Store cannot perform async tasks by itself. All the operations happen synchronously. But alomst all real life apps need to perform async tasks.
So how do we do this? We use thunks as a middleware.
Thunks are nothing but a function which returns another function.
So inorder to perform an async task we dispatch a thunk...The async tasks are performed and on completion, the necessary actions are dispatched. Check the diagram above to visualize the flow.
Going through the Code
Takign a look at the src folder we see
There are 4 components -
- Posts - Displays all Posts, Loading and Error messages. Displays a list of Post components.
- Todos - Displays all Todos, Loading and Error messages. Displays a list of Todo components.
- Todo - Displays a Single Todo
- Post - Displays a Single Post
The Main container is the parent component which displays both the Posts and Todos components.
Let's go over the files in the the store folder first.
- store/index.js

This file sets up the store which is going to be used in the React App.
First, we import the necessary things needed from the libraries needed to setup the store.
Also we import the rootReducer from the reducers folder.
Next we setup the Redux Dev Tools. ( For more info on connecting Redux Dev Tools, check here )
Moving on, now we use the createStore method to create the store and pass in the rootReducer and use add thunk as a middleware using the applyMiddleware function.
If you want to hide the redux dev tools in production, you can do this.
const composeEnhancers = process.env.NODE_ENV === 'development' ? window.__REDUX_DEVTOOLS_EXTENSION_COMPOSE__ || compose : compose;
- store/types.js

This file lists all the different action types which are going to be used while dispatching actions and also in the reducer while determining the dispatched action.
The actions and reducers folder have a similar structure. For each slice of state, there is an action file and reducer file in the respective folders. The index file in the actions folder exports all actions and the one in the reducer folder exports the rootReducer used by the store file above.
I am going to explain one slice ( Posts ) of the state. The concepts are same for the other slice ( Todo ).
- actions/post-actions.js
As stated earlier, an action is an object and we are going to use functions to return objects. This is the most commonly used pattern. We will come across two kinds of functions. One which returns an action object directly and one which returns a thunk.
The functions exported from the actions files are the ones which are going to be called from the React App.
Example Function which returns an action obj diretly:

First function just returns the action object. Second function just returns the object with some additional data receieved through parameters.
Example Function returning a thunk:

This function returns another function ( a thunk basically ), which has one parameter, dispatch which will be used to dispatch events before and/or after completion of async tasks.
As seen in the code, at the beginning of this function we dispatch LOADING_POSTS action by calling the loadPostsStart function.
When the posts are fetched successfully, SET_POSTS action is dispatched by calling the setPosts function and passing the fetched posts as a parameter. Finally, if there is an error we dispatch the POST_ERROR action by calling the setError function.
For every type of operation we perform we write the required functions. If the operation involves any async task, we write one thunk function and other functions which will dispatch events when the async task concludes.
Here is another thunk which uses parameters.

- actions/index.js
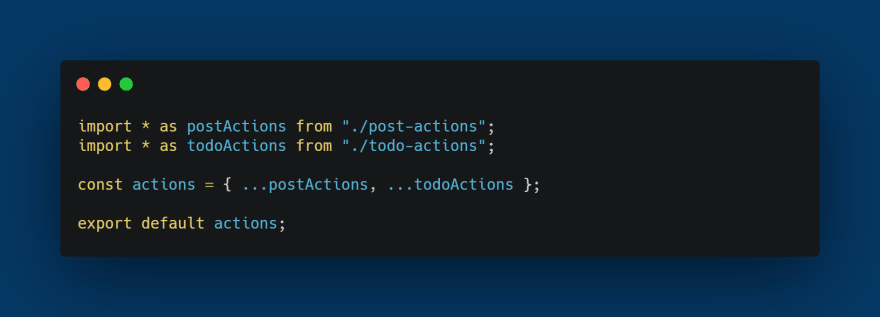
In this file all the actions from different files are imported and exported in one single object to be used in the React Components to dispatch actions.
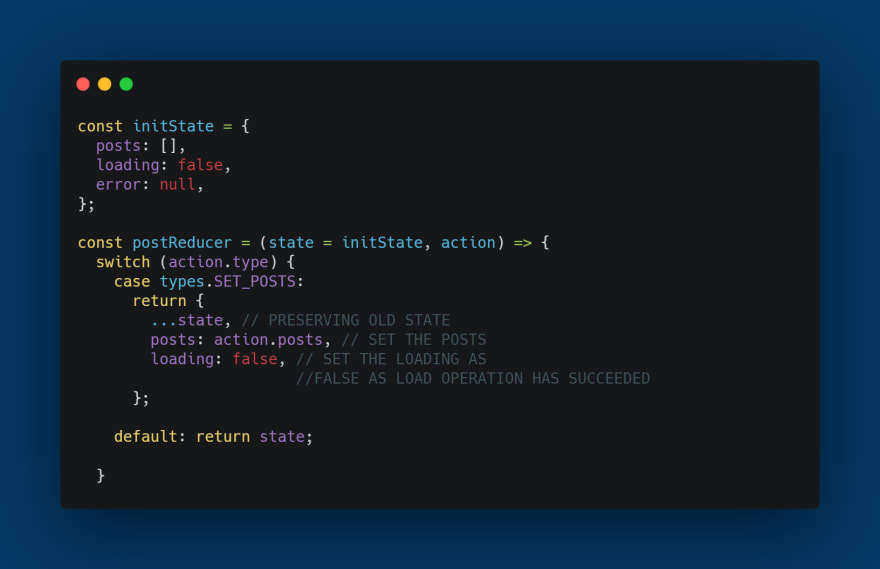
- reducers/posts-reducer.js
In every reducer file, the initial state is first defined and then the reducer function. In the reducer function, a switch case is used to determine the type of action and then relavant changes are made and the updated state object is returned.In the default case, the current state is returned.
The MOST IMPORTANT point to remember while updating the state is that the entire state has to be recreated or in other words we need to make a deep clone of the existing state and update few parts and return the updated state.
Deep Cloning is really important if you are working with arrays, nested objects, or array of objects and you will be working with them pretty often.
The best and easiest way to perform a deep clone of all of these is to use JSON.parse() and JSON.stringify().
Here is an action in which we update the posts ,which is an array of objects.

This is an action of adding a Post. Here we can see that first the posts array is deep cloned.
Then an array is created with the new post and all the old posts are added to this array. And finally the updated state is returned with the previous state being recreated and preserved ( ...state ) and the posts array being updated.
You can go through the comments in the reducer files at each step.
- reducers/index.js

In this file we combine all the reducers into one single reducer popularly known as the rootReducer. Notice when we call combineReducers we are mapping each reducer ( which pertains to a particular slice of state ) to a property of an object. This is used to differentiate the different slices of state in the React App.
Connecting Store to React App
Now the last step is to connect the store to our React App.
Step 1: Provider in src/index.js
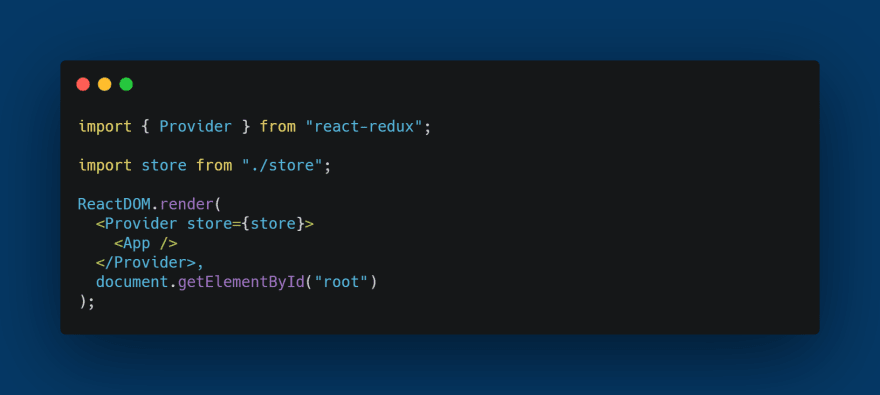
We import the Provider component, and the store and pass it to store props. The entire App is wrapped with the Provider component.
Step 2: mapStateToProps and mapDispatchToProps

We need to create two constants -
mapStateToProps - A function with one parameter, state which can be used to extract data from different slices of the state and map them to a property which will be available in the component as a prop.
Eg: posts, loadingPosts(extracted from posts slice), todos(extracted from todos slice),etc. can be accessed in as props.posts, props.todos, etc.mapDispatchToProps - A function with one paramater dispatch, which used to map functions which call the dispatch function with optional additional data to dispatch a certain event. These are also available as props in the connected component.
Finally we call connect passing the mapStateToProps and mapDispatchToProps objects and then our component. And then we use these as props normally in our apps.
You can call connect with either mapStateToProps( omitting the second argument) or mapDispatchToProps(passing null as the first argument)
Using Redux DevTools

Click this circle icon to open the Redux Dev Tools. You can check all the actions that have been dispatched. In the section on the right, you can look at everything, actions, entire state data, difference in state data, etc.
So thats it. Hopefully you have a solid basic understanding of how Redux works along with React. Play around with the code. You can always learn more from the Official Docs. Feel free to raise any Pull Requests. Will be glad to see them. Until next time. 👋❤
More Articles by me:
- How to structure your React Apps -


Top comments (2)
Hi, I'm a Redux maintainer. FWIW, this process can be simplified greatly, on several levels.
First, the fastest way to get started is with our official Redux+JS template for Create-React-App: github.com/reduxjs/cra-template-redux . It comes with Redux Toolkit and React-Redux already configured.
Second, the examples here are actually going against how we recommend writing Redux code.
createSliceAPI, which will also auto-generate the action creators for youcreateSliceuses Immer inside, so you can "mutate" the state inside of the reducer instead of having to write spread operations for immutable updatesPlease see these resources for our guidelines on how to write Redux code correctly:
Thanks for the insight. I wanted to provide a more bare bone approach.
Some comments have been hidden by the post's author - find out more