
Artistic style transfer is one of the most intuitive and accessible computer vision tasks out there. Though there’s a lot happening under the hood of a style transfer model, functionally, it’s quite simple.
Style transfer takes two images — a content image and a style reference image — and blends them so that the resulting output image retains the core elements of the content image, but appears to be “painted” in the style of the style reference image.
Style transfer models, as it turns out, also run very well on mobile phones, for both images and real-time video. As such, it’s not entirely surprising that Snap’s Lens Studio 3.0, with the introduction of SnapML, includes a template for building Lenses using style transfer models.
So far, we’ve covered the release of SnapML, taken a closer look at the templates you can work with, and provided a high-level technical overview—so I won’t be covering any of that here.
Instead, I’ll be working through an implementation of a custom style transfer Lens—from building the model, to integrating it in Lens Studio, to deploying and testing it within Snapchat.
But if you need or would like to get caught up on SnapML first, I’d encourage you to check out these resources from our team:
The Style Transfer Template
Before we jump into building our model and Lens, I first want to give you a sense of what’s included in the Lens Studio’s Style Transfer template.
Essentially, each ML-based Lens Studio template includes:
- A preconfigured project inside Lens Studio with an ML Component (Snap’s term for a container that holds the ML model file and input/output configurations) implemented. There’s also a sample model included by default.
- Access to a zip file that includes a Jupyter Notebook file (.ipynb) that you can run inside Google Colab. You’ll want to download this and unzip it (see below). I created a primary project folder on my local machine and nested this folder inside it.
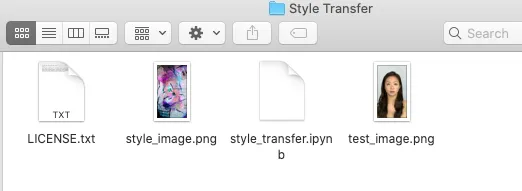
- Other important project files, depending on the ML task at hand (for Style Transfer, Snap provides a sample style reference image and a content/test image).
Training a Custom Style Transfer Model in Google Colab
I was pleasantly surprised at how easy it was to work with the Notebook the Snap team had prepared. Let’s work through the steps below:
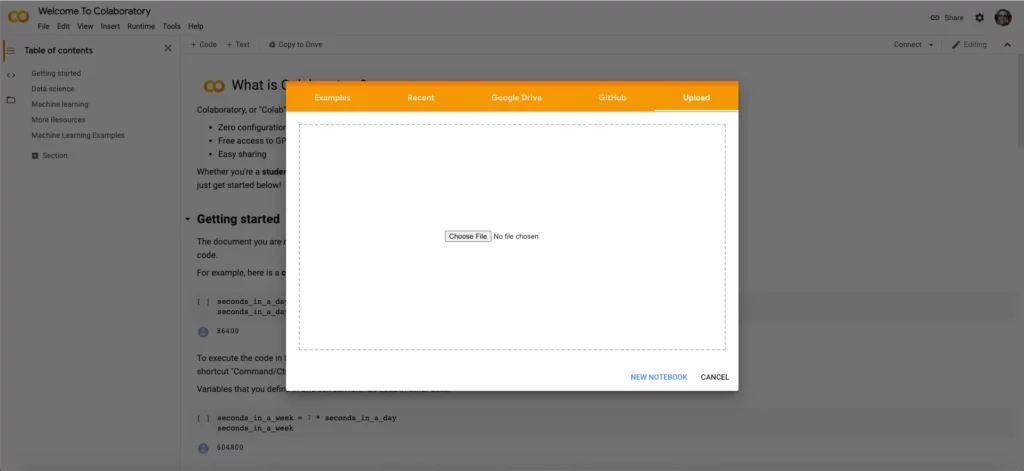
Step 1: Upload Style Transfer Notebook
Simply open Google Colab, and in the intro flow where you’re prompted to choose a project/Notebook, drag-and-drop the provided Python Notebook file. Once you’ve done that, Colab should automatically connect to the appropriate runtime—so for the purposes of this project, you won’t need to adjust anything there.
Step 2: Upload Style and Reference (Test) Images
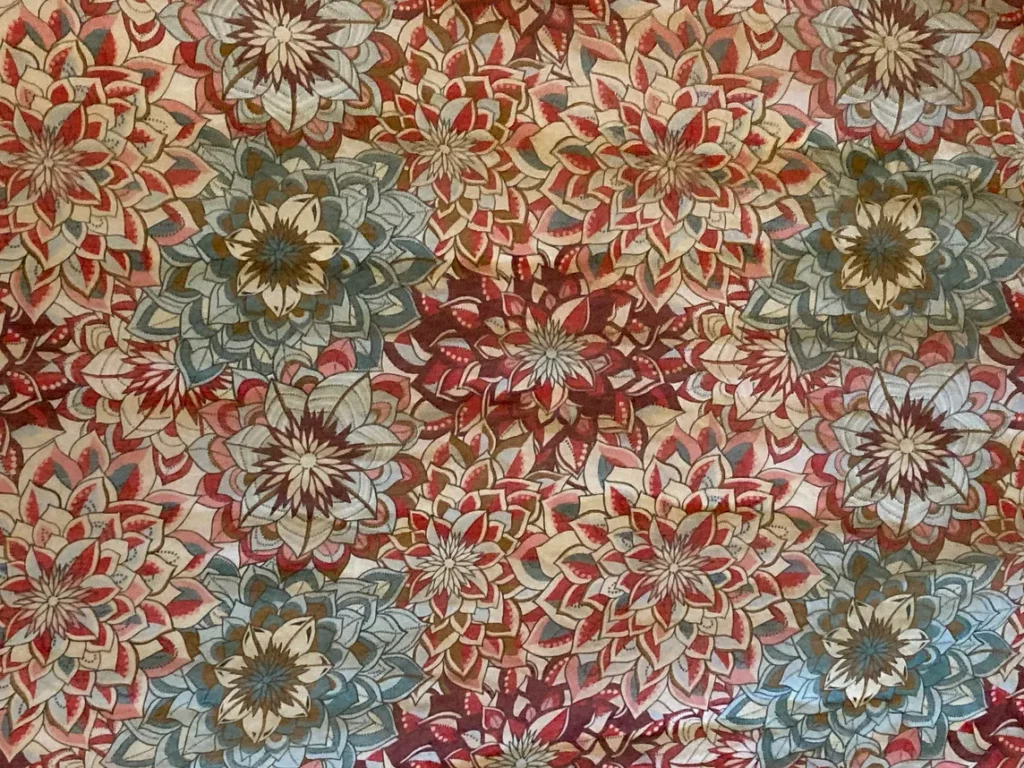
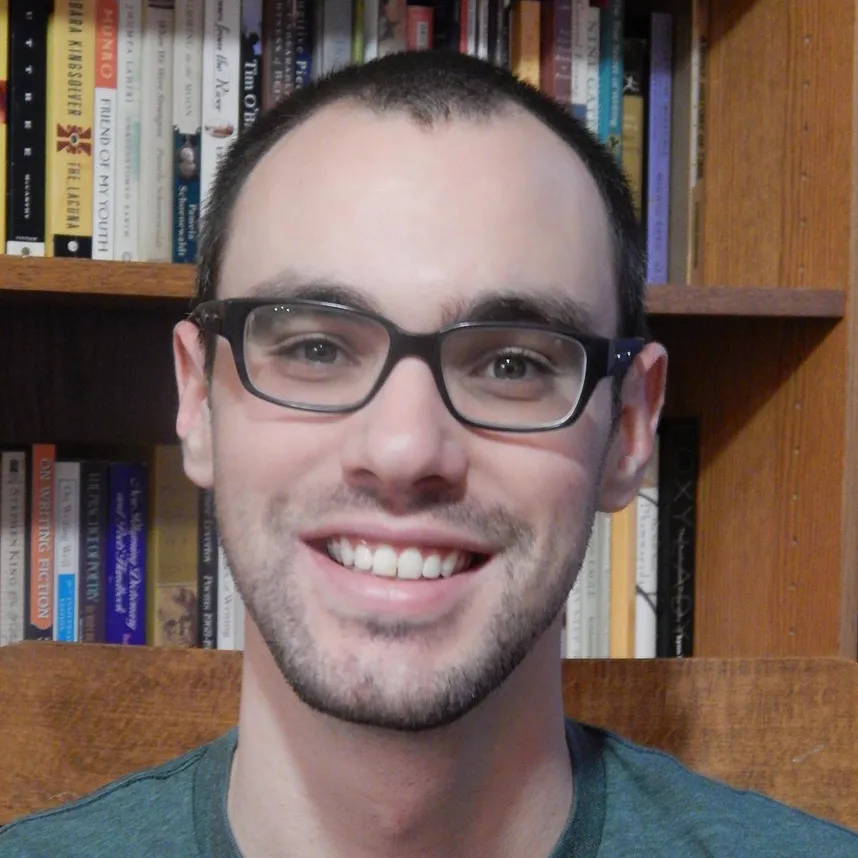
Because we’re training our own custom style transfer model, we’ll need to supply our model with the necessary training inputs: a style image and a content reference image.
With other templates (i.e. Classification, Segmentation), you’d need to upload full image datasets, but here, given the model architecture and task, you’ll only need to upload two images. These are the ones I chose:
To upload these, simply drag-and-drop them into the “Files” tab on the left-side panel. Click “Ok” when notified that exiting the runtime will delete these files — we should have a fully trained model once we’re done with this process, so no need to worry about that.
Step 3: Train the Model
Because all the model needs is a single style image to train on and a reference image to test on, we’re ready to train our model once we’ve uploaded these two images.
If you scroll through the Notebook you’ll notice each step in the process is commented out, with explanations for what’s happening at each step. I like this kind of additional detail, as it gives small windows into how the model is trained at each step, along with the requisite code blocks. So if you’re interested, I’d encourage you to sift through it to get a flavor of Snap’s magic sauce.
But if you just want to train your model, click Runtime in the top nav bar and choose the first option, Run All. This will automatically run all code blocks in succession, all the way from installing the necessary libraries to importing training data (the model leverages the COCO dataset to help train) to training, converting, and downloading the model.
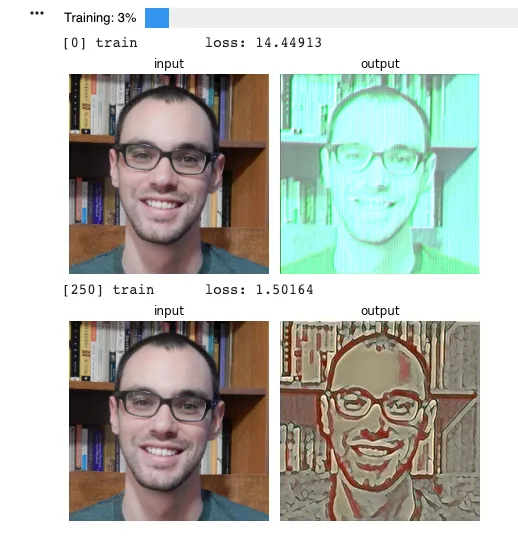
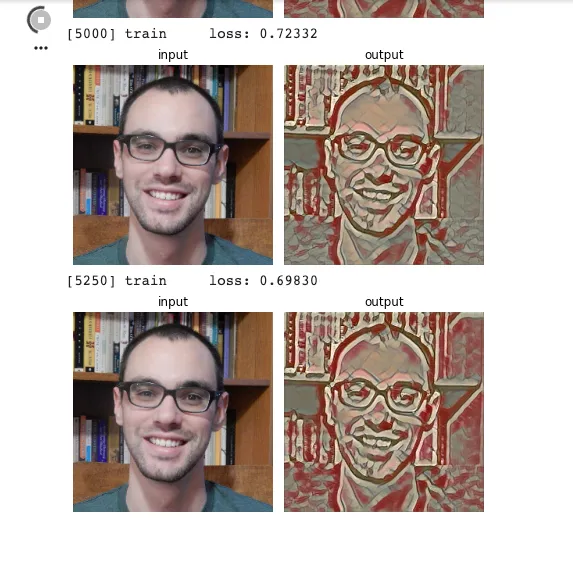
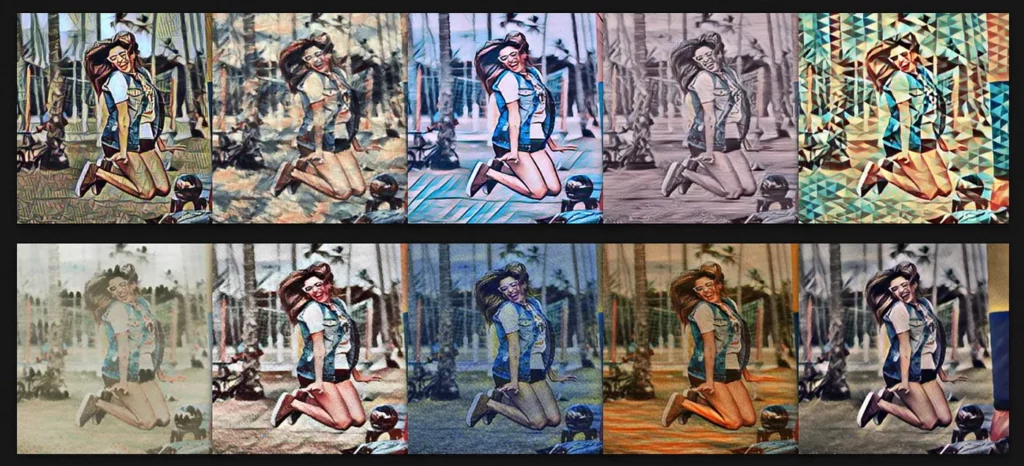
As you can see in the screenshots above, the Notebook provides a nice in-progress training visualization, which gives you both a qualitative and quantitative look at how the model is coming along.
After 10,000 training loops (the default amount — seemed like somewhere between 5000–7500 would have been sufficient), the model successfully trained! Next, we need to download the model and start working with it in Lens Studio.
Step 4: Downloading the .ONNX file
This might have to do with my inexperience in coding and working with Colab, but this part tripped me up just a bit. Since all the other code blocks had run automatically, I assumed the same for the model download.
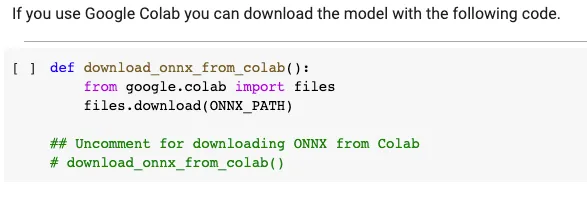
But as you can see in the above screenshot, there’s a note at the end that we need to “uncomment” and run the code block manually to actually download the file. Delete the # from the download_onnx_from_colab() function, and delete the remaining white space so that the function is all the way to left margin of the code block.
Run the block again, and your .onnx file should automatically download. Now we’re ready to implement our custom style transfer model in Lens Studio!
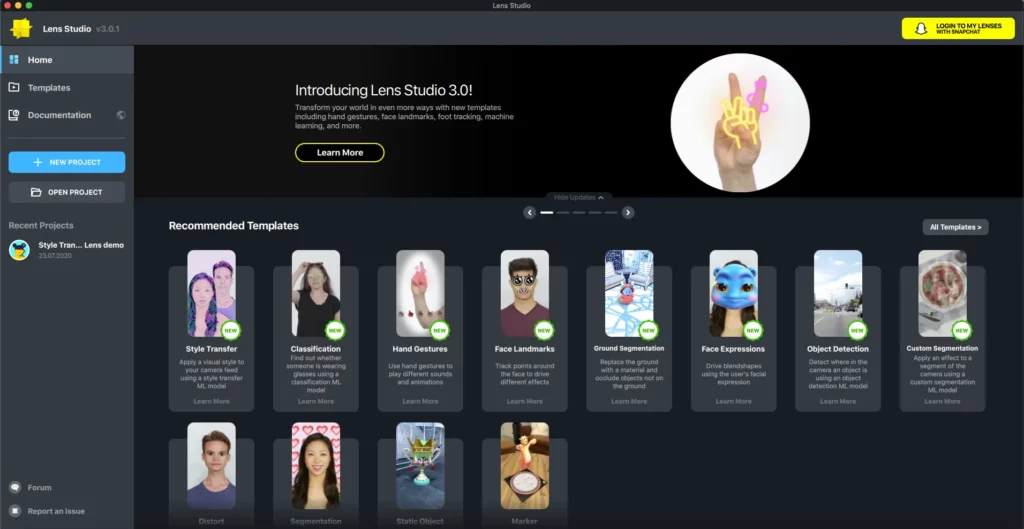
Implementing the Style Transfer Model in Lens Studio
If you’ll recall, Lens Studio includes a range of templates that pre-populate projects with certain components, textures, and more. One of those is Snap’s Style Transfer Template, and it should be easily accessible from the Lens Studio home page.
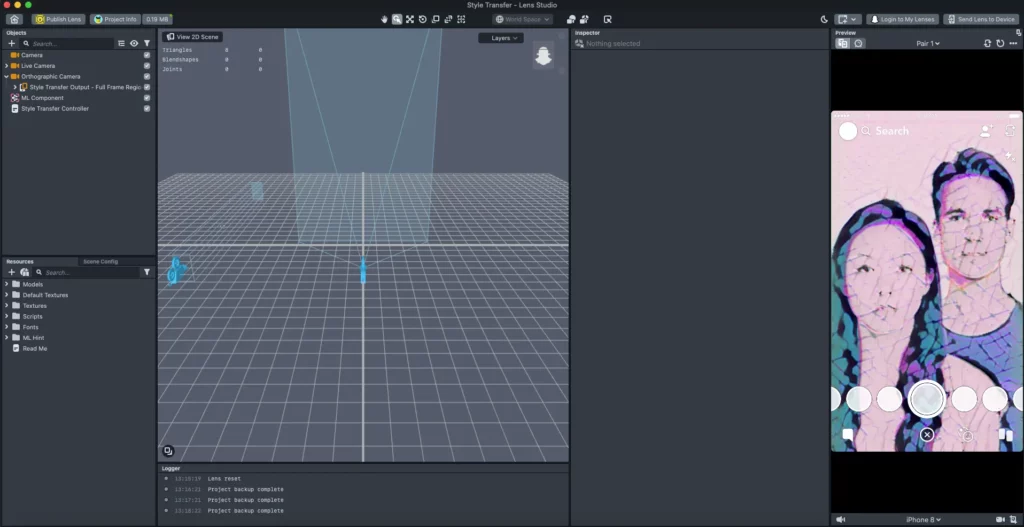
Above is what you’ll see when you launch the Style Transfer template. The Lens Studio team has already configured this template with components needed to import and run style transfer models built with their Notebooks.
Also, you can see that there’s already a preview in the right panel—this is the pre-built model, fashioned from the style and test images Snap provides in the original zip file. Our task here is to add our own model and tell Lens Studio to use it in order to apply the target style within the Lens.
Step 1: Import Model File
First, we need to import the .onnx model file into the Resources panel (lower left). We can simply drag-and-drop to do this. We’ll see this import configuration window pop up:
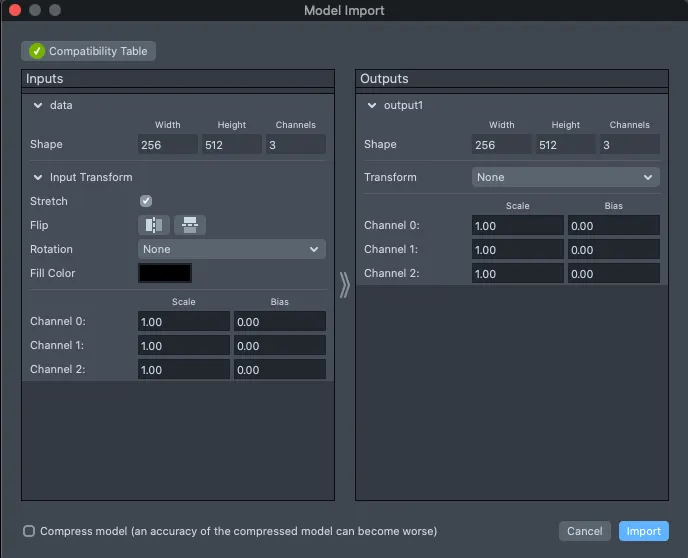
If you’re working with completely custom models—i.e. those built on your own, without the provided Notebooks—you might have to adjust these input and output configs, but since we built this model according to Snap’s exact specifications, we can just leave everything as is and click Import.
Step 2: Adding the Model to the ML Component
As aforementioned, model files are contained and configured through what’s known as an ML Component — essentially, the bridge between a model and Lens Studio.
In the template project, the ML Component, by default, contains the sample model we saw in the initial preview. We don’t have to do anything to that model file—instead, we have to configure the ML Component so that it actually pulls in and contains our model instead.
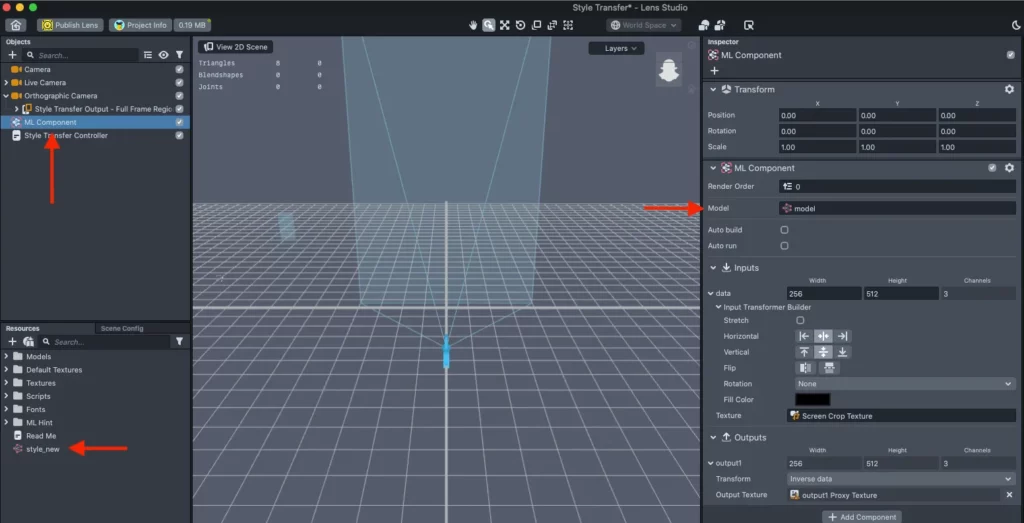
A few things to note in the image above:
- After you’ve dragged and dropped the model file in, you should see it in the Resources panel in the bottom left corner (style_new).
- To modify the ML Component, simply click on the respective Object in the top left panel.
- In the ML Component configuration on the right-side panel, you’ll see a configuration called Model. Here, simply click on that field, and you should see your model file as an option. Choose it and click OK.
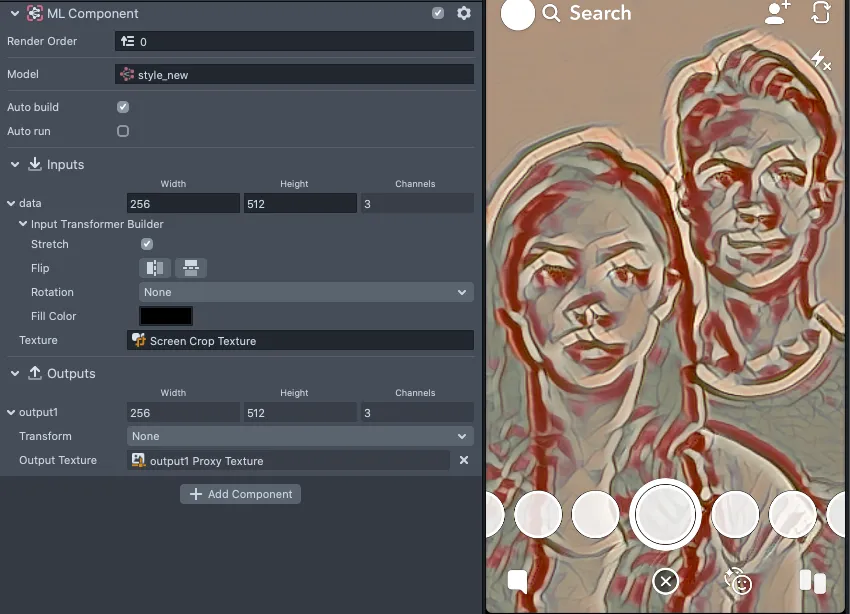
After you follow these steps, the Lens Preview on the right should reset and give you a look at your Lens in action.
Step 3: Configuring the Style Transfer Controller
This step will likely be more important if you’re building Lenses with multiple effects, or if you want more fine-grain control over how your model actually runs in Snapchat (i.e. continuously, upon user tap, adapted to device performance).
To configure this Controller, click on Style Transfer Controller in the Objects panel (top left of the screen, directly underneath the ML Component). Feel free to play around with the run mode and see if anything changes on the target device, but for the purposes of this tutorial, I’d refrain from adjusting the other config options.
Ultimately, I settled on the default—Adapt to Device Performance, which should ensure the best performance across devices and generations.
Testing the Lens in Snapchat
So far, we’ve trained our own custom style transfer model from the template provided by Lens Studio, and configured our Lens’s ML Component to work with our custom model.
Now, it’s time to test our Lens inside Snapchat, so we can see how it works in the real world, on both static images and live video.
In the top-right corner, above the preview panel, you’ll see a small button—Preview in Snapchat. When you click that, you’ll see a “Snapcode” pop up. You’ll need to open the Snapchat mobile app on your device, and follow the instructions here.
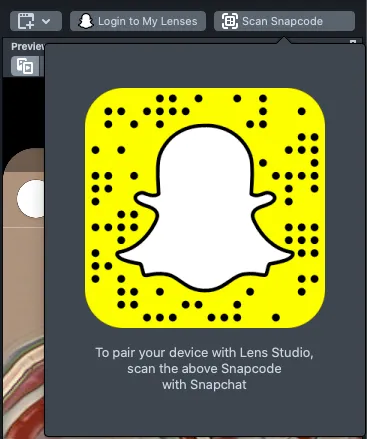
Once you’ve scanned the Snapcode, your test device will now be linked to Lens Studio. I initially thought this meant my Lens would be in my Snapchat queue, but alas, I’d missed the last step.
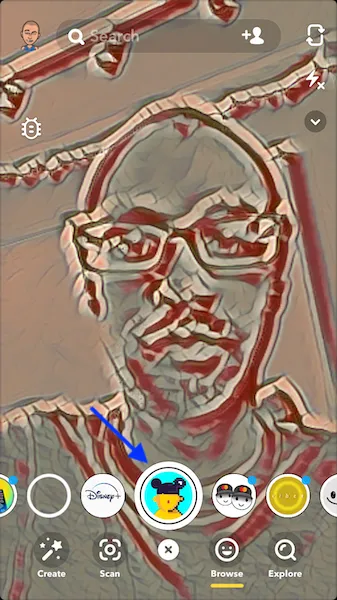
Once you’ve scanned the code, that same Scan Snapcode button will change to read Send Lens to Device. If successful, you’ll see a green checkmark, and you should also get a push notification from Snapchat (if you have them enabled).
At this point, you should be able to open Snapchat, tap to browse available Lenses, and find yours in the lineup!
What’s Next?
For the scope of this tutorial…we’re finished! You can now publish your Lens, or head back into Lens Studio to play with more effects, textures, materials, etc.
This might not make as much sense for style transfer since Lens Studio’s template is quite good and performant, but it’s also possible to work with more customized neural networks you’ve built on your own—with or without the help of the provided templates.
Our team will be releasing more content and how-tos around building with your own custom ML models in the near future—so stay tuned!
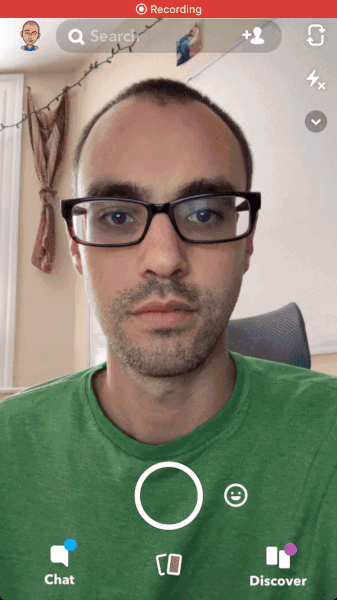
Finally, here’s a more complete and high-definition look at how my style transfer Lens looks when running on live video inside Snapchat:

Comments 0 Responses