DIY Single Sign-On for SSH


Carl Tashian
TL;DR In this post we're going to set up Google single sign-on for SSH. Behind the scenes, we'll use OpenID Connect (OIDC), short-lived SSH certificates, a couple of clever SSH configuration tweaks, and Smallstep's open-source step-ca and step packages. We will set up an SSH Certificate Authority, and use it to bootstrap a new host and a new user in our system. While this approach requires more up-front work than a typical SSH public/private key setup, it comes with a lot of benefits beyond single sign-on. It eliminates the need for gathering and shipping and managing authorized_keys files.
Watch our video walk-through of this project
How not to use SSH
For years, I innocently copied and pasted the same rusty old public key into an authorized_keys file on every server I used. And I always forgot to chmod it properly, so it never worked the first time. Someone taught me how to do this in 2004 and I never stopped.
I only rotated my key once, begrudgingly, in 2015, when OpenSSH deprecated my key type. Years later, who knows what servers are out there with my public key still on them? Old startups I worked for? Freelancing clients? My niece Elsa's crypto mining rig?
From an organization's standpoint, authorized_keys files just plain suck. In the early days, maybe someone crafts these files by hand like I did, but as the number of hosts and users grows it becomes a dreadful task. And one day you wake up with an ugly morass of public keys scattered across the infrastructure.
Many organizations will then make a playbook to automate the management of authorized_keys files. No matter how thoughtfully executed, the task of gathering and shipping and maintaining all those keys remains messy.
Single sign on with OpenID Connect + SSH certificates
We're going to set up an SSH certificate authority and manage SSH access using short-lived certificates instead of authorized_keys files. And, we will pair it with OpenID Connect (OIDC) for single sign-on support.
This will take more up-front work than your typical out-of-the-box SSH configuration, but bear with me because once you get it going it's pretty sweet.
What's an SSH certificate? It's a superior alternative to the public/private SSH key pair. Like public/private keys, certificates are exchanged between the user and host during the SSH handshake. a pared-down cousin of a TLS X.509 certificate. For a deeper dive, see our blog post, If You're Not Using SSH Certificates, You're Doing SSH Wrong.
Here a decoded SSH certificate:
-:
        Type: ecdsa-sha2-nistp256-cert-v01@openssh.com user certificate
        Public key: ECDSA-CERT SHA256:N7ErGTPjhmruRS/4OiwyRi6Iyr59z0Ur1ifkHIHu4V8
        Signing CA: ECDSA SHA256:E0GH/kZ/CGUIe8mMzzpujIiEYGC2IHDHafYBnye1WSU
        Key ID: "carl@smallstep.com"
        Serial: 16253962425132258867
        Valid: from 2020-03-23T16:01:39 to 2020-03-24T08:01:39
        Principals:
                carl
                carl@smallstep.com
        Critical Options: (none)
        Extensions:
                permit-X11-forwarding
                permit-agent-forwarding
                permit-port-forwarding
                permit-pty
                permit-user-rc
User certificates like this one identify users to hosts. Host certificates identify hosts to users. The biggest difference is the
Principalsfield.By default, during the SSH handshake, SSHD will allow usernames listed in a user certificate's
Principalsfield to sign in. Likewise, SSH expects to find the target hostname in a host certificate'sPrincipalsfield.Certificate can also have extensions that allow privileged SSH features (like agent and port forwarding) or that force configuration directives. To make magic happen, we're going to set up an ✨SSH Certificate Authority (CA) ✨, specifically Smallstep's
step-caserver. Our CA will issue SSH certificates to users and hosts when they supply the right credentials.
Here's a flow chart showing how Alice will get user certificate for herself and sign into a host:

We'll make this happen with an OpenSSH configuration block that works alongside our step command line tool.
Advantages
-
No more public key management. You will no longer have
users * hostsnumber ofauthorized_keysfiles littered across your infrastructure. Users won't even need an.sshdirectory on your hosts. -
Easily establish and revoke access across all hosts. SSH access expires the same day a user is removed from the OAuth domain. Traditional SSH key pairs don't expire. SSH certificates give us the benefit of passive revocation.
-
Bring your own security policy. Your Google security policy (including 2FA and security keys) will apply to the OAuth OIDC flow for granting SSH certificates. You can configure how often you want your certificates to expire.
-
Validated host certificates. We will leverage EC2 Instance Identity Documents (IIDs) so that only hosts in your AWS account will be issued certificates.
-
User certificates are stored in memory. Key pairs are often stored on disk—and they never expire.
-
No more Trust On First Use (TOFU). With host certificates, you'll never see this message again:
The authenticity of host 'ec2-3-15-28-130.us-east-2.compute.amazonaws.com (3.15.28.130)' can't be established.
ECDSA key fingerprint is SHA256:HYDAjwFL/qEmTuKm903tIk0fbPNk1CSRqH/usavToLw.
Are you sure you want to continue connecting (yes/no/[fingerprint])?
This post won't cover
- Integrating more deeply with an Identity Provider (eg. syncing with a SCIM or LDAP directory)
- Adding
sudosupport that leverages certificates - Advanced access control lists (ACLs) for mapping between users and groups of hosts
- Backing up your CA's database
- Automatically provisioning on hosts when a user connects for the first time
- Immediately revoking a user's certificate, before it expires
Prerequisites
- Your hosts live on EC2
- Your users live together in a GSuite domain
- You have the
steptoolkit installed locally- On macOS, you can run
brew install step - On Linux, you can find Debian packages here.
- On macOS, you can run
But I don't want to run a Certificate Authority!
Maybe you're thinking, "This is complex and scary."
Certificate Authorities got this reputation thanks to the arcane details of X.509 TLS certificates, the sheer number of acronyms in the world of PKI, and the complexity of tools like openssl.
Also, big CAs like Let's Encrypt do have a daunting amount of responsibility for keeping the internet secure.
You're not running Let's Encrypt.
SSH certificates are simpler than TLS certificates. An SSH CA simply lets us delegate some of the responsibilities around authentication and authorization for a fleet of hosts to a single centralized service.
Still not convinced? Smallstep SSH can manage SSH access for you (and we run the CA) for $3/host/month.
For this project, we'll set up the CA with three provisioners—three methods for issuing certificates:
- For user certificates, we will have an OAuth OIDC provisioner, associated with our Google OAuth app. We're trusting that Google reliably signs people in and only gives out valid, Google-signed OAuth identity tokens to authenticated users. The CA will verify the token using Google's public key.
- For new EC2 hosts, we need an AWS provisioner, associated with our AWS account. New hosts will ask for SSH host certificates using this provisioner. We're trusting AWS to provide an Amazon-signed instance identity document that the CA will verify using Amazon's public key.
- Finally, for host certificate renewal we need an SSHPOP provisioner. We'll renew our host certificates weekly.
Shall we get to it?
1. Create a Google OAuth Credential
You'll need a Google OAuth 2.0 Credential for this project. This takes 2 minutes.
- Create a Google Cloud Console Project if you don't have one
- Create the project in the GSuite Organization that you will use for single sign on.
- Configure the OAuth 2.0 consent screen for an Internal project
- Create an OAuth 2.0 credential
- For Application Type, choose Desktop app
Jot down the Client ID and Client Secret; you'll need them for the next step!
Note: Your CA will only issue user certificates for users signing in to the GSuite organization associated with your Google Cloud project.
2. Launch your Certificate Authority
We're going to install step-ca on an Ubuntu 22.04 LTS instance on AWS. A free tier instance (t2.micro/t3.micro) should suffice.
Grab this CA launch script and plug in the variables at the top:
- The OIDC client ID
- OIDC client secret
- Your GSuite domain name
- A name for your CA
- A root key password
- Your email
Upload it as an EC2 User Data script for use in Step 3 (Configure Instance) when you launch your EC2 instance.
For connectivity, your VPC will need an internet gateway attached and DNS hostnames enabled. Your instance should be in a security group that's available to all of your hosts and users on ports 22 (SSH) and 443 (HTTPS).
This is a good moment to mention that
step-caonly accepts HTTPS connections via mTLS—it's more resistant to attacks than your typical web server. Connect to your CA instance using your PEM key.
The output of the User Data script is located in /var/log/cloud-init-output.log. Check it out and make sure everything initialized properly. The step-ca service should be running.
The CA will have created the following certificates and keys:
/etc/step-ca/certs/root_ca.crt— your CA's root TLS certificate (self-signed)./etc/step-ca/certs/ssh_host_ca_key.pub— the SSH host CA key lets users verify host certificates./etc/step-ca/certs/ssh_user_ca_key.pub— the SSH user CA key lets hosts verify user certificates.- You'll also have (in
/etc/step-ca/secrets) the CA's private signing keys for the above certificates and keys. The password for these keys is saved in/etc/step-ca/password.txt. The CA reads this on startup to decrypt your keys.
As root, remove the User Data script, which contains your root CA password:
# rm /var/lib/cloud/instances/i-**/user-data.txt**
You'll need two bits of information from your CA:
- The public hostname, so we can find it again.
- The root certificate fingerprint, so we can establish a mutual TLS connection with it.
As root, run:
# step certificate fingerprint $(step path)/certs/root_ca.crt
5bc2b4779ad1562f6ed0809857fbed7925d2432eb25083f41a468532495ca658
Jot these down. Your CA is up and running! 🎉
3. Bootstrap a new host
Let's bootstrap an Ubuntu instance that will be our first ssh target host.
Note: Your CA will only issue host certificates for instances that are in its AWS account. This time around, grab this host User Data script for launching the new instance—filling in these variables:
- Your CA's URL (
https://[CA hostname]) - Your CA's root certificate fingerprint
Here's what the User Data script will do:
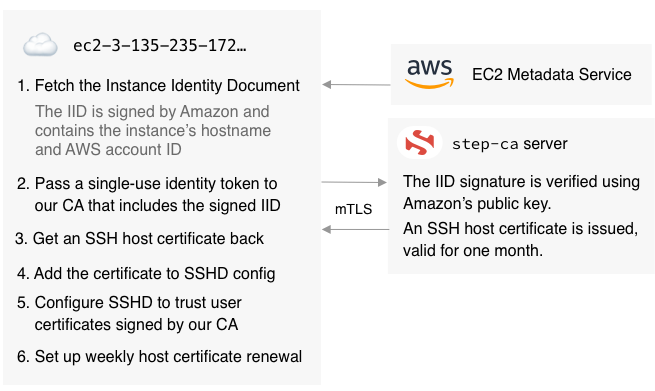
So, we get a host certificate in exchange for a single-use token that contains the Instance Identity Document) and its signature.
About those IIDs... In case you've never played with IIDs, here's what one looks like:
$ TOKEN=`curl -X PUT "http://169.254.169.254/latest/api/token" -H "X-aws-ec2-metadata-token-ttl-seconds: 21600"` \
&& curl -H "X-aws-ec2-metadata-token: $TOKEN" –v http://169.254.169.254/latest/dynamic/instance-identity/document
{
  "accountId" : "8072125551212",
  "architecture" : "x86_64",
  "availabilityZone" : "us-east-2c",
  "billingProducts" : null,
  "devpayProductCodes" : null,
  "marketplaceProductCodes" : null,
  "imageId" : "ami-0fc20dd1da406780b",
  "instanceId" : "i-01bd292377d6d8fec",
  "instanceType" : "t2.micro",
  "kernelId" : null,
  "pendingTime" : "2020-03-11T23:18:12Z",
  "privateIp" : "172.31.46.150",
  "ramdiskId" : null,
  "region" : "us-east-2",
  "version" : "2017-09-30"
}
This bit of JSON is signed by Amazon. Here's the signature:
$ TOKEN=`curl -X PUT "http://169.254.169.254/latest/api/token" -H "X-aws-ec2-metadata-token-ttl-seconds: 21600"` \
    && curl -H "X-aws-ec2-metadata-token: $TOKEN" –v http://169.254.169.254/latest/dynamic/instance-identity/signature
c0p6ygyFNFxyjs/73QGCQN+7khkZBr6H5cP/gefBgAwe80GmSTNlQy68LBSQQYrQczv2aHTXj3xa
CFkaGE4GPYiAogCkywcnt5VAp3t176GQwVxqfmawTliPMs31dY7ZeZvixN/1uoe8x1pt0EXAMPLE
Sign in with your PEM key and make sure everything initialized properly. The output of your user data script is located in
/var/log/cloud-init-output.log.
Create a user for yourself on the host
Create a new user on the host. Your username must match the user portion of the email address you'll use to sign in to Google. In my case:
$ sudo adduser --quiet --disabled-password --gecos '' carl
The host side of our setup is done! 🔑
4. Onboard a new user
Let's get you set up as the first user. On your local machine, run:
$ CA_URL=https://[YOUR CA].compute.amazonaws.com
$ CA_FINGERPRINT=[CA FINGERPRINT]
$ step ca bootstrap \
       --ca-url $CA_URL \
       --fingerprint $CA_FINGERPRINT
This will install your CA's root certificate on your machine and configure it. It creates two files: ~/.step/config/defaults.json (the config file for step), and ~/.step/certs/root_ca.crt (your root CA's TLS certificate).
Next, we can provision a user certificate for ourselves:
$ step ssh login [your email address] --provisioner "Google"
What does this command do?
- It launches your system browser and starts Google's OIDC sign-in flow
- After signing in, the ID token you get back from Google is sent to your CA
- Your CA validates the Google token and issues an SSH certificate associated with your email address
- The certificate is added to your SSH agent. Use
step ssh listto see it, orstep ssh list --raw | step ssh inspectto parse and examine it.
Finally, let's configure ssh to use our CA:
$ step ssh config
Here are the steps taken by step ssh config:
- It fetches the CA's host public key—used to verify host certificates—and installs it into your SSH configuration. The entry looks like this (in
~/.step/known_hosts):
@cert-authority * ecdsa-sha2-nistp256 AAAAE2VjZHNhLXNoYTItbmlzdHAyNTYAAAAIbmlzdHAyNTYAAABBBHyWTo9TLDwhyLlHq2ANkjtSGLyJ3xPtfL+7faiV+YA0k4kLUc8cJ5rWFHdUShbwtkOsLhkqeDDXoFnH/C5BG+4=
- It imports this unintrusive config block (in
.step/ssh/config) into your ssh configuration:
 Match exec "step ssh check-host %h"
     ForwardAgent yes
     User carl
     UserKnownHostsFile "/Users/carl/.step/ssh/known_hosts"
     ProxyCommand step ssh proxycommand %r %h %p --provisioner "Google"
The Match exec block is only evaluated if the provided command returns true.
step ssh check-host goes up to your CA and asks if the hostname you're trying to SSH to has been given a certificate. If so, it returns true. We don't want CA-managed hosts to interfere with your sconfig for any other hosts.
The ProxyCommand directive delivers the Single Sign-on magic. step ssh proxycommand will check for your SSH certificate before attempting to connect. If it's missing or expired, it will run you through the OAuth OIDC flow and request a new certificate from your CA.
Note: A template on your CA defines this config block. If you want to change anything—for example, you may wish to remove the
ForwardAgentdirective—you can find the template in/etc/step-ca/templates/ssh.
Try it out!
We're ready to SSH to the target host you've set up. You can run SSH with -v to watch the handshake. Specifically, you should see something like:
debug1: Server host certificate: ecdsa-sha2-nistp256-cert-v01@openssh.com SHA256:KUwZbRewusotBbO4Wbrj1EpPexMqKEj0ZUr1Fvf41+g, serial 782
1790606781444805 ID "i-0fa7218db55ac0536" CA ecdsa-sha2-nistp256 SHA256:VIwnVtTJJwdUsjGaPyOS5yT1O/uxyxj0CQJd+Ce/w0M valid from 2020-03-2
3T16:23:32 to 2020-04-22T16:24:32
debug1: Host 'ec2-3-135-235-172.us-east-2.compute.amazonaws.com' is known and matches the ECDSA-CERT host certificate.
debug1: Found CA key in /Users/carl/.step/ssh/known_hosts:1
...
debug1: Offering public key: carl@smallstep.com ECDSA-CERT SHA256:mBQXA0znZvd+21hhvViUVEybzrO4x190xZftFXAYCFY agent
debug1: Server accepts key: carl@smallstep.com ECDSA-CERT SHA256:mBQXA0znZvd+21hhvViUVEybzrO4x190xZftFXAYCFY agent
Boom! You're in.
Tip: You can run
step ssh hoststo ask the CA for a list of hosts that have been issued certificates.
Q&A
How do I register an existing host with the CA?
For Ubuntu 22.04 LTS hosts, the process is identical to bootstrapping a new host—just run your host launch script as root.
For other platforms, you may need to port the script to suit your situation.
Once you have all of your existing hosts up and running, you may want to adjust the instanceAge setting on the AWS provisioner on the CA. You'll see it in /etc/step-ca/config/ca.json. By default, an instance of any age can bootstrap itself. If you set it to, say, 5m, the CA will only accept IID tokens from instances less than 5 minutes old, as an extra measure of security.
Note: The Instance Identity token created in the script is a one-time token. You can't re-enroll a host, you can only renew its certificate. Why? Because any user on the host can access the IID at any time, and we don't want any user to be able to get a host certificate from the CA.
Can I use a different OAuth OIDC provider?
Sure! In the User Data script for the CA, you'll need to change the OAuth configuration endpoint URL, and change the name of your OIDC provisioner.
Can I use GCP or Azure hosts instead of AWS?
Yup! step-ca has provisioners for all three. You'll need to make some adjustments to your CA's configuration and host bootstrapping script. See step-ca's provisioner documentation for details.
My host is not on GCP, Azure, or AWS. Now what?
If you're not using one of the big three cloud providers, there's a different flow for getting a host certificate.
A combination of the ACME provisioner (the protocol used by Let's Encrypt) and the X5C provisioners can be used to sign an SSH certificate for a host. Add those two provisioners, then run this to get your host SSH certificate:
step ca certificate internal.smallstep.com internal.crt internal.key
step ssh certificate --host --x5c-cert internal.crt --x5c-key internal.key internal.smallstep.com internal
With the first command, the ACME HTTP challenge is validated by the CA, and the host is trusted and given an X.509 certificate. The second command uses that certificate to authenticate to the x5c provisioner, and get an SSH host certificate. Note that the x5c provisioner will let you get an SSH host certificate for any hostnames. (This is also true of the cloud provisioners; the IID is typically used to authenticate to the CA, not to constrain the certificate principals.)
Once you have the host cert, use the SSHPOP provisioner to renew it (as described above).
Can I use a bastion host (jump box)?
You can. First, get all of your hosts set up with host certificates. Then, you'll need to add the host CA key to known_hosts on your bastion:
$ CA_URL=https://[YOUR CA].compute.amazonaws.com
$ CA_FINGERPRINT=[CA FINGERPRINT]
$ step ca bootstrap \
          --ca-url $CA_URL \
          --fingerprint $CA_FINGERPRINT
$ mkdir -p ~/.ssh && echo "@cert-authority * $(step ssh config --host --roots)" > ~/.ssh/known_hosts
From there, just ssh to the bastion, then ssh to the internal hostname.
Can I change the SSH certificate duration?
Yes. By default they are valid for 16 hours. Under the claims object of the CA configuration (ca.json), for your OIDC provisioner, add the following keys to change the default:
"defaultUserSSHCertDuration": "720h",
"maxUserSSHCertDuration": "720h"
Will I get locked out of my hosts if my CA goes down?
You will, even though SSH and SSHD don't directly interact with the CA. The CA issues certificates and holds a database of hosts. Your users rely on that database to choose whether to try the certificate authentication path when connecting to a host.
One option here is to create a second, offline CA and store it on a USB stick somewhere safe, for emergency access, and set your host up to trust that CA in addition to your online CA. To generate an offline CA in /mnt/offline-ca:
export STEPPATH=/mnt/offline-ca
step init --ssh --no-db
Now, /mnt/offline-ca/certs/ssh_user_ca_key.pub is the offline SSH user CA key you'll need to append to your hosts' TrustedUserCAKeys file.
If you ever need to generate a certificate using this CA to sign in (as alice, for example), you'd run:
export STEPPATH=/mnt/offline-ca
step ssh certificate --offline --principal=alice alice@example.com my_key
The certificate will be added to your SSH agent and saved on disk.
Can I use hosts in multiple AWS accounts?
Sure. You'll need to add the account IDs to the CA's config file (/etc/step-ca/config/ca.json), and restart the CA server.
How do I remove a host from step-ca?
For now you'll have to wait for it to expire. When you terminate a host, the host appears in the step ssh hosts command until the host certificate expires. Host certificates expire in 30 days by default.
How might I add sudo support?
You can do this using agent forwarding and the pam_ussh pluggable authentication module.
What else can I do with my CA?
LOTS! Now that you have your very own private CA, you could set it up to issue TLS certificates for encrypting all of your internal traffic using mutual TLS. See Step Certificates Documentation to learn more about the CA, provisioners, configuration options, etc.
Wrapping up
With our basic setup, anyone in your Google organization will be able to get a certificate. They will only be able to access hosts on which they have accounts with usernames that match their Google email username.
If you want features like fine-grained mappings between users and hosts and automatic user provisioning, or if you simply don't want to manage your own CA server, check out our Smallstep SSH product. It's self-service and only $3/month per host in your infrastructure.
Carl Tashian (Website, LinkedIn) is an engineer, writer, exec coach, and startup all-rounder. He's currently an Offroad Engineer at Smallstep. He co-founded and built the engineering team at Trove, and he wrote the code that opens your Zipcar. He lives in San Francisco with his wife Siobhan and he loves to play the modular synthesizer 🎛️🎚️