

In programming, an array is a collection of elements or items. Arrays store data as elements and retrieve them back when you need them.
The array data structure is widely used in all programming languages that support it.
In this handbook, I'll teach you all about arrays in JavaScript. You'll learn about complex data handling, destructuring, the most commonly used array methods, and more.
Why Did I Write this Article?
There are many great articles on JavaScript arrays already available around the internet. So why did I write yet another article on the same subject? What's the motivation?
Well, over the years of interacting with my mentees, I realized that most beginners need a tutorial that covers arrays thoroughly from beginning to end with examples.
So I decided to create such an article chock full of meaningful examples. If you are a beginner at JavaScript, I hope you'll find it very helpful.
But even as an experienced developer, this handbook may come in handy to help you brush up on things as you need. I'm also learning the whole thing again while writing about it. So let's dive in.
What is an Array in JavaScript?
A pair of square brackets [] represents an array in JavaScript. All the elements in the array are comma(,) separated.
In JavaScript, arrays can be a collection of elements of any type. This means that you can create an array with elements of type String, Boolean, Number, Objects, and even other Arrays.
Here is an example of an array with four elements: type Number, Boolean, String, and Object.
const mixedTypedArray = [100, true, 'freeCodeCamp', {}];The position of an element in the array is known as its index. In JavaScript, the array index starts with 0, and it increases by one with each element.
So, for example, in the above array, the element 100 is at index 0, true is at index 1, 'freeCodeCamp' is at index 2, and so on.
The number of elements in the array determines its length. For example, the length of the above array is four.
Interestingly, JavaScript arrays are not of fixed length. You can change the length anytime by assigning a positive numeric value. We will learn more about that in a while.
How to Create an Array in JavaScript
You can create an array in multiple ways in JavaScript. The most straightforward way is by assigning an array value to a variable.
const salad = ['🍅', '🍄', '🥦', '🥒', '🌽', '🥕', '🥑'];You can also use the Array constructor to create an array.
const salad = new Array('🍅', '🍄', '🥦', '🥒', '🌽', '🥕', '🥑');Please Note:new Array(2)will create an array of length two and none of the elements are defined in it. However,new Array(1,2)will create an array of length two with the elements 1 and 2 in it.
There are other methods like Array.of() and Array.from(), and the spread operator( ...) helps you create arrays, too. We will learn about them later in this article.
How to Get Elements from an Array in JS
You can access and retrieve elements from an array using its index. You need to use the square bracket syntax to access array elements.
const element = array[index];Based on your use-cases, you may choose to access array elements one by one or in a loop.
When you're accessing elements using index like this:
const salad = ['🍅', '🍄', '🥦', '🥒', '🌽', '🥕', '🥑'];
salad[0]; // '🍅'
salad[2]; // '🥦'
salad[5]; // '🥕'
You can use the length of an array to traverse backward and access elements.
const salad = ['🍅', '🍄', '🥦', '🥒', '🌽', '🥕', '🥑'];
const len = salad.length;
salad[len - 1]; // '🥑'
salad[len - 3]; // '🌽'
You can also loop through the array using a regular for or forEach loop, or any other loop.
const salad = ['🍅', '🍄', '🥦', '🥒', '🌽', '🥕', '🥑'];

for(let i=0; i<salad.length; i++) {
  console.log(`Element at index ${i} is ${salad[i]}`);
}
And here's the output:

How to Add Elements to an Array in JS
Use the push() method to insert an element into an array. The push() method adds an element at the end of the array. How about we add some peanuts to the salad, like this:
const salad = ['🍅', '🍄', '🥦', '🥒', '🌽', '🥕', '🥑'];
salad.push('🥜');
Now the salad array is:
["🍅", "🍄", "🥦", "🥒", "🌽", "🥕", "🥑", "🥜"]
Note that the push() method adds an element to the end of the array. If you want to add an element to the beginning of the array, you'll need to use the unshift() method.
const salad = ['🍅', '🍄', '🥦', '🥒', '🌽', '🥕', '🥑'];
salad.unshift('🥜');
Now the salad array is:
["🥜", "🍅", "🍄", "🥦", "🥒", "🌽", "🥕", "🥑"]
How to Remove Elements from an Array in JS
The easiest way to remove a single element from an array is using the pop() method. Every time you call the pop() method, it removes an element from the end of the array. Then it returns the removed element and changes the original array.
const salad = ['🍅', '🍄', '🥦', '🥒', '🌽', '🥕', '🥑'];
salad.pop(); // 🥑

console.log(salad); // ['🍅', '🍄', '🥦', '🥒', '🌽', '🥕']
Use the shift() method to remove an element from the beginning of an array. Like the pop() method, shift() returns the removed element and changes the original array.
const salad = ['🍅', '🍄', '🥦', '🥒', '🌽', '🥕', '🥑'];
salad.shift(); // 🍅

console.log(salad); // ['🍄', '🥦', '🥒', '🌽', '🥕', '🥑'];
How to Copy and Clone an Array in JS
You can copy and clone an array to a new array using the slice() method. Note that the slice() method doesn't change the original array. Instead, it creates a new shallow copy of the original array.
const salad = ['🍅', '🍄', '🥦', '🥒', '🌽', '🥕', '🥑'];
const saladCopy = salad.slice();

console.log(saladCopy); // ['🍅', '🍄', '🥦', '🥒', '🌽', '🥕', '🥑']

salad === saladCopy; // returns false
Alternatively, you can use the spread operator to create a copy of the array. We will learn about that soon.
How to Determine if a Value is an Array in JS
You can determine if a value is an array using the Array.isArray(value) method. The method returns true if the passed value is an array.
Array.isArray(['🍅', '🍄', '🥦', '🥒', '🌽', '🥕', '🥑']); // returns true
Array.isArray('🍅'); // returns false
Array.isArray({ 'tomato': '🍅'}); // returns false
Array.isArray([]); // returns true
Array Destructuring in JavaScript
With ECMAScript 6 (ES6), we have some new syntax to extract multiple properties from an array and assign them to variables in one go. It is handy to help you keep your code clean and concise. This new syntax is called destructuring syntax.
Here is an example of extracting the values from an array using the destructuring syntax:
let [tomato, mushroom, carrot] = ['🍅', '🍄', '🥕'];Now you can use the variables in your code:
console.log(tomato, mushroom, carrot); // Output, 🍅 🍄 🥕To do the same thing without the destructuring, it would look like this:
let vegetables = ['🍅', '🍄', '🥕'];
let tomato = vegetables[0];
let mushroom= vegetables[1];
let carrot= vegetables[2];
So, the destructuring syntax saves you from writing lots of code. This gives you a massive boost in productivity.
How to Assign a Default Value to a Variable
You can assign a default value using destructuring when there is no value or undefined for the array element.
In the example below, we assign a default value for the mushroom variable.
let [tomato , mushroom = '🍄'] = ['🍅'];
console.log(tomato); // '🍅'
console.log(mushroom ); // '🍄'
How to Skip a Value in an Array
With destructuring, you can skip an array element to map to a variable. For example, you may not be interested in all the elements in an array. In that case, skipping a value comes in handy.
In the example below, we skip the mushroom element. Notice the space in the variable declaration at the left side of the expression.
let [tomato, , carrot] = ['🍅', '🍄', '🥕'];

console.log(tomato); // '🍅'
console.log(carrot); // '🥕'
Nested Array Destructuring in JS
In JavaScript, arrays can be nested. This means that an array can have another array as an element. Array nesting can go to any depth.
For example, let's create a nested array for fruits. It has a few fruits and an array of vegetables in it.
let fruits = ['🍈', '🍍', '🍌', '🍉', ['🍅', '🍄', '🥕']];How would you access the '🥕' from the above array? Again, you could do this without destructuring, like this:
const veg = fruits[4]; // returns the array ['🍅', '🍄', '🥕']
const carrot = veg[2]; // returns '🥕'
Alternatively, you could use this short-hand syntax:
fruits[4][2]; // returns '🥕'You can also access it using the destructuring syntax, like this:
let [,,,,[,,carrot]] = ['🍈', '🍍', '🍌', '🍉', ['🍅', '🍄', '🥕']];How to Use the Spread Syntax and Rest Parameter in JavaScript
Since ES6, we can use the ... (yes, three consecutive dots) as spread syntax and the rest parameter in array destructuring.
- For the rest parameter, the
...appears on the left side of the destructuring syntax. - For the spread syntax, the
...appears on the right side of the destructuring syntax.
How to Use the Rest Parameter in JS
With Rest Parameter, we can map out the left elements of an array in a new array. The rest parameter must be the last variable in the destructuring syntax.
In the example below, we have mapped the first two of the array elements to the tomato and mushroom variables. The remaining elements are mapped to the rest variable using the .... The rest variable is a new array containing the leftover elements.
const [tomato, mushroom, ...rest] = ['🍅', '🍄', '🥦', '🥒', '🌽', '🥕', '🥑'];

console.log(tomato); // '🍅'
console.log(mushroom); // '🍄'
console.log(rest); // ["🥦", "🥒", "🌽", "🥕", "🥑"]
How to Use the Spread Operator in JS
With the spread operator, we can create a clone/copy of an existing array like this:
const salad = ['🍅', '🍄', '🥦', '🥒', '🌽', '🥕', '🥑'];

const saladCloned = [...salad];
console.log(saladCloned); // ["🍅", "🍄", "🥦", "🥒", "🌽", "🥕", "🥑"]

salad === saladCloned // false
Destructuring Use Cases in JavaScript
Let's look at a few exciting use-cases of array destructuring, the spread operator, and the rest parameter.
How to Swap Values with Destructuring
We can swap the value of two variables easily using the array destructuring syntax.
let first = '😔';
let second = '🙂';
[first, second] = [second, first];

console.log(first);  // '🙂'
console.log(second); // '😔'
How to Merge Arrays
We can merge two arrays and create a new array with all the elements from both arrays. Let's take two arrays — one with a couple of smiley faces and another with a few veggies.
const emotion = ['🙂', '😔'];
const veggies = ['🥦', '🥒', '🌽', '🥕'];
Now, we will merge them to create a new array.
const emotionalVeggies = [...emotion, ...veggies];
console.log(emotionalVeggies); // ["🙂", "😔", "🥦", "🥒", "🌽", "🥕"]
JavaScript Array Methods
So far, we have seen a few array properties and methods. Let's do a quick recap of the ones we've looked at:
push()– Insert an element at the end of the array.unshift()– Insert an element at the beginning of the array.pop()– Remove an element from the end of the array.shift()– Remove an element from the beginning of the array.slice()– Create a shallow copy of an array.Array.isArray()– Determine if a value is an array.length– Determine the size of an array.
Now we'll learn about other important JS array methods with examples.
How to Create, Remove, Update, and Access Arrays in JavaScript
In this section, we will learn about methods you can use to create a new array, remove elements to make the array empty, access elements, and many more.
The concat() array method
The concat() method merges one or more arrays and returns a merged array. It is an immutable method. This means it doesn't change (mutate) existing arrays.
Let's concat two arrays.
const first = [1, 2, 3];
const second = [4, 5, 6];

const merged = first.concat(second);

console.log(merged); // [1, 2, 3, 4, 5, 6]
console.log(first); // [1, 2, 3]
console.log(second); // [4, 5, 6]
Using the concat() method we can merge more than two arrays. We can merge any number of arrays with this syntax:
array.concat(arr1, arr2,..,..,..,arrN);Here is an example:
const first = [1, 2, 3];
const second = [4, 5, 6];
const third = [7, 8, 9];

const merged = first.concat(second, third);

console.log(merged); // [1, 2, 3, 4, 5, 6, 7, 8, 9]
The join() array method
The join() method joins all the elements of the array using a separator and returns a string. The default separator used for joining is comma(,).
const emotions = ['🙂', '😍', '🙄', '😟'];

const joined = emotions.join();
console.log(joined); // "🙂,😍,🙄,😟"
You can pass a separator of your choice to join the elements. Here is an example of joining the elements with a custom separator:
const joined = emotions.join('<=>');
console.log(joined); // "🙂<=>😍<=>🙄<=>😟"
Invoking the join() method on an empty array returns an empty string:
[].join() // returns ""The fill() array method
The fill() method fills an array with a static value. You can change all the elements to a static value or change a few selected items. Note that the fill() method changes the original array.
const colors = ['red', 'blue', 'green'];

colors.fill('pink');
console.log(colors); // ["pink", "pink", "pink"]
Here is an example where we are changing only the last two elements of the array using the fill() method:
const colors = ['red', 'blue', 'green'];

colors.fill('pink', 1,3); // ["red", "pink", "pink"]
In this case, the first argument of the fill() method is the value we change with. The second argument is the start index to change. It starts with 0. The last argument is to determine where to stop filling. The max value of it could be colors.length.
Please check out this Twitter thread for a practical use of the fill() method.
Have you used the #JavaScript array fill() method in practice yet? It fills all the array elements with a static value. 🧵 👇#DEVCommunity #100DaysOfCode pic.twitter.com/ahfsJBOacT
— Tapas Adhikary (@tapasadhikary) February 12, 2021
Also, you may find this demo project helpful: https://github.com/atapas/array-fill-color-cards.
The includes() array method
You can determine the presence on an element in an array using the includes() method. If the element is found, the method returns true, and false otherwise.
const names = ['tom', 'alex', 'bob', 'john'];

names.includes('tom'); // returns true
names.includes('july'); // returns false
The indexOf() array method
You may want to know the index position of an element in array. You can use the indexOf() method to get that. It returns the index of the first occurrence of an element in the array. If an element is not found, the indexOf() method returns -1.
const names = ['tom', 'alex', 'bob', 'john'];

names.indexOf('alex'); // returns 1
names.indexOf('rob'); // returns -1
There is another method lastIndexOf() that helps you find the index of the last occurrence of an element in the array. Like indexOf(), lastIndexOf() also returns -1 if the element is not found.
const names = ['tom', 'alex', 'bob', 'tom'];

names.indexOf('tom'); // returns 0
names.lastIndexOf('tom'); // returns 3
The reverse() array method
As the name suggests, the reverse() method reverses the elements' positions in the array so that the last element goes into the first position and the first one to the last.
const names = ['tom', 'alex', 'bob'];

names.reverse(); // returns ["bob", "alex", "tom"]
The reverse() method modifies the original array.
The sort() array method
The sort() method is probably one of the most often used array methods. The default sort() method converts the element types into strings and then sorts them. The default sorting order is ascending. The sort() method changes the original array.
const names = ['tom', 'alex', 'bob'];

names.sort(); // returns ["alex", "bob", "tom"]
The sort() method accepts an optional comparator function as an argument. You can write a comparator function and pass to the sort() method to override the default sorting behavior.
Let's now take an array of numbers and sort them in ascending and descending order using a comparator function:
const numbers = [23, 5, 100, 56, 9, 13, 37, 10, 1]
First, we'll invoke the default sort() method and see the output:
numbers.sort();Now the sorted array is, [1, 10, 100, 13, 23, 37, 5, 56, 9]. Well, that's not the output we expect. But it happens because the default sort() method converts the elements to a string and then compares them based on the UTF-16 code unit values.
To solve this, let's write a comparator function. Here is one for the ascending order:
function ascendingComp(a, b){
  return (a-b);
}
Now pass this to the sort() method:
numbers.sort(ascendingComp); // retruns [1, 5, 9, 10, 13, 23, 37, 56, 100]

/*

We could also code it like,

numbers.sort(function(a, b) {
  return (a-b);
});

Or, with the arrow function,

numbers.sort((a, b) => (a-b));

*/
For descending order, do this:
numbers.sort((a, b) => (b-a));Check out this GitHub repository for more sorting examples and tips: https://github.com/atapas/js-array-sorting
The splice() array method
The splice() method helps you add, update, and remove elements in an array. This method may be a bit confusing at the beginning, but once you know how to use it properly, you will get it right.
The main purpose of the splice() method is to delete elements from array. It returns an array of the elements deleted and modifies the original array. But you can add and replace elements using it as well.
To add an element using the splice() method, we need to pass the position where we want to add, how many elements to delete starting with the position, and the element to add.
In the example below, we are adding an element zack at the index 1 without deleting any elements.
const names = ['tom', 'alex', 'bob'];

names.splice(1, 0, 'zack');

console.log(names); // ["tom", "zack", "alex", "bob"]
Have a look at the following example. Here we are removing one element from the index 2 (the 3rd element) and adding a new element, zack. The splice() method returns an array with the deleted element, bob.
const names = ['tom', 'alex', 'bob'];

const deleted = names.splice(2, 1, 'zack');

console.log(deleted); // ["bob"]
console.log(names); // ["tom", "alex", "zack"]
Check out this Twitter thread to learn how the splice() method helps you make an array empty.
How do you prefer to remove one, many, or all the elements from a #javascript array in a native way?
— Tapas Adhikary (@tapasadhikary) October 5, 2020
- 🗑️arr.length = 0
- 🗑️arr = []
- 🗑️arr.shift()
- 🗑️arr.pop()
- 🗑️arr.splice()
This is a thread to talk about it. 🧵#CodeNewbie #100DaysOfCode #DevCommunityIN #DEVCommunity
Static Array Methods in JavaScript
In JavaScript, arrays have three static methods. We have discussed Array.isArray() already. Let's discuss the other two now.
The Array.from() array method
Let's take a simple HTML code snippet that contains a div and a few list elements:
<div id="main">
  <ul>
    <ol type="1">
      <li>...</li>
      <li>...</li>
      <li>...</li>
      <li>...</li>
      <li>...</li>
      <li>...</li>
      <li>...</li>
      <li>...</li>
      <li>...</li>
      <li>...</li>
    </ol>
  </ul>
</div>
Now we'll query the DOM using the getElementsByTagName() method.
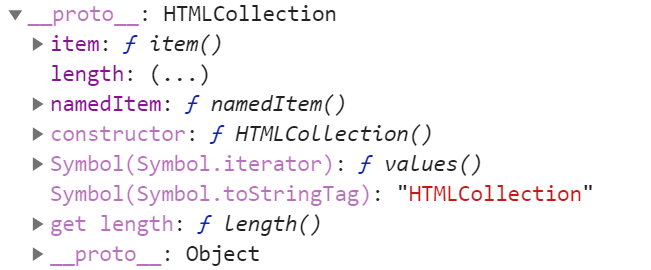
document.getElementsByTagName('li');It returns a HTMLCollection that looks like this:
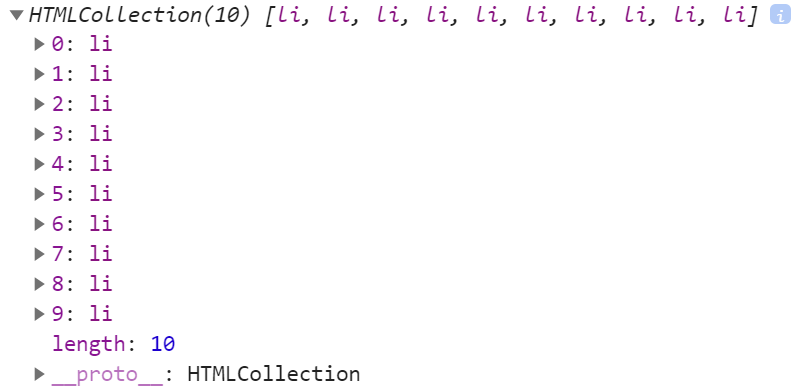
So it is like an array. Now let's try iterating over it using forEach:
document.getElementsByTagName('li').forEach(() => {
 // Do something here..
})
Guess what the output is? It's an error like this:

But why? Because the HTMLCollection is not an array. It is an Array-Like object. So you can not iterate over it using forEach.
This is where you should use the Array.from() method. It converts an array-like object to an array so that you can perform all the array operations on it.
const collection = Array.from(document.getElementsByTagName('li'))Here the collection is an array:

The Array.of() array method
The Array.of() method creates a new array using any number of elements of any type.
Array.of(2, false, 'test', {'name': 'Alex'})The output looks like this:

Array Iterator Methods in JavaScript
Now we're gonna learn about array iterator methods. These are very useful methods for iterating through array and performing computations, making decisions, filtering out stuff, and more.
So far, we have not seen an example of an array of objects. In this section, we will use the following array of objects to explain and demonstrate the methods below.
This array contains the information for some students subscribed to various paid courses:
let students = [
   {
      'id': 001,
      'f_name': 'Alex',
      'l_name': 'B',
      'gender': 'M',
      'married': false,
      'age': 22,
      'paid': 250,
      'courses': ['JavaScript', 'React']
   },
   {
      'id': 002,
      'f_name': 'Ibrahim',
      'l_name': 'M',
      'gender': 'M',
      'married': true,
      'age': 32,
      'paid': 150,
      'courses': ['JavaScript', 'PWA']
   },
   {
      'id': 003,
      'f_name': 'Rubi',
      'l_name': 'S',
      'gender': 'F',
      'married': false,
      'age': 27,
      'paid': 350,
      'courses': ['Blogging', 'React', 'UX']
   },
   {
      'id': 004,
      'f_name': 'Zack',
      'l_name': 'F',
      'gender': 'M',
      'married': true,
      'age': 36,
      'paid': 250,
      'courses': ['Git', 'React', 'Branding']
   }
];
Alright, let's get started. All the array iterator methods take a function as an argument. You need to specify the logic to iterate and apply in that function.
The filter() array method
The filter() method creates a new array with all the elements that satisfies the condition mentioned in the function. Let's find the student who is female. So the filter condition should be that the gender is equal to 'F'.
const femaleStudents = students.filter((element, index) => {
  return element.gender === 'F';
})

console.log(femaleStudents);
The output is this:

That's right. The student with name Rubi is the only female student we have got so far.
The map() array method
The map() method creates a new array by iterating through the elements and applying logic we provided in the function as an argument. We'll create a new array of full names of all the students in the students array.
const fullNames = students.map((element, index) => {
  return {'fullName': element['f_name'] + ' ' + element['l_name']}
});

console.log(fullNames);
The output looks like this:

Here we see a new array with the fullName properties that is computed using the f_name and l_name properties of each student object.
The reduce() array method
The reduce() method applies a reducer function on each of the array elements and returns an output value. We'll apply a reducer function on the students array to compute the total amount paid by all the students.
const total = students.reduce(
   (accumulator, student, currentIndex, array) => {
      accumulator = accumulator + student.paid;
      return (accumulator);
   },
0);

console.log(total); // 1000
In the above code,
- We initialize the
accumulatorwith0. - We apply the
reducemethod on each of the student objects. We access thepaidproperty and add it to the accumulator. - Finally, we return the accumulator.
The some() array method
The some() method returns a boolean value (true/false) based on at least one element in the array passing the condition in the function. Let's see if there are any students below the age 30.
let hasStudentBelow30 = students.some((element, index) => {
  return element.age < 30;
});

console.log(hasStudentBelow30); // true
Yes, we see there is at least one student younger than 30.
The find() array method
Using the some() method, we have seen that there is a student below age 30. Let's find out who that student is.
To do that, we will use the find() method. It returns the first matched element from the array that satisfies the condition in the function.
Arrays have another related method, findIndex(), that returns the index of the element we find using the find() method. If no elements match the condition, the findIndex() method returns -1.
In the example below, we pass a function to the find() method that checks for the age of each of the student. It returns the matched student when the condition satisfies.
const student = students.find((element, index) => {
  return element.age < 30;
});

console.log(student);
The output is this:
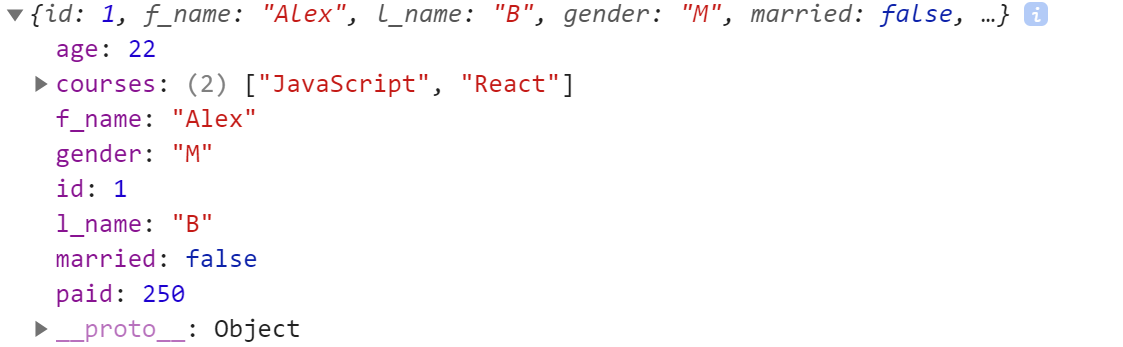
As we see, it is Alex who is 22 years old. We found him.
The every() array method
The every() method detects if every element of the array satisfies the condition passed in the function. Let's find if all the students have subscribed to at least two courses.
const atLeastTwoCourses = students.every((elements, index) => {
  return elements.courses.length >= 2;
});

console.log(atLeastTwoCourses); // true
As expected, we see that the output is true.
Proposed Array Methods
As of May, 2021, ECMAScript has a method in proposal, the at() method.
The at() Method
The proposed at() method would help you access the elements of an array using a negative index number. As of now, this is not possible. You can access elements only from the beginning of the array using a positive index number.
Accessing elements from the back of the array is possible using the length value. With the inclusion of the at() method, you would be able to access the elements using both positive and negative indexes using a single method.
const junkFoodILove = ['🥖', '🍔', '🍟', '🍕', '🌭', '🥪', '🌮', '🍿'];

junkFoodILove.at(0); // 🥖
junkFoodILove.at(3); // 🍕
junkFoodILove.at(-1); // 🍿
junkFoodILove.at(-5); // 🍕
junkFoodILove.at(-8); // 🥖
junkFoodILove.at(10); // undefined
Here is a quick demo of it:
You can use this polyfill to achieve the functionality of the at() method until this method gets added to the JavaScript language. Please checkout this GitHub repository for the at() method examples: https://github.com/atapas/js-array-at-method
Before We End...
I hope you've found this article insightful, and that it helps you understand JavaScript arrays more clearly. Please practice the examples multiple times to get a good grip on them. You can find all the code examples in my GitHub repository.
Let's connect. You will find me active on Twitter (@tapasadhikary). Please feel free to give a follow.
You may also like these articles:
- Why do you need to know about Array-like Objects?
- 5 useful tips about the JavaScript array sort method
- Ways to Empty an Array in JavaScript and the Consequences
- Build your JavaScript Muscles with map, reduce, filter and other array iterators
- Why do you need to know about the JavaScript Array at() method?