

Introduction: Game of Life Coffee Table


As I told you in my article "The Beauty of Math - Conway's Game of Life Art" I was thinking it would be nice to make a piece of furniture, in this case a small coffee table, that it would be an interesting and pleasant image to display the light games I proposed. It could even be a subject of discussion at a cup of coffee :)
I will not particularly insist on the mathematical theory on which the light effects are displayed, I presented in that article already, but I will insist on how it’s done, hoping that you will realize how easy it is to build such a piece of furniture.
I also think that you will notice in this article that I tried as much as possible to minimize the cost of the materials and the effort put into practical realization, which I often do in my articles because I do not like to reinvent the wheel. My opinion is that it is much faster and easier when we can call on local craftsmen who know their profession and I cannot have (in my apartment) a glass workshop, a carpentry workshop, a locksmith workshop anyway. 😊
I did not build the table because I wanted, as I said before, to make my work easier, so I ordered the coffee table online (I really like to improve the products I buy). So I chose a simple, modern, elegant with a glass top of course. From the pictures I deduced that it will have the transparent smoked glass top but after a month and a half (!) of waiting, when I received it I had the big surprise that the top was not transparent but it was a black painted glass, completely opaque. That's why I needed to make another board (I tried one of plexiglas and one of real smoked glass as you will see below).
Let's start then...
Step 1: Materials, Tools


Materials required:
- Coffee table with glass top, 500x500mm tray, 460x460mm interior;
- Smoked plexiglass 500x500mm;
- Smoked glass 500x500mm;
- Silver and black frosted window foil;
- Addressable LED strip WS2812 60led/m;
- Wemos D1 Mini module with ESP8266;
- Power supply 5v/8A;
- MDF board 460x460mm;
- wood slats 20x10mm;
- 100 cm DC Female Jack to Open Wire Adapter Cable, ID 2.1mm OD 5.5mm;
- Two ports electrical connectors;
- Support for 3 AAA batteries;
...wire of different colors for soldering, wood adhesive, other small things ...
Some details about materials…
You can see the table model I ordered for example here - or here.
I ordered it from here from an online retailer for Home and Lifestyle in Central and Eastern Europe -
Other model that I think might be interesting, also this model would really be worth making from copper pipes for example, I'm sure that with the two LED matrices it would look awesome 😊
I ordered the smoked plexiglass sheet online , it is 5mm thick.
I ordered the smoked glass in a local workshop, it is 6mm thick and it is also tempered.
I ordered the MDF board and the slats also in a local workshop.
The main tools I used:
- Soldering station
- Drilling machine
- Screwdrivers, pliers, hammer, linear, other small things ...
Step 2: The MATRIX… the LED Matrix 😊


In The Beauty of Math article I used 4 arrays of 8x8 LEDs, ie a matrix of 16x16 LEDs. I thought I should use such matrices for this project also. As the table has an active surface of 460mmx460mm the matrix could have 36 matrices of 8x8 ie 48x48 (2304) leds. That could be made but ... the cost of the cheapest 8x8 LED module would be $5.2 so in total $187!
Other two interesting variants would be the ones with 32x32 (1024) LEDs and the one with 24x26 + 25x25 (1249) LEDs. These can be made from much cheaper LED strips those one with 60leds/m, (one LED price will be 14.24/300 = $0.05 - the price is lower at 5m strips, the remaining LEDs could be used for other projects) -
So the first one would cost $51 and the second one would be $ 62. You can see that the price is much lower than the 8x8 module version, even if the number of LEDs is only half.
It is true that the price is lower than the variant with 8x8 LED modules but the parts would be difficult to solder and their command could be quite complicated.
I also read this article - "Diffusing LEDs Right" - where the author recommends that for a good diffusion of the LED lights the distance between the LEDs and the diffusion surface should be at least equal to or greater than the distance between the LEDs. The frame of the coffee table I ordered allows a distance of 20 mm between the LEDs and the diffusion surface (table top). The above mentioned article focuses on the more uniform diffusion of the LED light, which was not really necessary in my project, I wanted to see each LED individually as a cell, only a little bit blurred.
Considering this aspect I decided that it would be best to try the simplest (and cheapest) 25x25 (625) LED version. It would only cost $31. Also, the soldering is easy to make.
In the video below you can see how I glued the pieces of led strips to the mdf support, I also attached the jpg and svg files of the different variants of arrangement of the analyzed LEDs matrixes.
After attaching the LED strips to the MDF board, the supply wires (red + green) and the data wires (yellow) are then soldered. Then the wood slats are glued to the MDF board with wood glue.
You can see in the photos above the fully assembled LED array.


Step 3: Electronics


The heart of the electronic part is a Wemos D1 mini module that is based on the ESP8266 microcontroller. Information about this module can be found on the wemos website and in the instructable "Wemos ESP8266 Getting Started Guide With Arduino IDE"
Why this module? It has more digital outputs (I needed 5), no need for power + programming eletronics only a microUSB cable and last but not least, it works perfectly with the Arduino IDE.
The electronic scheme I attached above.
A note. Please pay attention to the S1 switch in the diagram. This allows the power supply of the Wemos D1 mini to be switched off when programming ie when the microUSB cable is present. Without this switch the 5v line from the source and the 5v line from the USB cable being connected could cause the fail of the USB port of the computer, power supply failing or electronic module to fail. When we finish programming, we remove the microUSB cable, we change the position of the switch so that the module is powered from the external 5v source.
I installed the Wemos electronic module in an AAA battery holder (see photos above) and I also used the support's switch as mentioned above.
Step 4: Software

In order to display the different luminous effects, I adapted the program from my article - The Beauty of Math - Conway's Game of Life Art - and the framework program that I successfully used to design the - VERBIS - Desktop 8x8 RGB LED Matrix Word Clock - and the - Soothe&Refresh Smart Lamp - and uploaded it to github - here
I will not insist on the functioning of the program because I described everything in my previously mentioned projects, I would draw attention only to the page where the game can be chosen (screenshot above) with the rules that I borrowed from the page - Cellular Automata rules lexicon - and also a few initial variables - density and fading step. You can play with these values to get particularly beautiful effects.
Step 5: Assembly


The assembly is very simple, I made use as much as I could of what I already had.
The LED matrix fits perfectly into the frame housing and to support it I put some washers under the assembly screws so that the wooden frame would rest on the screw heads (see photos above).
I had big problems with applying the foil to the plexiglass and glass sheets, I struggled pretty much until I found this video - https://www.youtube.com/watch?v=Pq-E7bi2KK4 - then it became a whole lot simpler 😊
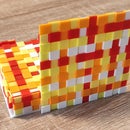
However I must admit that even now it is not a perfect application of the foil but it is much better than in the beginning. I placed two layers of silver frosted foil on the plexiglass sheet and three layers of black frosted foil on the glass (see photo)
Also in the photo above you can see the table completely mounted (without the glass top).
Step 6: Conclusion
You can see the coffee table "in action" in the video below.
Some considerations:
- At first I was a bit worried of the power consumption of the LED array but after a few measurements I became confident it will be alright, even though the brightness variable was 128 (half maximum), the maximum current consumption was below 1A. However, you should not overdo it, the higher the light intensity, the more the LEDs become heated, this heating leading to a shorter operating time. I chose the brightness value to 64, with this value I also filmed the video above;
- This construction can also be used for other LED effects, for example I want to add to my table a display of the time at the end of each iteration of 256 generations;
- For a coffee table the glass tray is more suitable because the glass does not bend, does not scratch easily and resists hot coffee 😊
- The plexiglass plate is easier and if you fix it by the wooden frame you can hang the whole construction on the wall and thus you can have a dynamic abstract "alive" 😊 painting in your living room;
- Be careful not to exceed the number of generations over 256, I would not want your table at some point to accumulate knowledge at a geometric rate and one early morning to become self aware… 😊

Participated in the
Make it Glow Contest


