
Overview
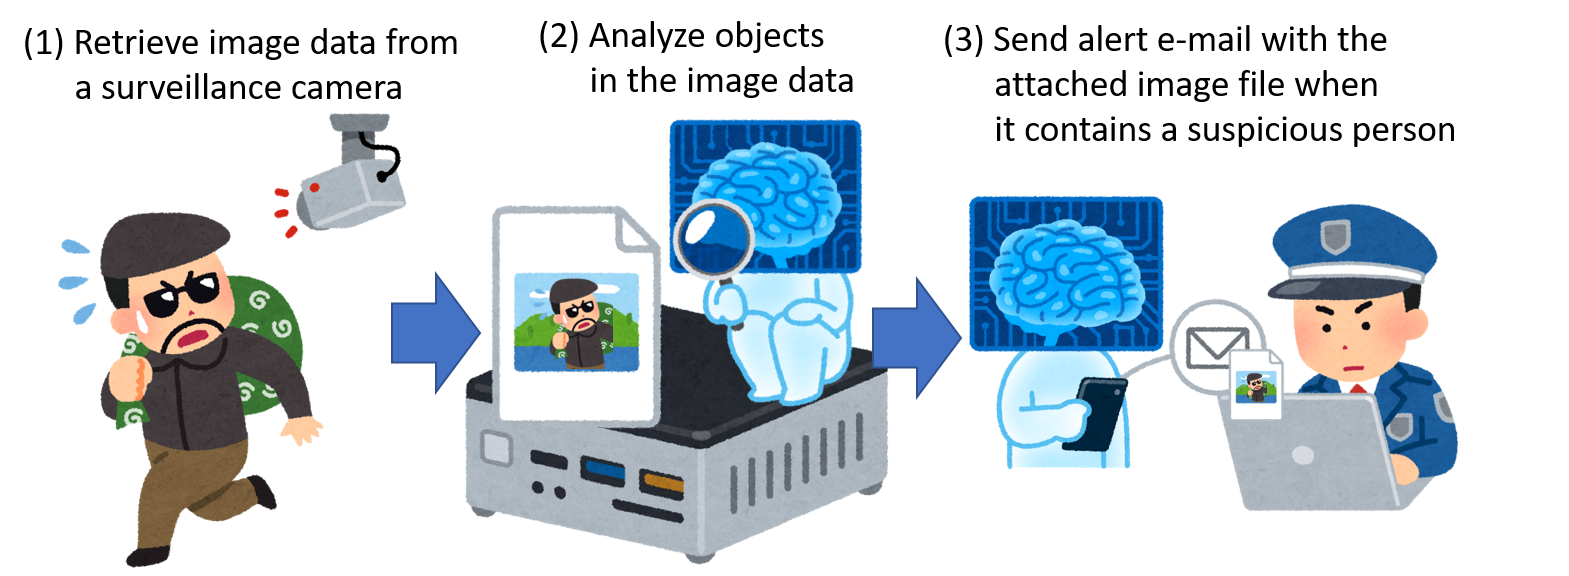
In a previous article, we introduced a procedure for developing an image recognition flow using Node-RED and TensorFlow.js. Now, let’s apply those learnings from what we have done and develop an e-mail alert system that uses a surveillance camera together with image recognition. As shown in the following image, we will create a flow that automatically sends an email alert when a suspicious person is captured within a surveillance camera frame.
Objective: Develop flow
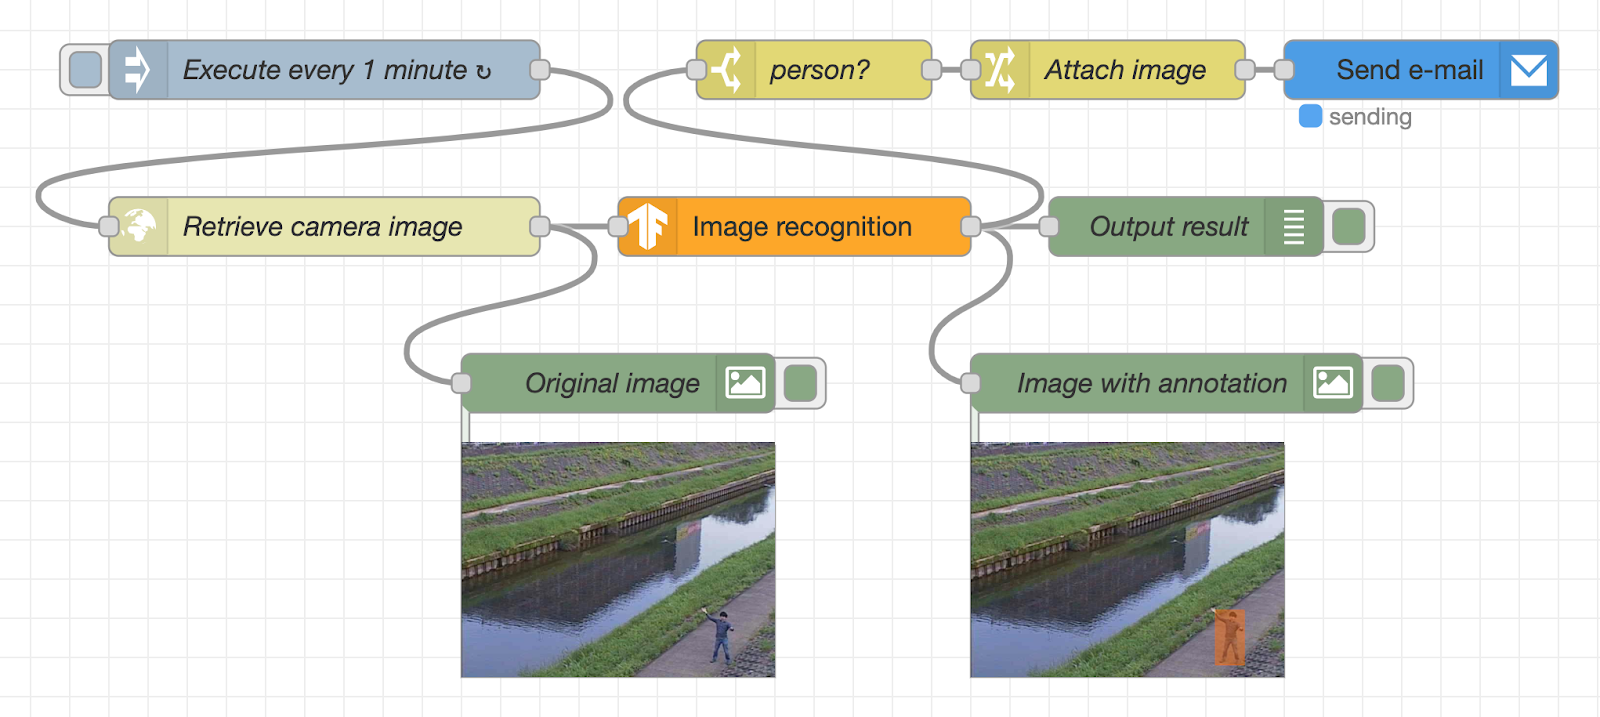
In this flow, the image of the surveillance camera is periodically acquired from the webserver, and the image is displayed under the “Original image” node in the lower left. After that, the image is recognized using the TensorFlow.js node. The recognition result and the image with recognition results are displayed under the debug tab and the “image with annotation” node, respectively.

If a person is detected by image recognition, an alert mail with the image file attached will be sent using the SendGrid node. Since it is difficult to set up a real surveillance camera, we will use a sample image sent by a surveillance camera in Kanagawa Prefecture of Japan to check the amount of water in the river.
We will explain the procedure for creating this flow in the following sections. For the Node-RED environment, use your local PC, a Raspberry Pi, or a cloud-based deployment.
Install the required nodes
Click the hamburger menu on the top right of the Node-RED flow editor, go to “Manage palette” -> “Palette” tab -> “Install” tab, and install the following nodes.
- –node-red-contrib-tensorflow: Image recognition node using TensorFlow.js
- –node-red-contrib-image-output: Nodes that display images on the Flow Editor
- –node-red-contrib-sendgrid: Nodes that send mail using SendGrid
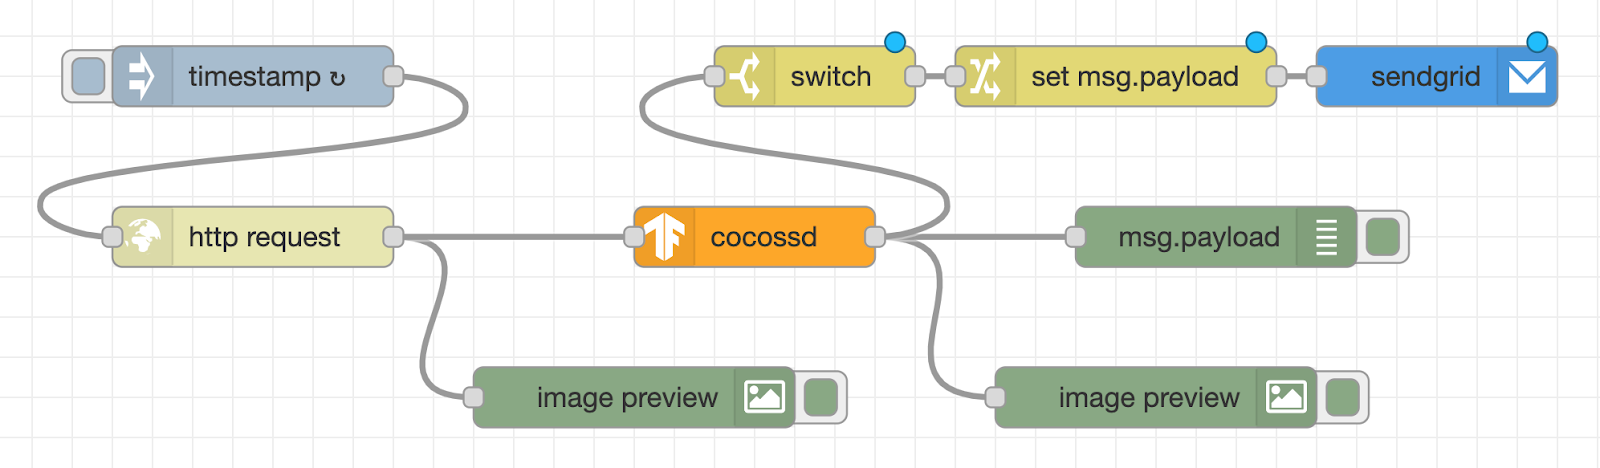
Create a flow of acquiring image data
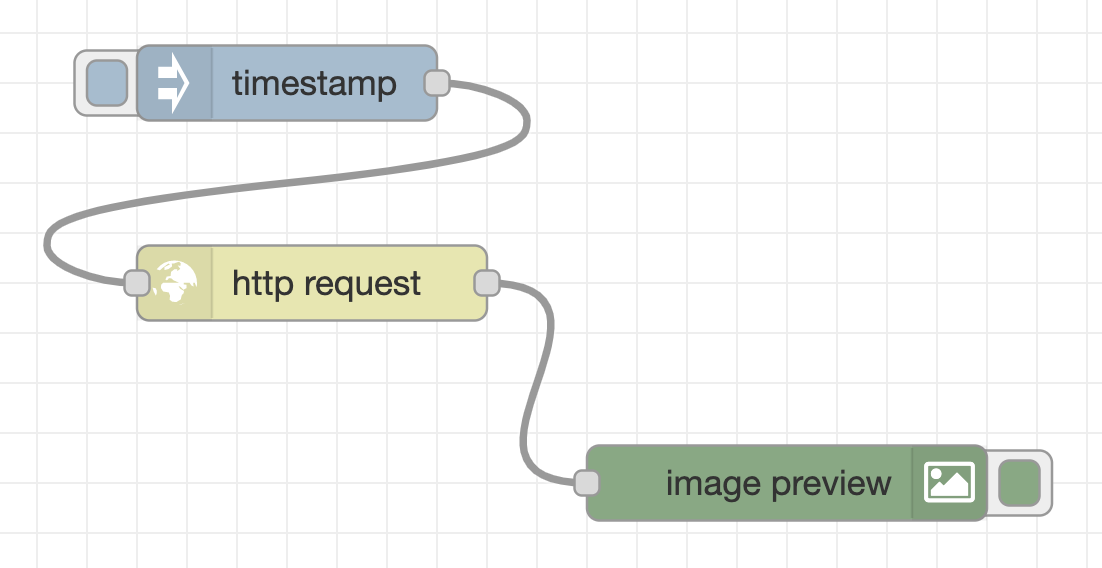
First, create a flow that acquires the image binary data from the webserver. As in the flow below, place an inject node (the name will be changed to “timestamp” when placed in the workspace), http request node, and image preview node, and connect them with wires in the user interface.
Then double-click the http request node to change the node property settings.
Adjust http request node property settings
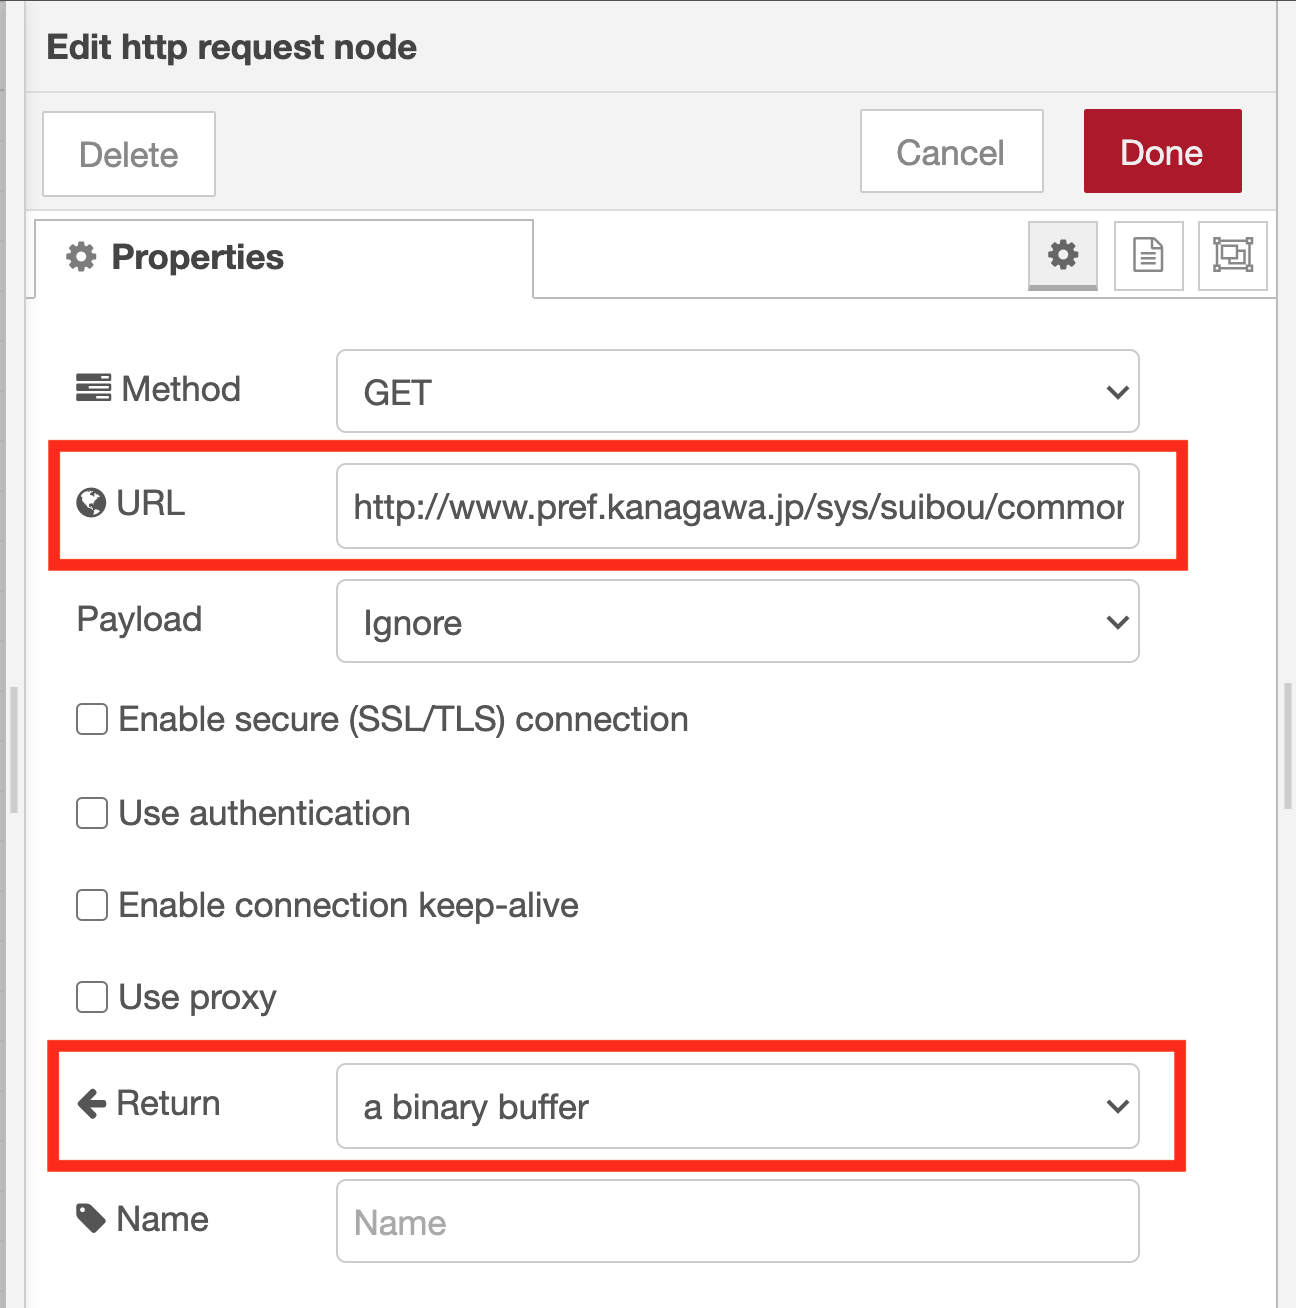
Paste the URL of the surveillance camera image to the URL on the property setting screen of the http request node. (In Google Chrome, when you right-click on the image and select “Copy image address” from the menu, the URL of the image is copied to the clipboard.) Also, select “a binary buffer” as the output format.
Execute the flow to acquire image data
Click the Deploy button at the top right of the flow editor, then click the button to the inject node’s left. Then, the message is sent from the inject node to the http request node through the wire, and the image is acquired from the web server that provides the image of the surveillance camera. After receiving the image data, a message containing the data in binary format is sent to the image preview node, and the image is displayed under the image preview node.
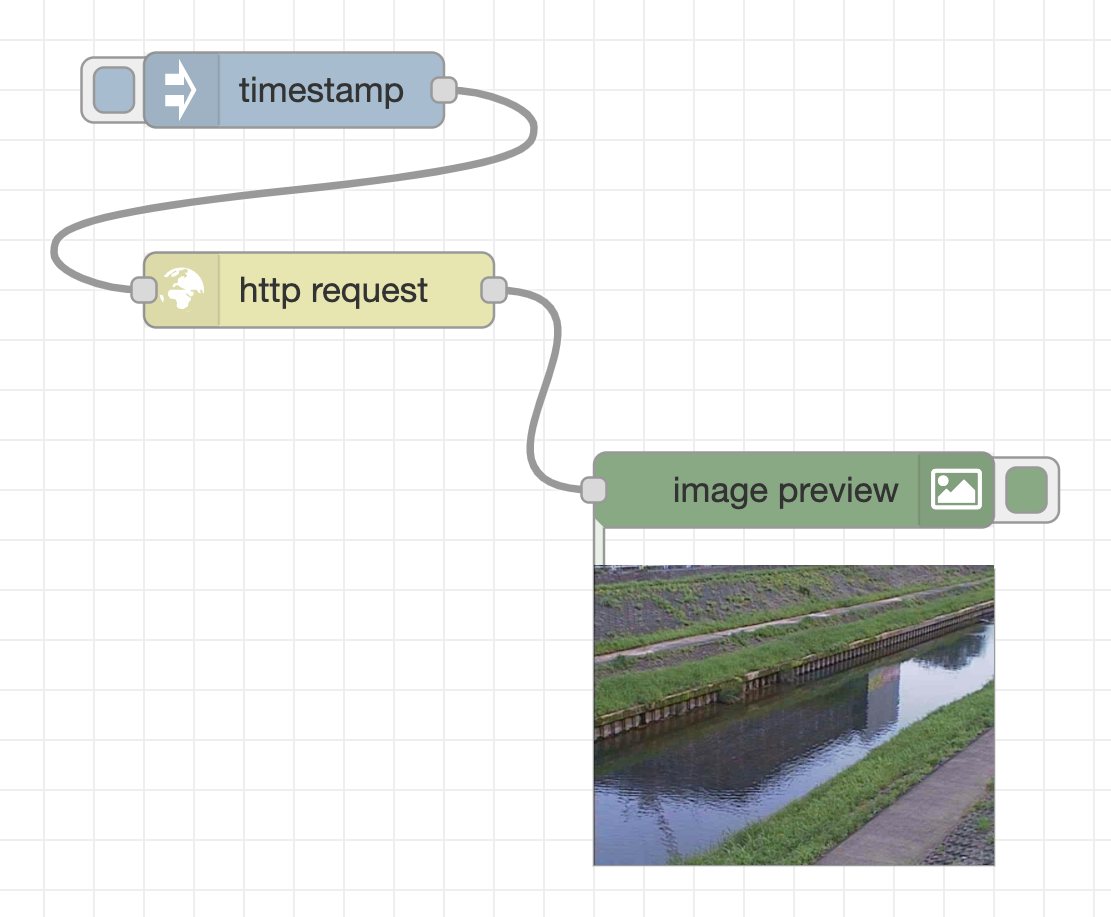
An image of the river taken by the surveillance camera is displayed in the lower right.
Create a flow for image recognition of the acquired image data
Next, create a flow that analyzes what is in the acquired image. Place a cocossd node, a debug node (the name will be changed to msg.payload when you place it), and a second image preview node.
Then, connect the output terminal on the right side of the http request node, and the input terminal on the left side of the cocossd node.
Next, connect the output terminal on the right side of the cocossd node and the debug node, the output terminal on the right side of the cocossd node, and the input terminal on the left side of the image preview node with the respective wires.
Through the wire, the binary data of the surveillance camera image is sent to the cocossd node, and after the image recognition is performed using TensorFlow.js, the object name is displayed in the debug node, and the image with the image recognition result is displayed in the image preview node.
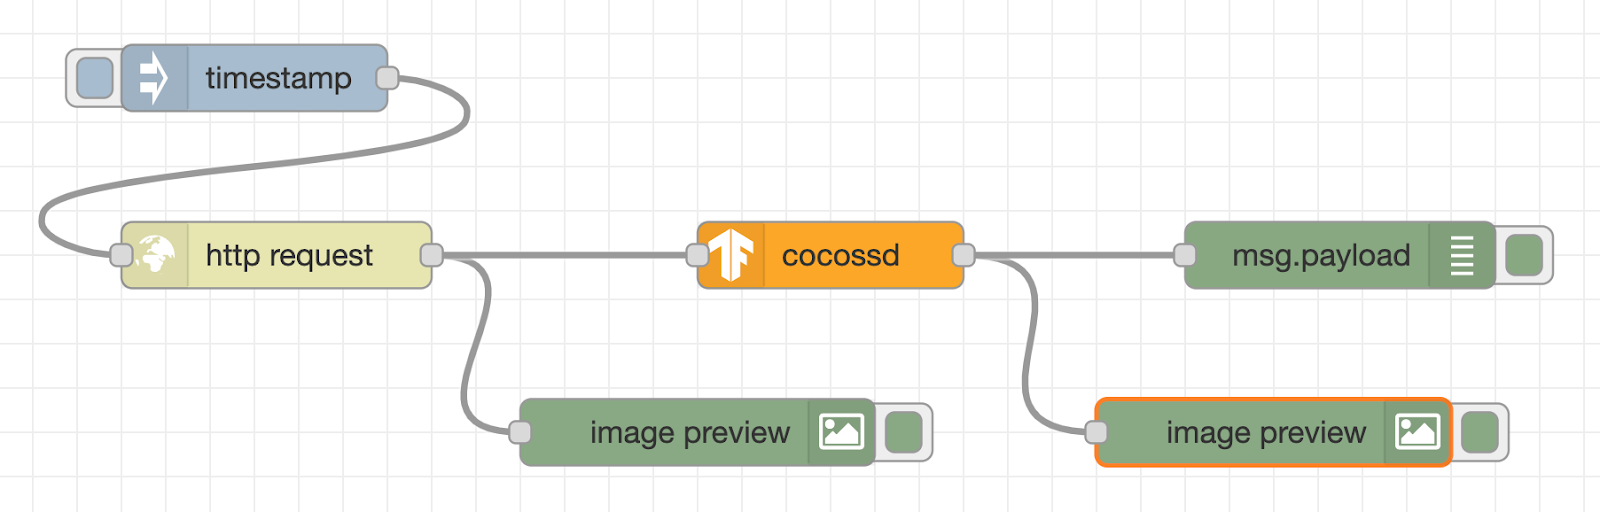
The cocossd node is designed to store the object name in the variable msg.payload, and the binary data of the image with the annotation in the variable msg.annotatedInput.
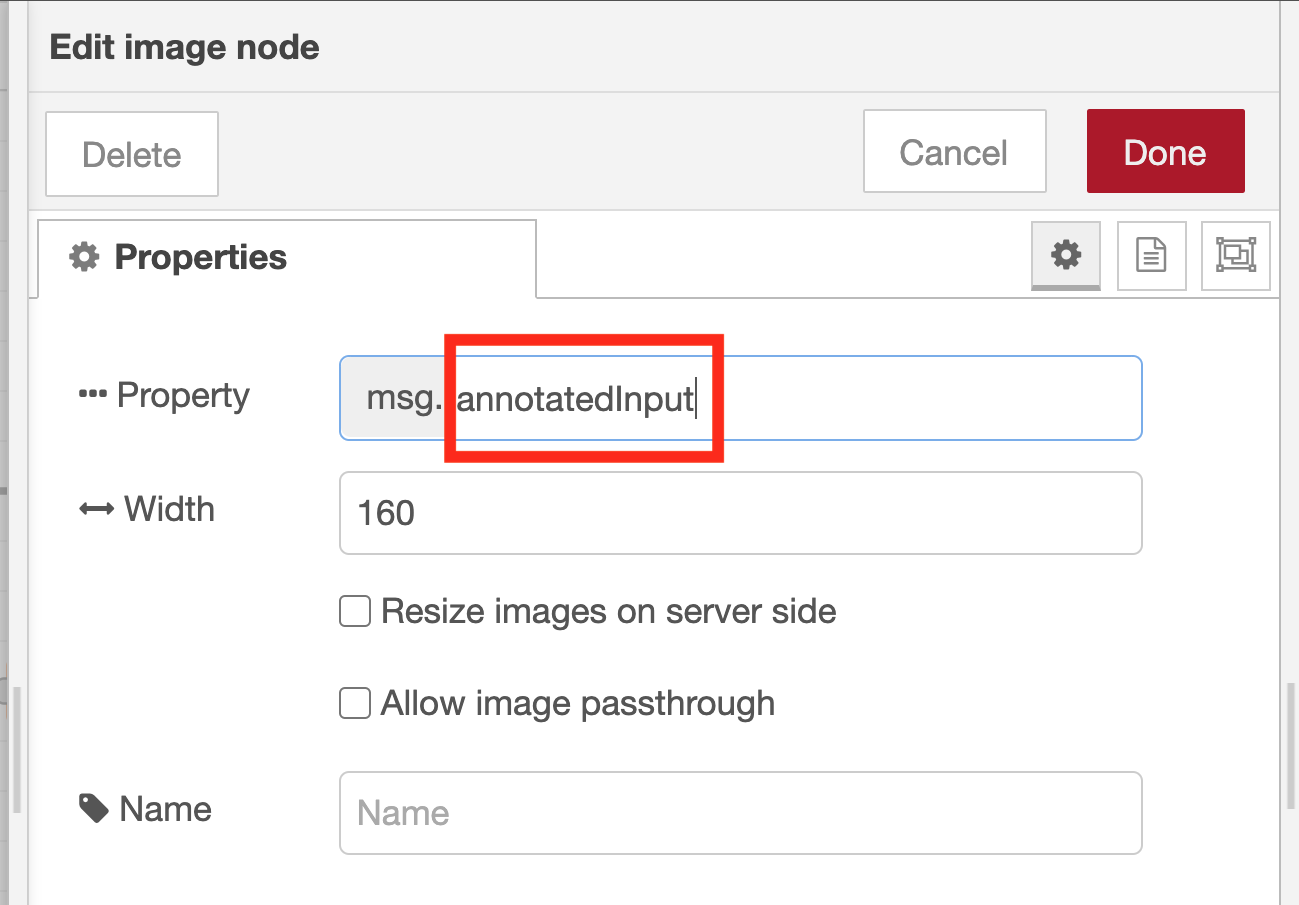
To make this flow work as intended, you need to double-click the image preview node used to display the image and change the node property settings.
Adjust image preview node property settings
By default, the image preview node displays the image data stored in the variable msg.payload. Here, change this default variable to msg.annotatedInput.
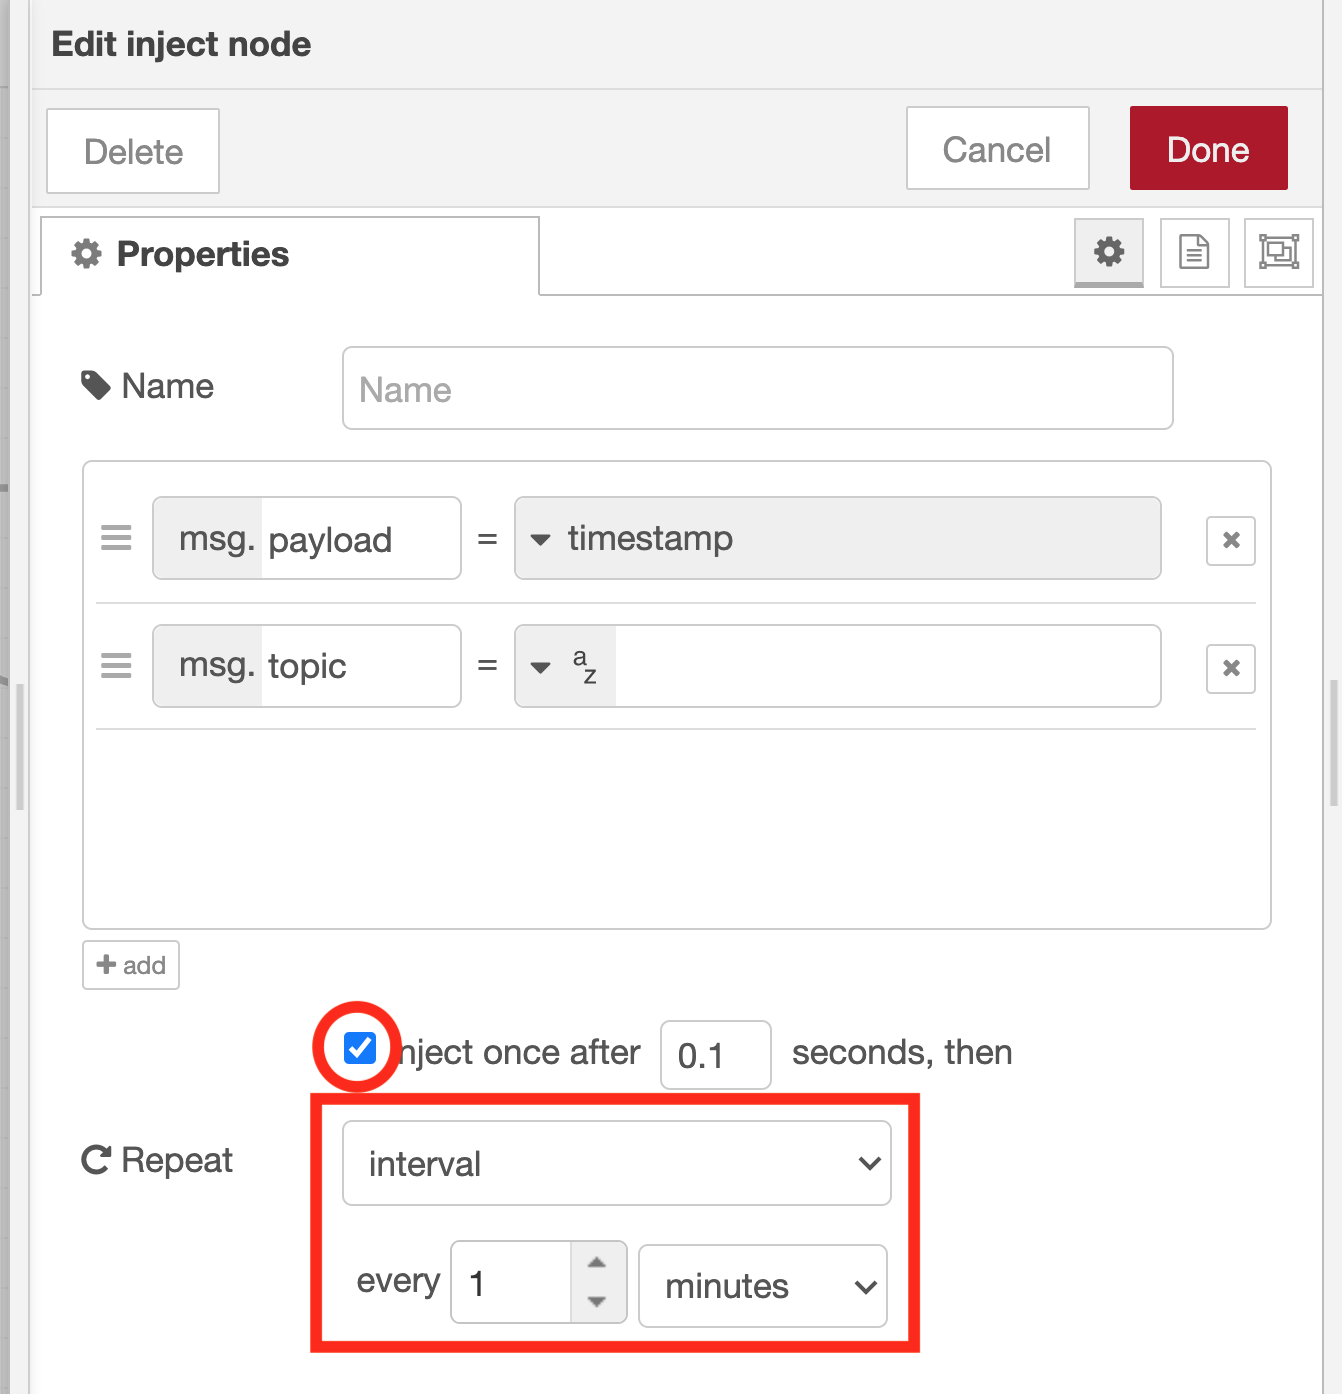
Adjust inject node property settings
Since the flow is run regularly every minute, the inject node’s property needs to be changed. In the Repeat pull-down menu, select “interval” and set “1 minute” as the time interval. Also, since we want to start the periodic run process immediately after pressing the Deploy button, select the checkbox on the left side of “inject once after 0.1 seconds”.
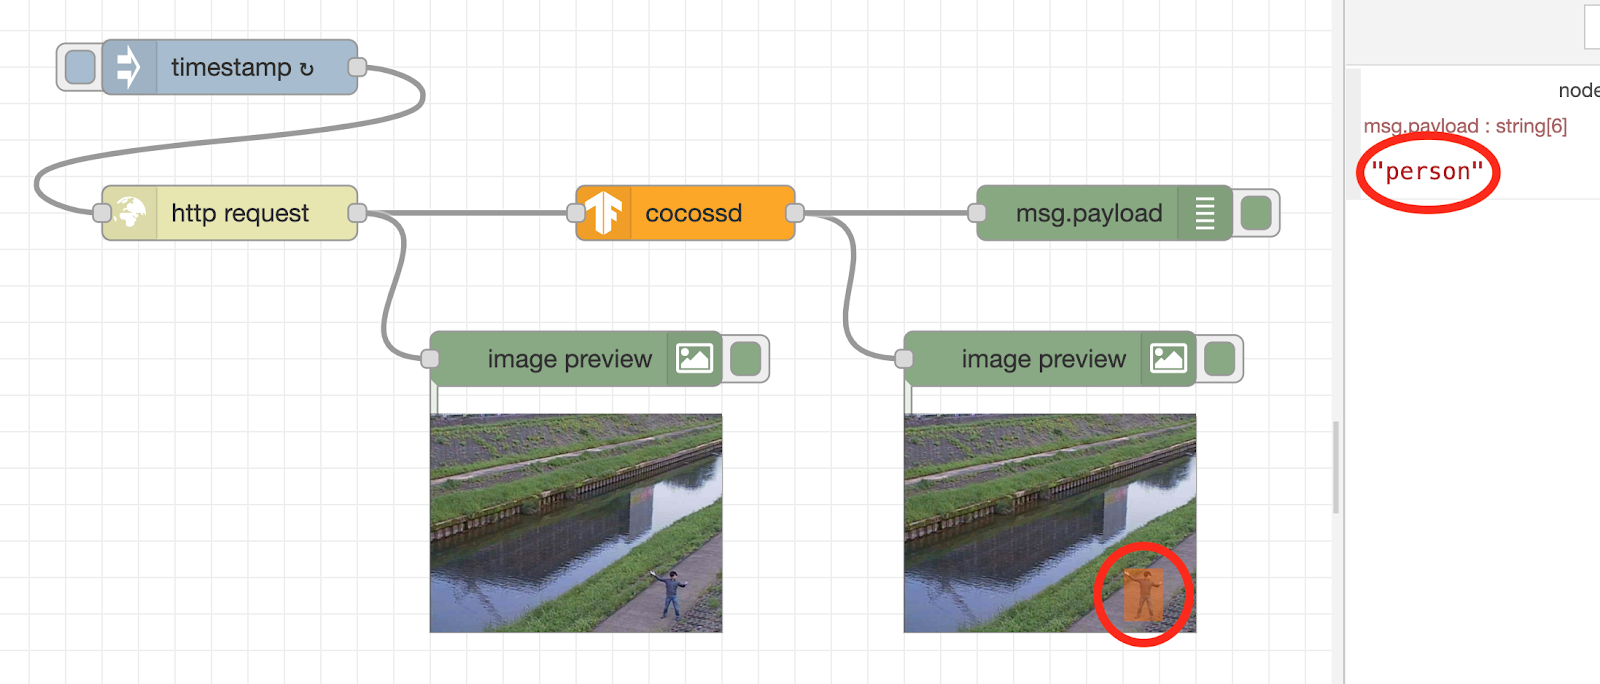
Run the flow for image recognition
The flow process will be run immediately after pressing the Deploy button. When the person (author) is shown on the surveillance camera, the image recognition result “person” is displayed in the debug tab on the right. Also, below the image preview node, you will see the image annotated with an orange square.
Create a flow of sending an email when a person caught in the surveillance camera
Finally, create a flow to send the annotated image by email when the object name in the image recognition result is “person”. As a subsequent node of the cocossd node, place a switch node that performs condition determination, a change node that assigns values, and a sendgrid node that sends an email, and connect each node with a wire.
Then, change the property settings for each node, as detailed in the sections below.
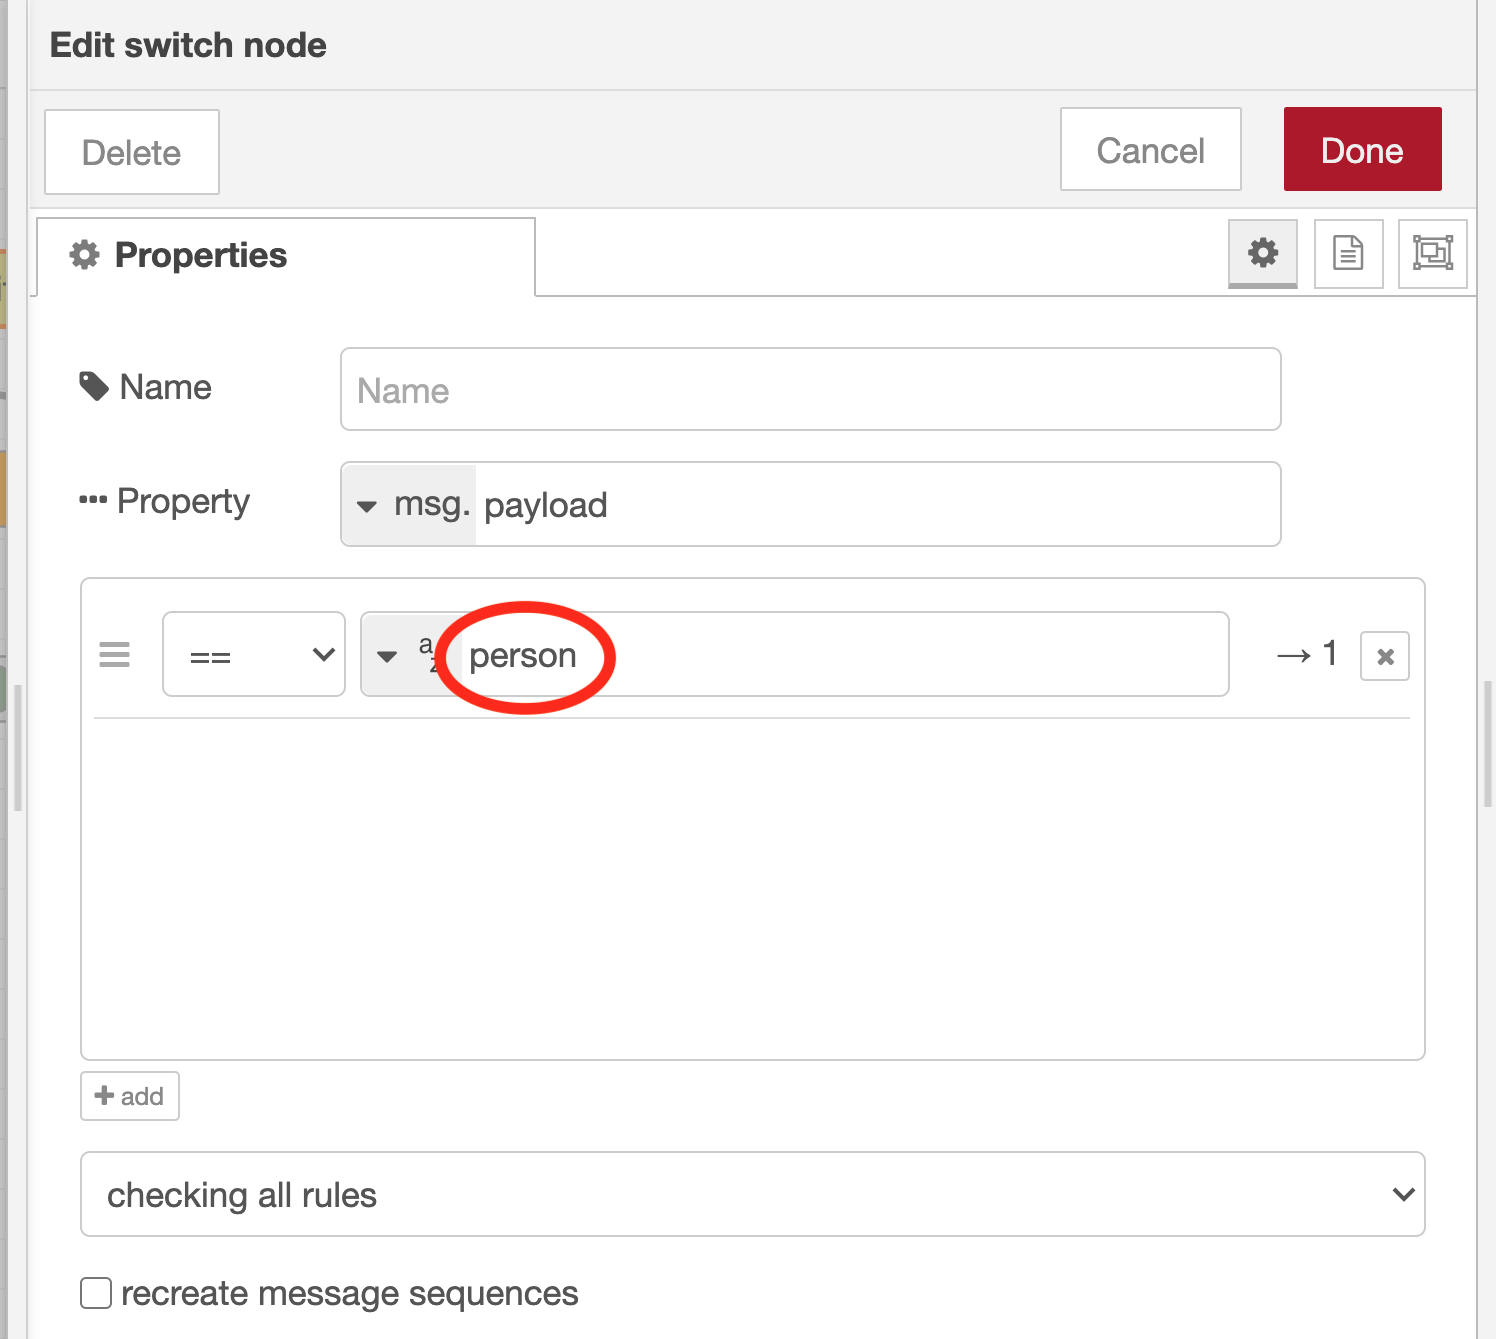
Adjust the switch node property settings
Set the rule to execute the subsequent flow only if msg.payload contains the string “person”
To set that rule, enter “person” in the comparison string for the condition “==” (on the right side of the “az” UX element in the property settings dialog for the switch node).
Adjust the change node property settings
To attach the image with annotation to the email, substitute the image data stored in the variable msg.annotatedInput to the variable msg.payload. First, open the pull-down menu of “az” on the right side of the UX element of “Target value” and select “msg.”. Then enter “annotatedInput” in the text area on the right.
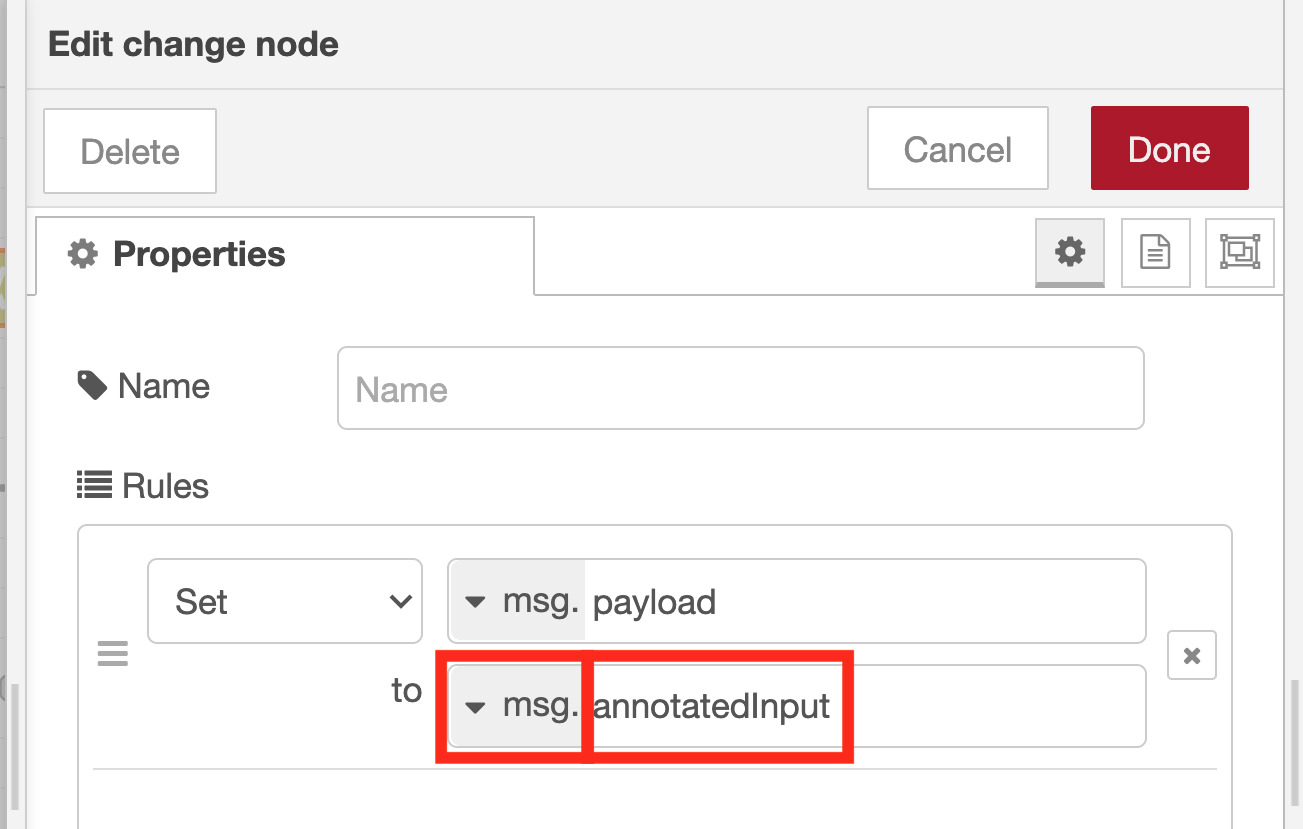
If you forget to change to “msg.” in the pull-down menu that appears when you click “az”, the flow often does not work well, so check again to be sure that it is set to “msg.”.
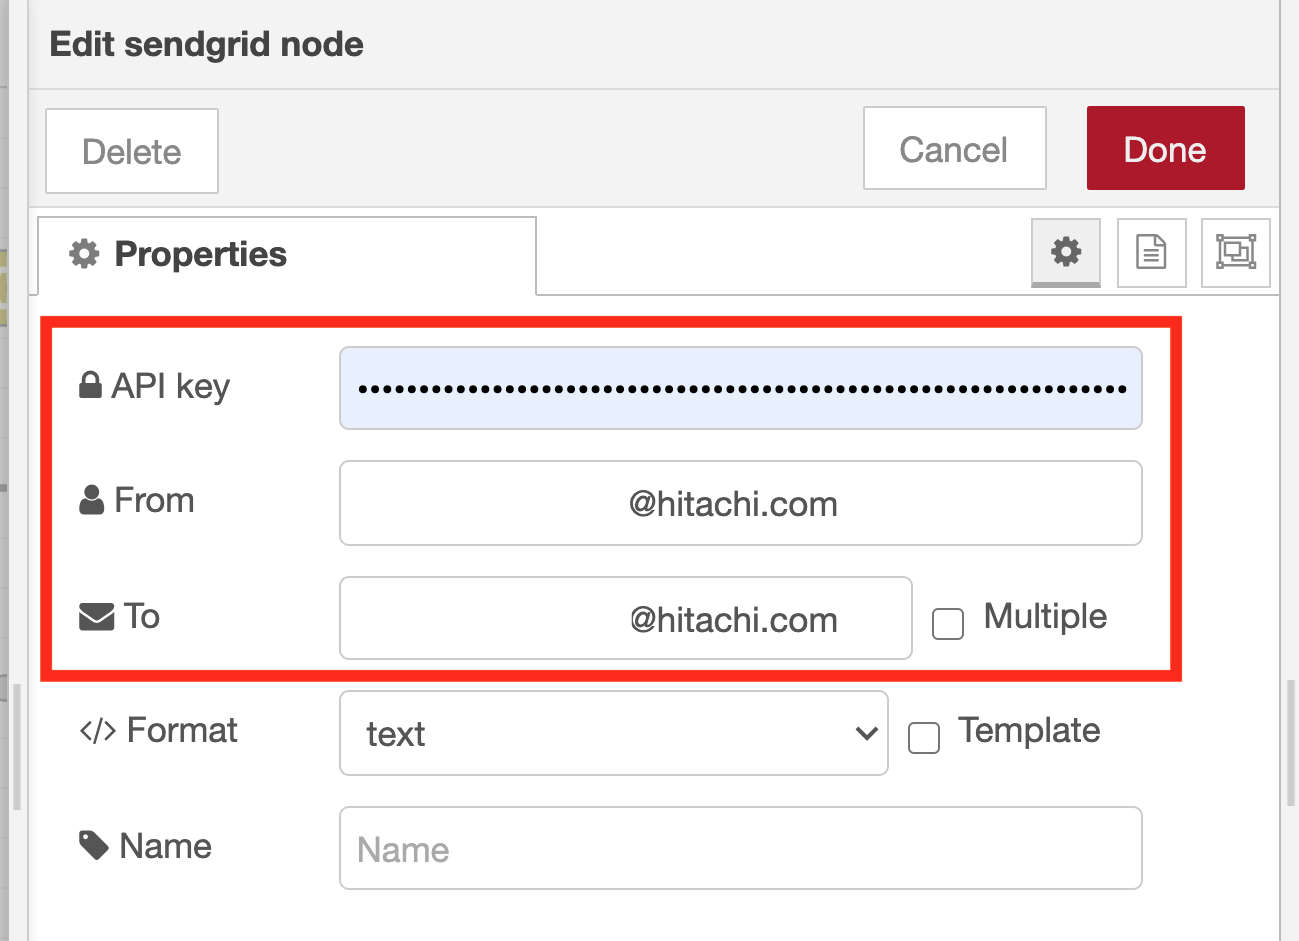
Adjust the sendgrid node property settings
Set the API key from the SendGrid management screen. And then input the sender email address and recipient email address.
Finally, to make it easier to see what each node is doing, open each node’s node properties, and set the appropriate name.
Validate the operation of the flow to send an email when the surveillance camera captures a person in frame
When a person is captured in the image of the surveillance camera, the image recognition result is displayed in the debug tab the same as in the previous flow of confirmation and the orange frame is displayed in the image under the image preview node of “Image with annotation”. You can see that the person is recognized correctly.
After that, if the judgment process, the substitution process, and the email transmission process works as designed, you will receive an email with the image file with the annotation attached to your smartphone as follows:

Conclusion
By using the flow created in this article, you can also build a simple security system for your own garden using a camera connected to a Raspberry Pi. At a larger scale, image recognition can also be run on image data acquired using network cameras that support protocols such as ONVIF.
About the author: Kazuhito Yokoi is an Engineer at Hitachi’s OSS Solution Center, located in Yokohama, Japan.


