
In this article, you’ll learn the fundamentals of Vue.js. Even though the article uses Vue 3, the fundamentals apply to older Vue versions too.
We’ll cover how to:
- create a Vue application with Vue CLI
- render lists
- use conditional rendering
- make use of dynamic CSS
- handle user inputs and events
- use methods and computed properties
- use HTML attribute binding
We’ll start by creating a skeleton application with the CLI.
Creating the Application with Vue CLI
The Vue command-line interface allows us to create and configure new Vue projects from scratch. That is, instead of adding packages and configurations ourselves, the CLI does that for us.
Let’s install the Vue command-line interface.
Installing Vue CLI
The tutorial assumes you don’t have Vue CLI installed on your machine. To install it, run the following command:
npm i -g @vue/cli
Alternatively, you can install it using Yarn as follows:
yarn global add @vue/cli
Once you’ve run any of the above commands, the installation starts, and it will take a few seconds or minutes. Once the installation finishes, you can create projects with the following command:
vue create your-project-name
The vue create command
Once we’ve run the vue create command, we’ll be prompted with a handful of questions. The purpose of these questions is to configure the project to suit our needs.
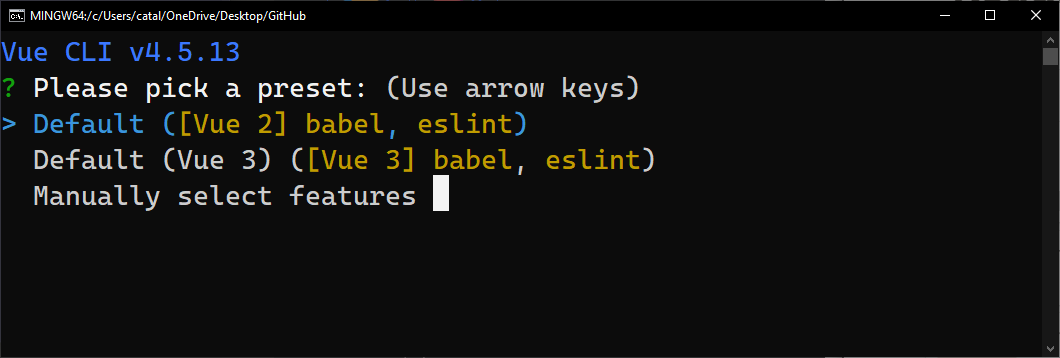
Figure 1 above shows the welcome screen we get when we run vue create your-project-name. We then have to choose between three different options:
- create a default Vue 2 project
- create a default Vue 3 project
- manually select features
The first two options will install a default Vue project for us. However, we don’t want a default project. For this tutorial, we’ll manually select the features for our project. Once we choose the third option, we’ll get a series of questions.
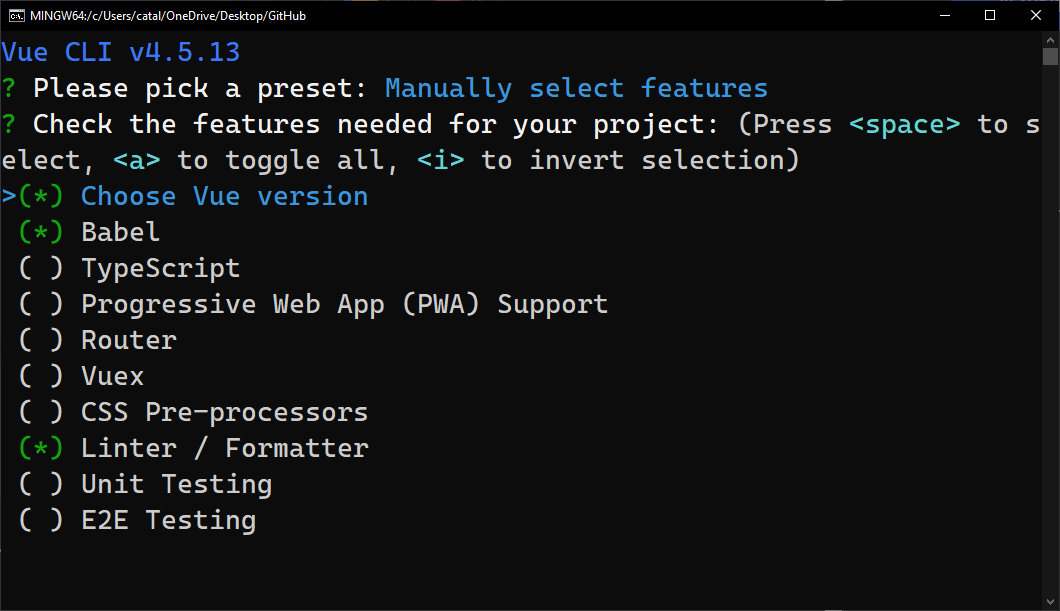
Figure 2 above illustrates what we see when we choose the third option — manually select features. We can pick what features we need in our project, such as:
- adding unit and E2E testing to our project
- choosing a linter/formatter for the project
- adding options such as Vuex, TypeScript, Router and so on
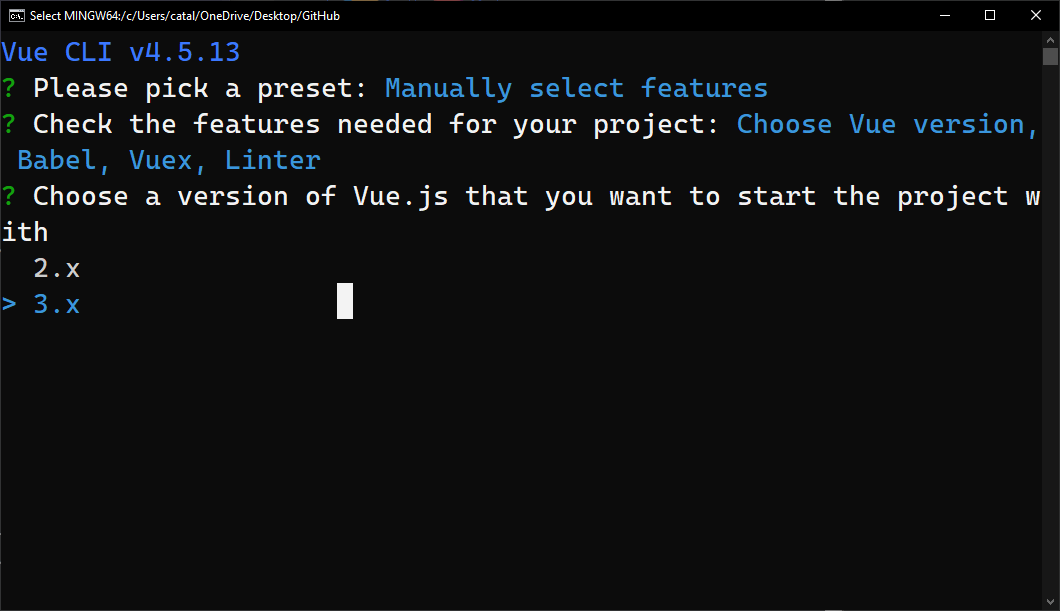
After that, we’re prompted to choose a Vue version for our project. For this tutorial, I recommend choosing Vue 3, as pictured below.
Lastly, we’ll need to answer more questions based on the features we select in the first step, as shown earlier in Figure 2.
Before going further, I want to make sure we’re on the same page:
- Run
vue create vue3-fundamentalsin your terminal. - Choose “manually select features”.
- Untick all features except Babel. For this tutorial, we don’t need any extra features.
- Choose Vue version 3.
- Choose “In dedicated config files” when it asks you where to place the config for Babel, and so on.
- Don’t save the preset for future projects.
After following the above steps, the project structure should look like the one in Figure 4 below.
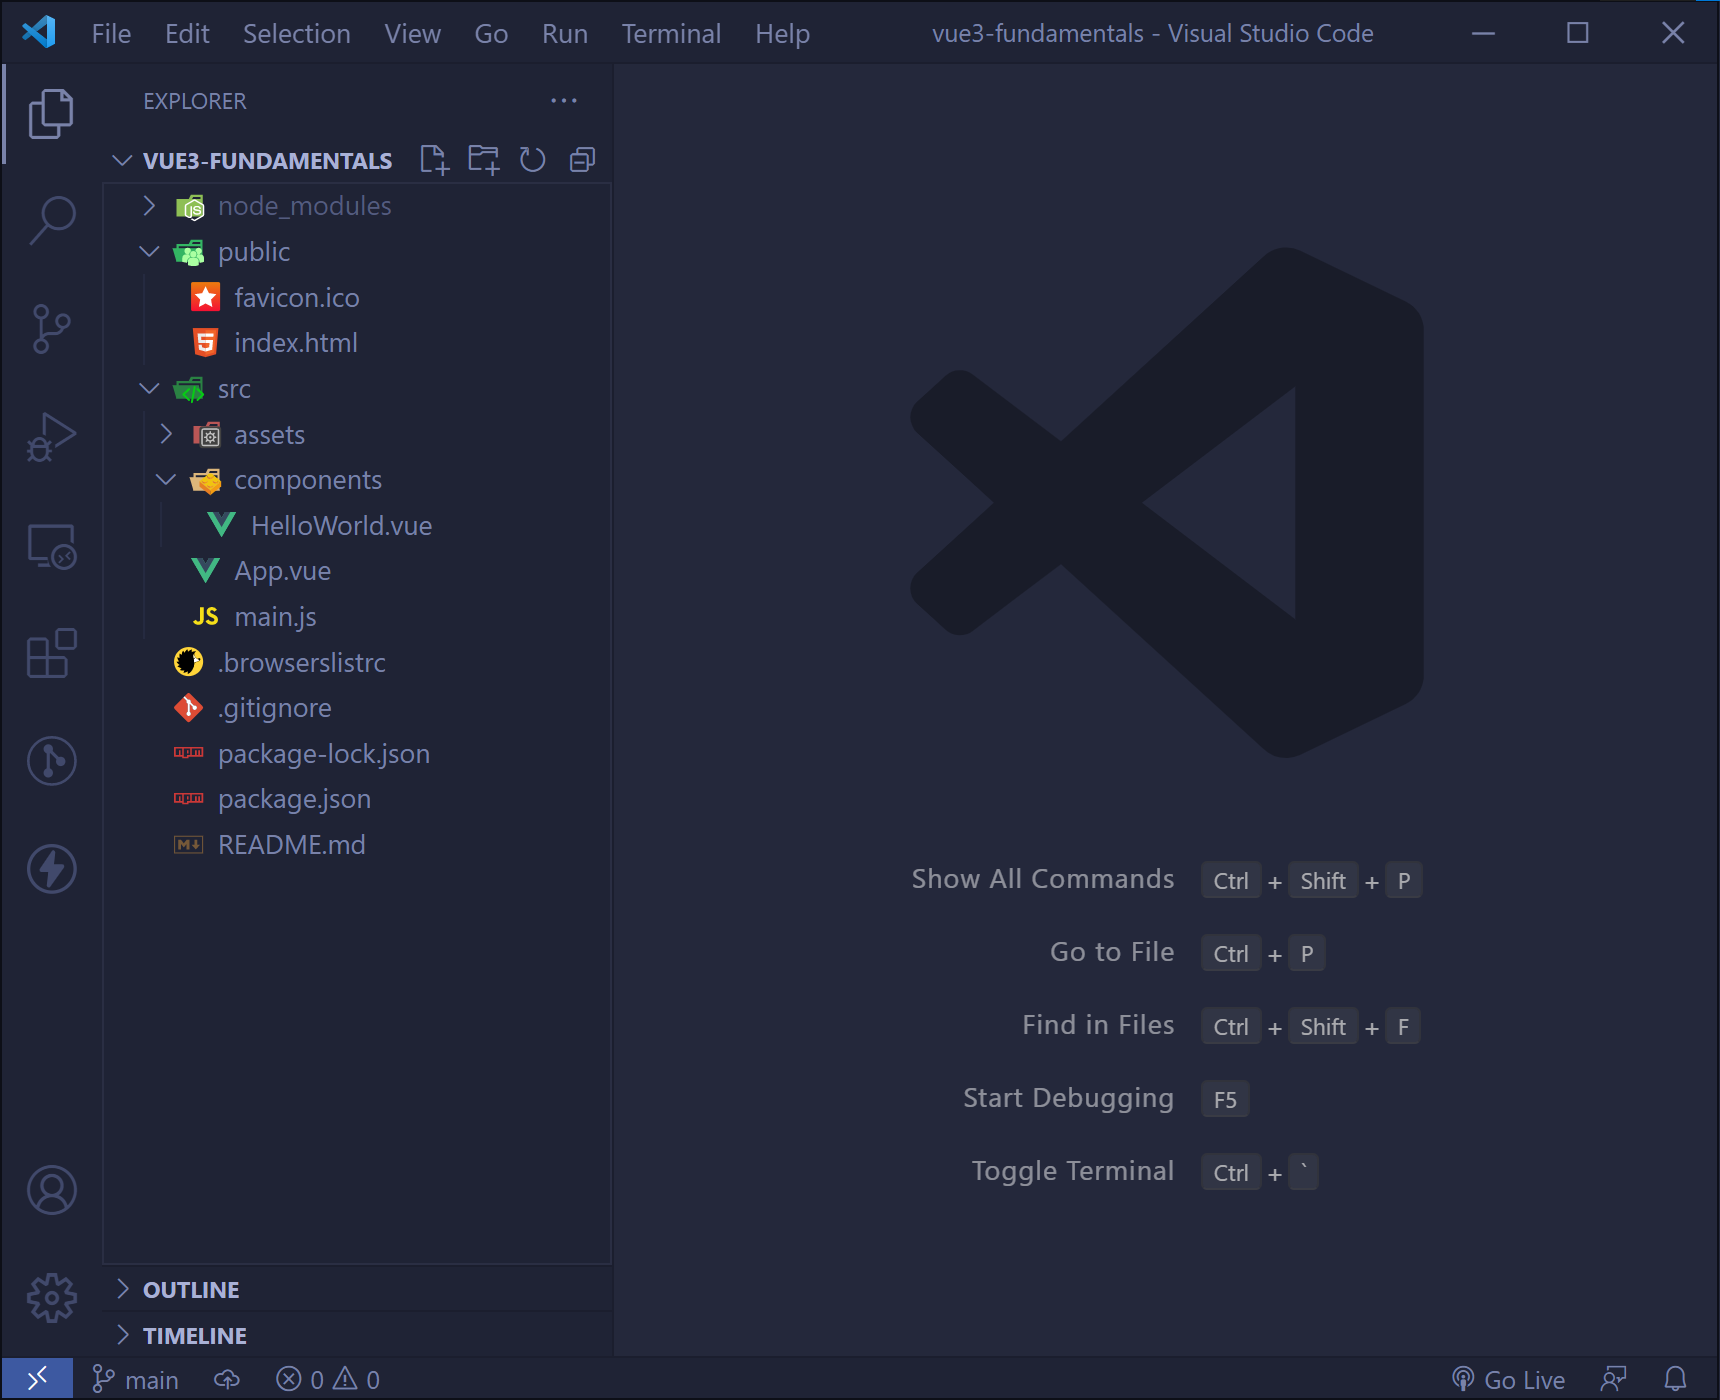
That’s it with the project configuration! Now we’re ready to work on it and learn Vue!
If you want to see a more comprehensive article about the CLI, check this Vue CLI article.
Preparing the Application
There are some things we don’t need in the application. First of all, go to src > components and delete the HelloWorld.vue component.
Now go to the App.vue file and remove all the references of HelloWorld from the file. Also, remove the image with the Vue logo. Lastly, modify the export default {} code block.
See the complete code of App.vue below:
<template>
  <h1>{{ title }}</h1>
</template>

<script>
export default {
  data() {
    return {
      title: 'My To Do App'
    }
  }
}
</script>
Set up a title property and display it in the template.
List Rendering
The first concept we’ll cover is how to render lists in a Vue application. However, before we can do that, we need a list.
Open the file App.vue and add the following array:
<script>
export default {
  data() {
    return {
      title: 'My To Do App',
      tasks: [
        { id: 1, name: 'Learn Vue JS', finished: false },
        { id: 2, name: 'Build a Vue application', finished: false },
        { id: 3, name: 'Write an article about Vue JS', finished: false }
      ]
    }
  }
}
</script>
In the above code snippet, we added an array of objects. Each object represents an individual task, and each task contains the following:
- an ID: we can identify each task by its unique ID
- a name: it describes what the task is about
- finished field: it represents whether the person finished the task or not
The next step is to loop over the array and render it on the page. In Vue, we can loop over lists with the v-for directive. The v-for directive has the form of task in tasks, where each task represents an individual item in the array, and the tasks represents the array.
We can see the v-for directive in action in the code snippet below:
<ul>
    <li v-for="task in tasks" :key="task.id">
      {{task.id}}. {{ task.name }}
    </li>
</ul>
We can render each item or task using the Mustache notation. We use the Mustache notation by using those double curly braces.
At the moment, it only displays the ID and the name of the tasks. But we could also show whether it’s finished or not as follows:
{{ task.id }}. {{ task.name }} - {{ task.finished}}
However, we’ll use that field for other purposes later in the tutorial. If we save the code and run the application, we should see something as follows:
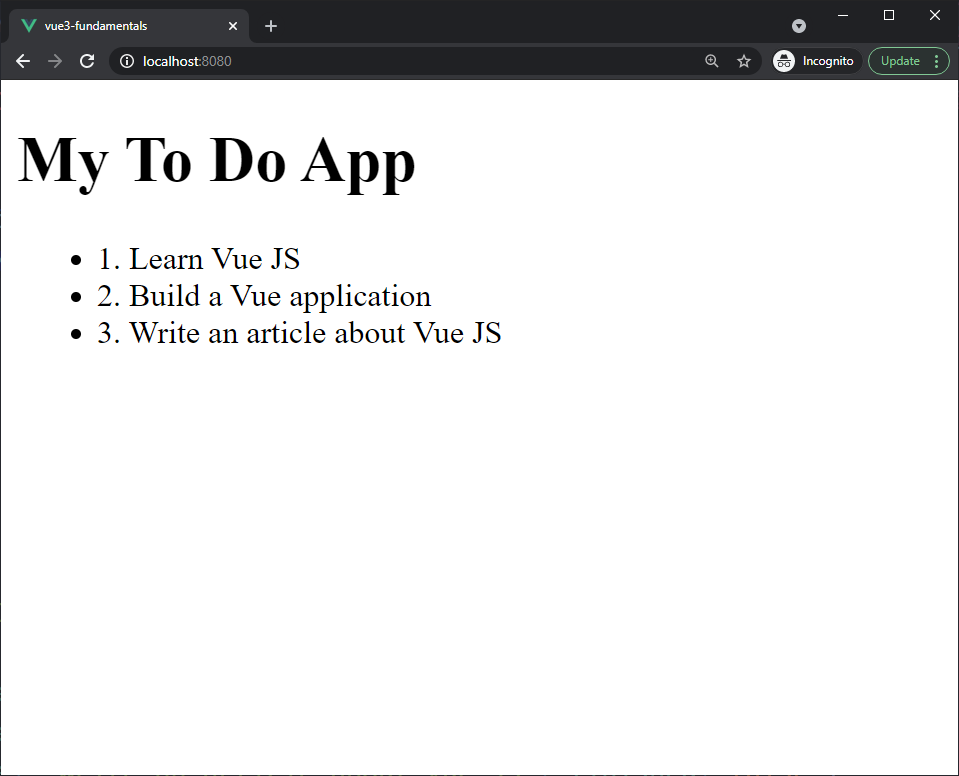
You can see that the tasks are rendered on the page, and each one has an ID and a name.
Unique key
You may have noticed the following bit of code:
:key="task.id"
It’s recommended we use the :key attribute when we loop over lists. The reason is so that each DOM element has a unique key. Thus, Vue can track each node’s identity to reuse and reorder existing elements. As a result, it also improves the performance of the application.
Usually, we use the item’s ID for the :key attribute, like in the above example.
Check this gist to see how the App.vue file should look up to this point.
Conditional Rendering
There are occasions when we want to display something on the page based on a specific condition. Thus, we can use the v-if directive to render a piece of code based on a condition.
The block of code is rendered only if the expression provided returns a truthy value. For instance, in the application we’re building in this tutorial, we might want a Delete task button to show after we finish a task. Thus, we can delete a task when we’re done with it.
Let’s add the Delete task button. Go to the App.vue file and add the following code in the unordered list:
<ul>
    <li v-for="task in tasks" :key="task.id">
        {{ task.id }}. {{ task.name }}

        <div v-if="task.finished">
            <button>Delete task</button>
        </div>
    </li>
</ul>
You can see the new div with the v-if directive. Its purpose is to check if the task is finished. If the task is completed, it shows the delete button. If the task isn’t finished, the button is hidden.
Go and change the finished field on any task from the task array to true. After that, refresh the application, and we should see the delete button.
If you followed all the steps, this is what you should see:
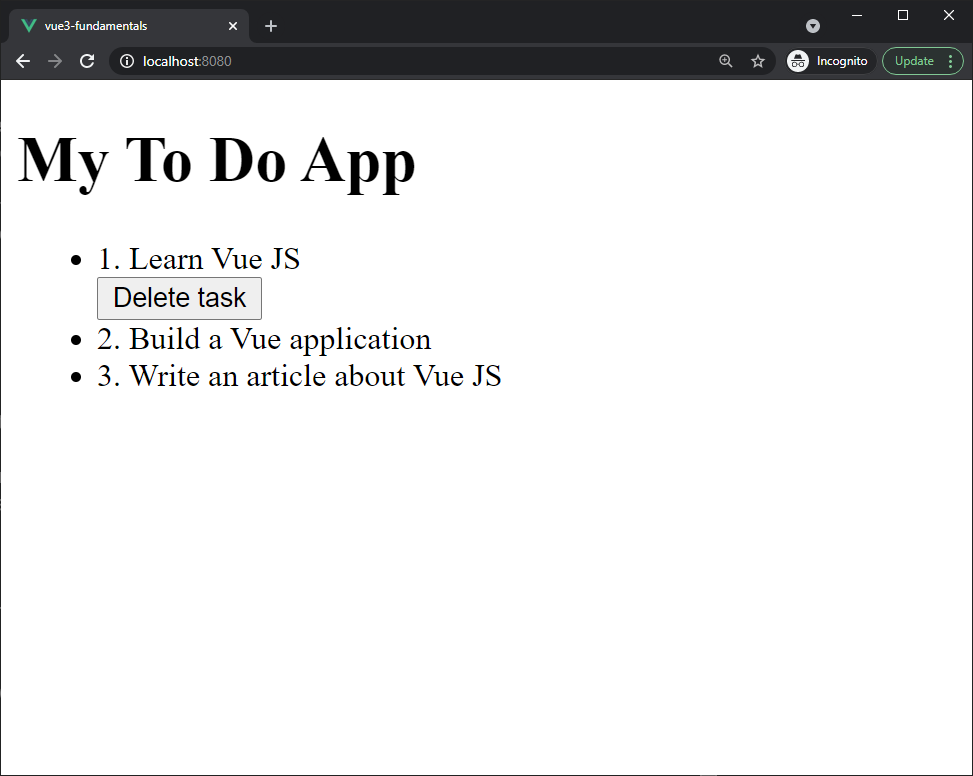
The v-if directive is handy when we want to render something based on a condition.
Before moving on, it’s important to note that we can use v-else-if and v-else too. For instance, we could have something similar to this:
<ul>
    <li v-for="task in tasks" :key="task.id">
        {{ task.id }}. {{ task.name }}

        <div v-if="task.finished">
            <button>Delete task</button>
        </div>
        <div v-else-if="task.edit">
            <button>Edit task</button>
        </div>
        <div v-else>
            <p>No button</>
        </div>
    </li>
</ul>
You can see how powerful conditional rendering is. However, for this tutorial, we’re using only the v-if.
Check this gist to see how the App.vue file should look up to this point.
Handling User Input
The next step is to handle the user input. First of all, go to the App.vue file and add the following HTML code under the application title:
<h2>Add a new task</h2>

<div>
   <input type="text"
     v-model="newTask"
     placeholder="Add a new task"
   >
</div>

<div v-if="newTask.length > 0">
   <h3>New task preview</h3>
   <p>{{ newTask }}</p>
</div>
In the above code snippet, we add a text input that allows users to add new tasks. Also, you’ll note the v-model directive. The v-model directive enables us to create two-way binding between the input field and the application state. (You can learn more about v-model in “Understanding the New Reactivity System in Vue 3”.)
Before we can try out the code, add the newTask field in the Vue instance as follows:
return {
      title: 'My To Do App',
      newTask: '',
      tasks: [
        { id: 1, name: 'Learn Vue JS', finished: false },
        { id: 2, name: 'Build a Vue application', finished: false },
        { id: 3, name: 'Write an article about Vue JS', finished: false }
      ]
    }
If we run the application and type anything in the input field, we’ll see the text appearing under the input field.
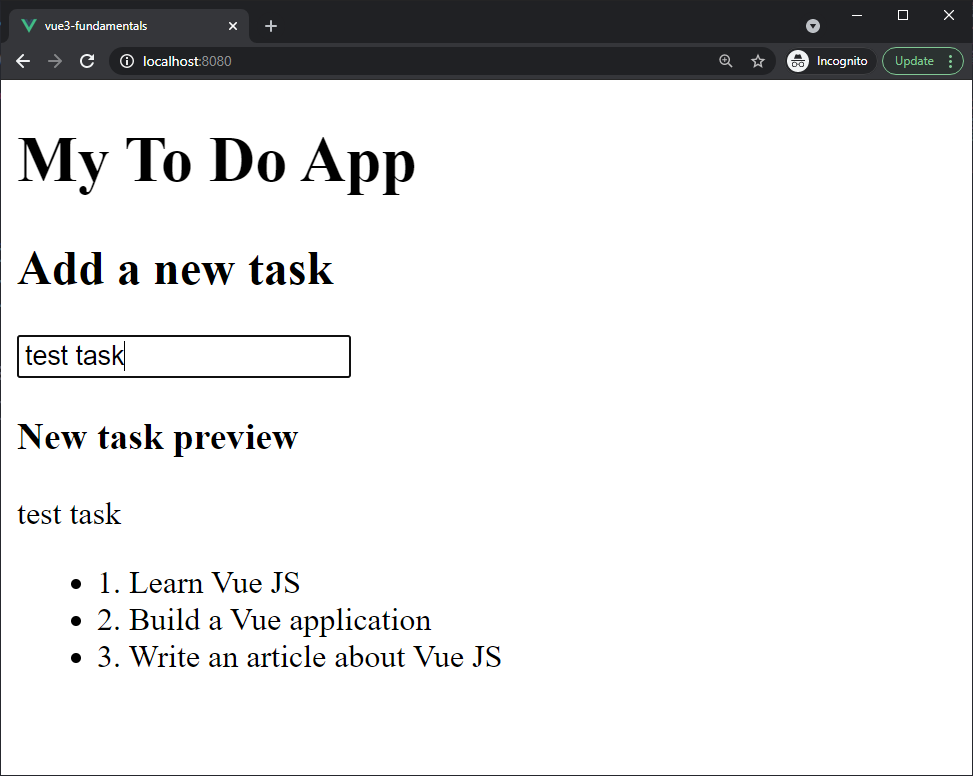
In the code above, we added <p>{{ newTask }}</p> in the HTML code, which represents the “newTask” field. Thus, it gets updated and rendered on the page whenever we add anything in the input field. It appears under the input field.
Check this gist to see how the App.vue file should look up to this point.
Methods
Before learning about handling user events, we need to learn about methods. The reason is that we’ll use methods to handle those user events.
All Vue instances have a property called methods, where we add all our methods. For example, we’ll add a button that allows us to add tasks. Thus, we encapsulate the logic for that button in a method, and we add it to the methods field.
Open the file Vue.app and add the following code after data():
methods: {
    addTask() {
      if (this.newTask.length < 1) return

      this.tasks.push({
        id: this.tasks.length + 1,
        name: this.newTask,
        finished: false
      });

      this.newTask = ''
    }
  }
The above code only adds a task if the user entered something in the input field and then clears the field. That is to prevent entering empty strings into our tasks list.
Now, we can use the addTask() method as we would in any other application. We call the method, and the method will run, which is precisely what the next step is about.
Be aware: The application will have two more methods:
- remove a task
- finish a task (which toggles a task on and off)
However, I excluded them from the above code snippet for readability purposes, but you will see them in the gist. You can see this gist with the complete code for App.vue up to this point.
Handling User Events
Now that you know what methods are about, it’s time to learn about handling user events. For instance, what happens when the user clicks on the Add task button?
We can add an event listener to that button. In Vue, we can listen to events with the v-on directive. When an event such as the user clicking a button is triggered, the application runs the specified method.
Let’s see it in action. Go to the App.vue file and add a button under the input field. We should have the following code:
<div>
    <input type="text"
        v-model="newTask"
        placeholder="Add a new task"
    >

    <button
      @click="addTask"
      :disabled="newTask.length < 1"
    >
      Add task
    </button>
  </div>

  <div v-if="newTask.length > 0">
    <h3>New task preview</h3>
    <p>{{ newTask }}</p>
</div>
Observe the @click="addTask" code. The v-on directive has a shorthand symbol, which is the @ symbol. Thus, instead of writing v-on:click, we can write it as shown above.
Clicking on the Add task button triggers the method addTask(), which adds the task. Therefore, with the v-on directive, we can listen to user events and call a specific method when they are triggered.
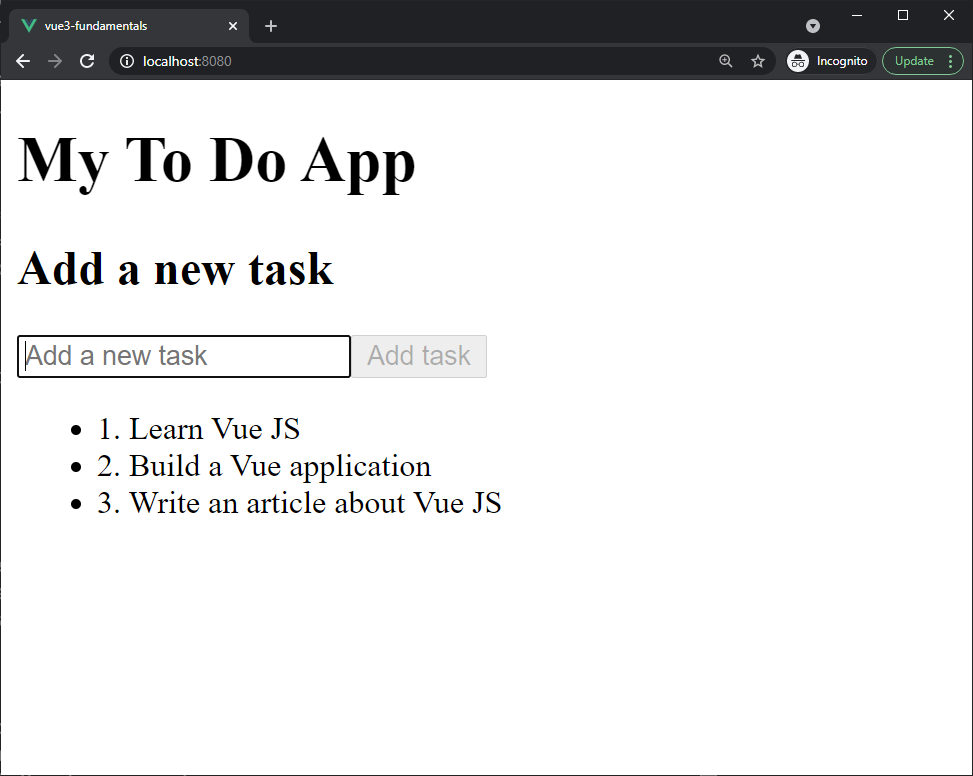
In Figure 8, you can see the newly created button. At first, it’s disabled, but once we start typing, it works!
See this gist with the complete code for App.vue up to this point.
Computed Properties
Another handy feature in Vue is computed properties. They’re similar to methods, except that they should not mutate data. However, the computed properties are great for manipulating data and reusing it across our application.
For this application, we’ll add two computed properties:
- One that returns the number of all tasks.
- One that returns the tasks’ array in reverse order. Why? We need it to show the latest tasks at the top of the list.
Thus, in App.vue, add the following code under the methods property:
computed: {
    allTasks() {
        return this.tasks.length
    },
    latest() {
        return [...this.tasks].reverse()
    }
  }
You may have noticed that the latest() computed property returns a new reversed array. As mentioned previously, a computed property should not mutate the existing data.
Also, when we use computed properties, it’s important to use the return keyword. If we don’t return stuff, it won’t work! Now we can use the newly created properties.
In our template, find the “Add a new task” section and add the following line underneath:
<span>You have {{ allTasks }} {{ allTasks > 1 ? 'tasks' : 'task' }} at the moment</span>
The above line displays all the tasks in our list. Also, it determines when to use “tasks” or “task” based on the number of tasks.
Lastly, go to the piece of code where we loop over the array of tasks and change task in tasks to task in latest. This is how our code should look now:
<ul>
      <li v-for="(task, index) in latest" :key="task.id">
        {{ index + 1 }}. {{ task.name }}

        <div v-if="task.finished">
          <button>Delete task</button>
        </div>
      </li>
</ul>
We now loop over the latest, and we also have an “index” field now. The new field is used to show the position of the tasks in the list.

Figure 9 illustrates the computed properties in action. You can see that it shows the total count of tasks, and it also displays the tasks in the order they were added.
Computed properties versus methods
Before moving further, I want to emphasize again that they’re similar but different. We should use methods to mutate data and use the computed properties for the presentation layer.
Mutating data in the computed properties can result in bugs that are hard to spot.
Check this gist to see how the App.vue file should look up to this point.
Attribute Binding
In Vue, we can bind HTML attributes to Vue data with the v-bind directive. That is, we can use dynamic values rather than hardcoded values for our attributes.
Let’s make use of the attribute binding by adding a logo. Go to the Vue.app and add two new fields, logoURL and logoCaption. Our code should look as follows:
data() {
    return {
      title: 'My To Do App',
      newTask: '',
      logoURL: 'https://images.unsplash.com/photo-1507925921958-8a62f3d1a50d?ixid=MnwxMjA3fDB8MHxwaG90by1wYWdlfHx8fGVufDB8fHx8&ixlib=rb-1.2.1&auto=format&fit=crop&w=1955&q=80',
      logoCaption: 'A photo by Kelly Sikkema on Unsplash showing post-it notes',
      tasks: [
        { id: 1, name: 'Learn Vue JS', finished: false },
        { id: 2, name: 'Build a Vue application', finished: false },
        { id: 3, name: 'Write an article about Vue JS', finished: false }
      ]
    }
  },
Then, in the same file, add the following HTML img element above the application title:
<img :src="logoURL" :alt="logoCaption" width="200" height="200" />
Observe the colons in the :src and :alt attributes. They’re the shorthand of v-bind. Thus, instead of writing v-bind:src, we write it :src.
Let’s say we use the logo in multiple places without having a separate component for it. That means copy–pasting the same img tag in multiple locations. If we want to change the logo, we’ll have to make changes in many places. However, by using the attribute binding, we only have to make one change — in the Vue instance.
The image below illustrates one example — with the img element. However, we can use the attribute binding with other HTML elements too. For instance, we could use it with the href element as well.
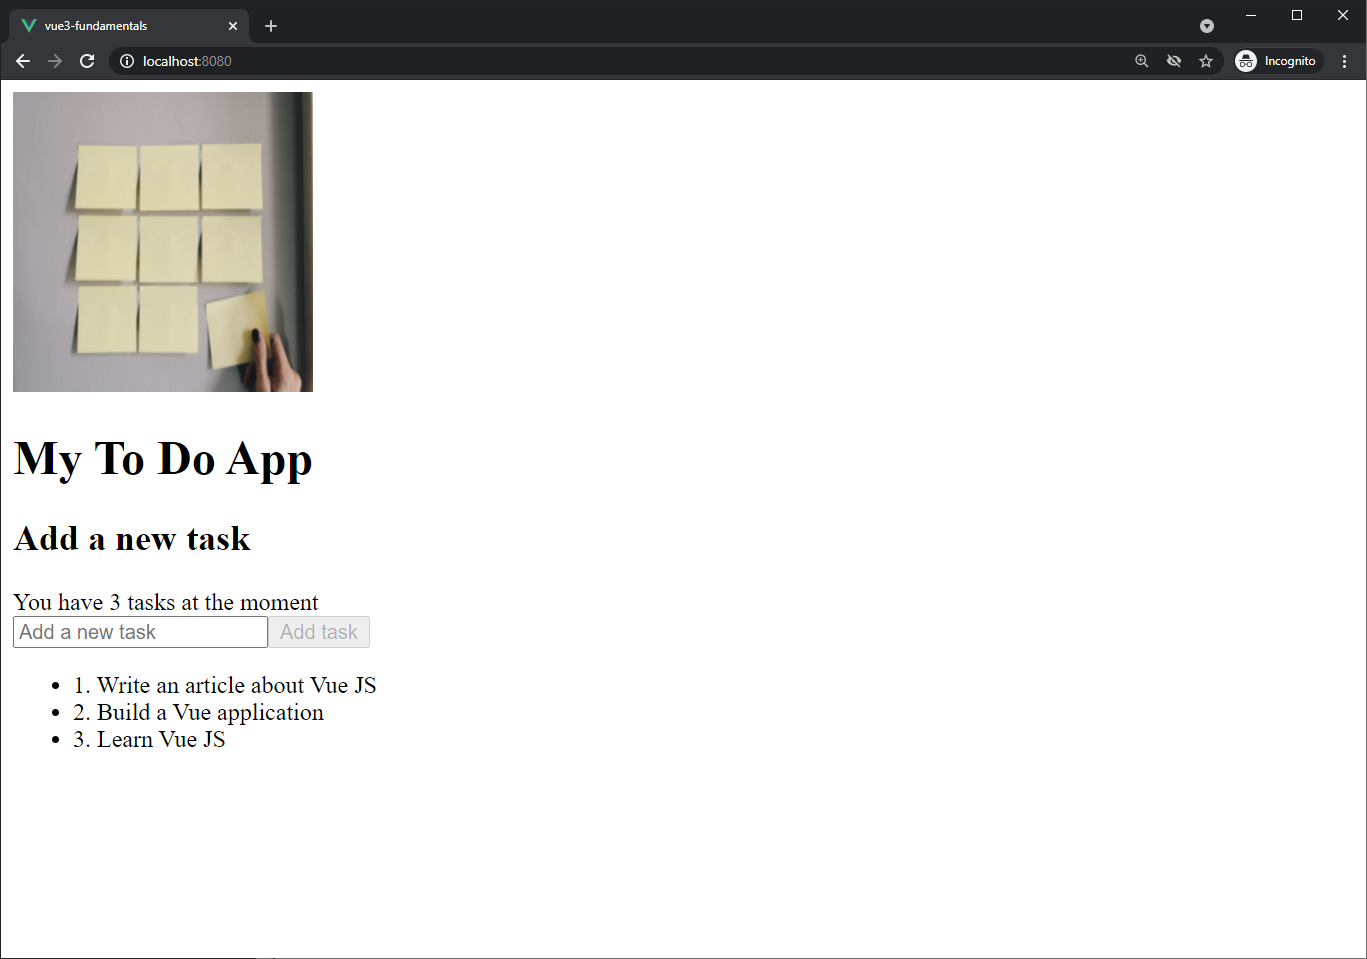
Figure 10 illustrates the image in action!
Check this gist to see how the App.vue file should look up to this point.
Dynamic CSS
In Vue, we can use dynamic CSS. That means whether a class is used or not is determined by a data property. An example from the to-do application would be to add the class strikeout when the task is finished.
Go to the App.vue file and add the :class attribute after the @click attribute. See the code below:
<ul>
    <li
      v-for="(task, index) in latest"
      :key="task.id"
      @click="finishTask(task)"
      :class="{ strikeout: task.finished }"
    >
      {{ index + 1 }}. {{ task.name }}

      <div v-if="task.finished">
          <button>Delete task</button>
      </div>
    </li>
</ul>
Also, at the end of App.vue, add the following bit of CSS:
<style>
.strikeout {
  text-decoration: line-through;
}
</style>
So, what happens now? In the above code, we added a user event as well — @click="finishTask(task)". That means we can click on the task to finish it. The method finishTask(task) toggles the finished field to true/false. If the finished field is set to true, the strikeout class is added.
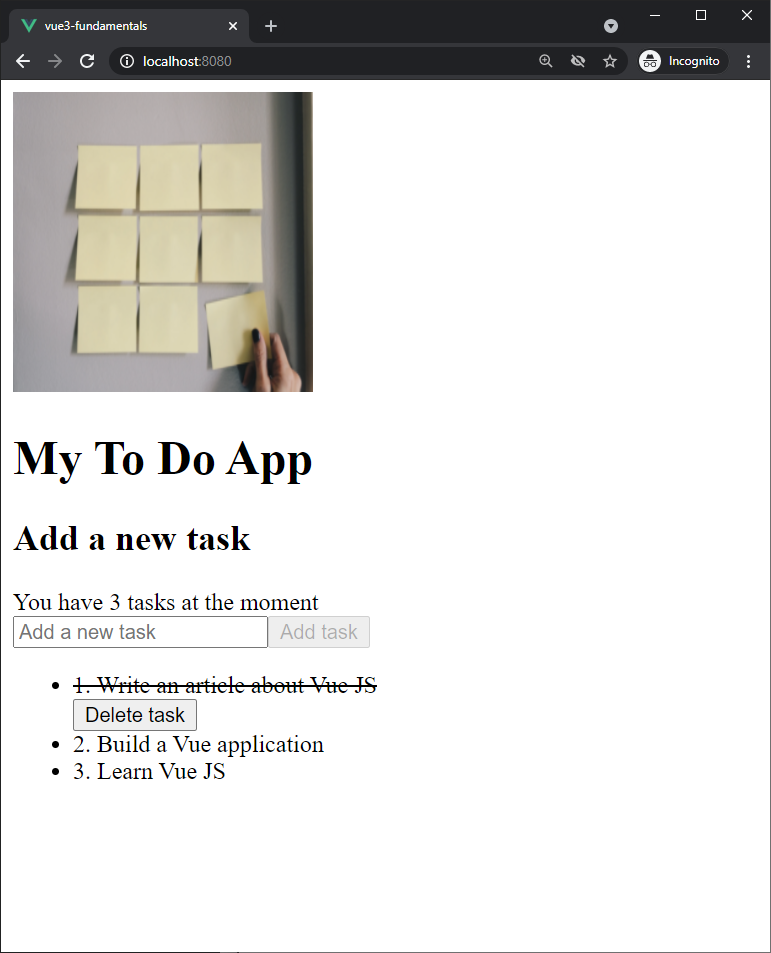
Figure 11 illustrates what happens when we click on the task. Thus, the dynamic CSS is great for scenarios like this.
It’s important to note that, if we want to add multiple dynamic classes, we can use the array notation. We can do it as follows:
<li
    v-for="(task, index) in latest"
    :key="task.id"
    @click="finishTask(task)"
    :class="[
        task.finished ? 'strikeout' : '',
        task.postponed ? 'text-gray' : '',
        'simple-class'
   ]"
>
    {{ index + 1 }}. {{ task.name }}

    <div v-if="task.finished">
        <button>Delete task</button>
    </div>
</li>
Thus, this way, we can add multiple dynamic classes based on multiple conditions. Moreover, we can add static classes in the array. See simple-class above.
Check this gist to see how the App.vue file should look up to this point.
Last Touches
Two things are left to finish the application:
- allowing the user to add a task by pressing the enter key on their keyboard
- making the delete button work
Open the file App.vue and find the input field. After you find it, add the following code:
<input type="text"
    v-model="newTask"
    @keyup.enter="addTask"
    placeholder="Add a new task"
>
You’ll notice @keyup.enter, which calls the method addTask when the user presses the enter key.
Secondly, find the delete button in our application and add the following code:
<div v-if="task.finished">
    <button @click="removeTask(task.id)">Delete task</button>
</div>
Now it listens for a click event, and whenever the Delete task button is clicked, it will trigger the method removeTask. It also passes the ID of the task, so it knows what task to delete.
Now we can enter tasks by pressing the enter key, and we can also delete tasks.
Check this gist to see how the App.vue file should look up to this point.
Conclusion
Well done for building your first application! From here, you’re ready to dive deep into Vue components, Vue Router and other concepts!
You can find the whole application in this “final-app.vue” gist. If you want to try it out, simply copy all the code into your App.vue file.
Frequently Asked Questions (FAQs) about Vue 3 for Beginners
What are the key differences between Vue 2 and Vue 3?
Vue 3 introduces several new features and improvements over Vue 2. The most significant change is the introduction of the Composition API, which provides a more flexible way to manage and reuse code. Vue 3 also has improved performance due to its new reactivity system and compiler enhancements. Other notable features include multiple root elements, fragments, teleport, and suspense, which help in handling asynchronous operations and code splitting.
How do I start a new project in Vue 3?
To start a new project in Vue 3, you need to have Node.js and npm installed on your computer. You can then use the Vue CLI to create a new project. Run the command ‘npm install -g @vue/cli’ to install the Vue CLI. Once installed, you can create a new project using ‘vue create my-project’. During the setup process, you can choose Vue 3 as the version for your project.
How does the Composition API in Vue 3 improve code organization?
The Composition API in Vue 3 provides a set of functions that allow you to better organize and reuse code in your Vue components. It’s particularly useful in large-scale applications where the traditional Options API can become cumbersome. With the Composition API, you can encapsulate functionality into reusable functions, making your code more readable and maintainable.
What is the purpose of the ‘setup’ function in Vue 3?
The ‘setup’ function is a new component option in Vue 3 that serves as the entry point for using the Composition API. It’s where you define reactive properties, computed properties, functions, and lifecycle hooks. The ‘setup’ function is called before the component is created, and the properties and methods returned by the ‘setup’ function are exposed to the component’s template.
How do I use Vue Router with Vue 3?
Vue Router is the official router for Vue.js and it’s fully compatible with Vue 3. To use Vue Router, you need to install it separately using npm or yarn. Once installed, you can create a router instance, define your routes, and then provide the router instance to your Vue application. In your components, you can use the ‘router-link’ and ‘router-view’ components to navigate between pages and render the current route.
How can I manage state in a Vue 3 application?
Vuex is the official state management library for Vue.js and it’s fully compatible with Vue 3. Vuex provides a centralized store for all your application’s state, and rules ensuring that state can only be mutated in a predictable way. You can install Vuex using npm or yarn, and then create a store that holds your application’s state. Components can then access and modify the state using Vuex’s ‘mapState’, ‘mapGetters’, ‘mapActions’, and ‘mapMutations’ helpers.
How do I handle forms in Vue 3?
Handling forms in Vue 3 is similar to Vue 2. You can use the ‘v-model’ directive to create two-way data bindings on form input, textarea, and select elements. Vue 3 also introduces the ‘v-model’ argument, which allows you to customize the property that’s used for the two-way binding.
How do I make HTTP requests in Vue 3?
Vue.js doesn’t have a built-in way to make HTTP requests, but you can use third-party libraries like axios. You can install axios using npm or yarn, and then use it to make HTTP requests from your components. Axios returns a promise that resolves to the response data, which you can then use to update your component’s data.
How do I use lifecycle hooks in Vue 3?
Lifecycle hooks in Vue 3 are functions that get called at different stages of a component’s life. They’re used to perform actions like fetching data, setting up event listeners, or cleaning up before a component is destroyed. Vue 3 provides several lifecycle hooks, including ‘onBeforeMount’, ‘onMounted’, ‘onBeforeUpdate’, ‘onUpdated’, ‘onBeforeUnmount’, and ‘onUnmounted’. You can use these hooks in your components by importing them from ‘vue’ and calling them in your ‘setup’ function.
How do I test Vue 3 components?
Testing Vue 3 components can be done using testing libraries like Jest and testing utilities like Vue Test Utils. Jest is a JavaScript testing framework that provides a full set of testing functions, while Vue Test Utils is a set of utility functions specifically designed for testing Vue components. You can use these tools to write unit tests for your components, ensuring that they work as expected.
 Catalin Pit
A developer advocate by day, and a software engineer by night. I enjoy working with Vue, Node.Js, AWS and JavaScript. I also write articles on the same topics.