Simplifying Angular Change Detection

Change Detection is the backbone of the Angular framework, and each component has its own change detector. This article explains change detection strategies and optimizations to help you write highly performant Angular applications.
Angular can detect when data changes in the component, and can re-render the view to display the updated data. Angular makes sure that data in the component and the view are always in sync with each other.
You must have used Angular bindings to display the data from the component or handle events raised on the view. Let us consider the next code listing:
@Component({
  selector: 'app-root',
  template: `
  <h2>{{count}}</h2>
  <button (click)='incCount()'>Increment</button>
  `
})
export class AppComponent implements OnInit {

  count: number = 10;
  incCount(): void{
    this.count = this.count +1;
  }
  ngOnInit() {

  }

}
The above component uses interpolation and event binding to display data and call a function on the click event, respectively. Each time the button is clicked, the value of count increases by 1, and the view gets updated to display the updated data. So, here you can see that Angular can detect data changes in the component, and then automatically re-render the view to reflect the change.
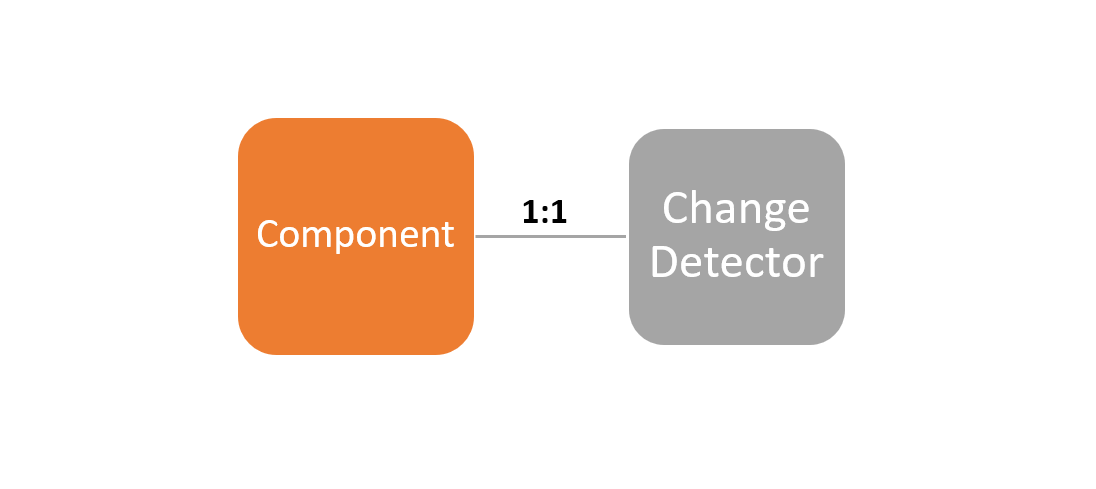
The part of the Angular framework that does this is called the “change detector.” Every component has a change detector that reads the binding on the template and makes sure that the data model and view are in sync with each other. Whenever, for any reason (actually there are three reasons which we cover later in the article), data model changes, it is the change detector that projects the updated data to the view, so that the view and the data model are in sync with each other.
The syncing gets complex when the data model gets updated at runtime. Let’s take a look at the next code listing:
@Component({
  selector: 'app-root',
  template: `
  <h2>{{count}}</h2>
  `
})
export class AppComponent implements OnInit {

  count: number = 10;
  ngOnInit() {
    setInterval(() => {
      this.count = this.count + 1;
    },100)

  }
}
The above component simply updates the value of count in every 100 milliseconds. Here, the count is a data model that is getting updated at runtime, but still the Angular change detector displays the updated value of the count in every 100 milliseconds by re-rendering the view.
So, the part of the Angular framework that makes sure the view and the data model are in sync with each other is known as the change detector.
The change detector checks the component for the data change and re-renders the view to project the updated data.
When Change Detector Runs
Angular assumes that the data in the component or the whole application state changes due to the following reasons, hence it runs the change detector when either of the following happens:
- An event, such as click or submit, gets fired
- An XHR is call to work with an API
- An asynchronous JavaScript function, such as setTimeOut() or setInterval(), gets executed
In the last code example, the component uses a setInterval() asynchronous JavaScript method, which updates the values of the count. Since it's an asynchronous method, Angular runs the change detector to update the view with the latest value of the count.
Now the question arises: What notifies Angular of these asynchronous operations?
So, there is something called ngZone in Angular whose responsibility is to inform Angular about any asynchronous operations. We won’t get into the details of ngZone in this article, but you should know it exists.
Change Detector Tree
Each component in Angular has its own change detector.
The change detector can be referred inside the component using the ChageDetectorRef service, and if required you can inject the ChageDetectorRef in a component by making a reference of it in the constructor as shown in next code listing:
export class AppComponent implements OnInit {

  constructor(private cd: ChangeDetectorRef) {
    console.log(this.cd);
  }

  ngOnInit() {
    console.log('init life cycle hook');
  }
}
The ChangeDetectorRef provides various APIs to work with the change detector, but before working with them effectively, you need to understand the component tree.
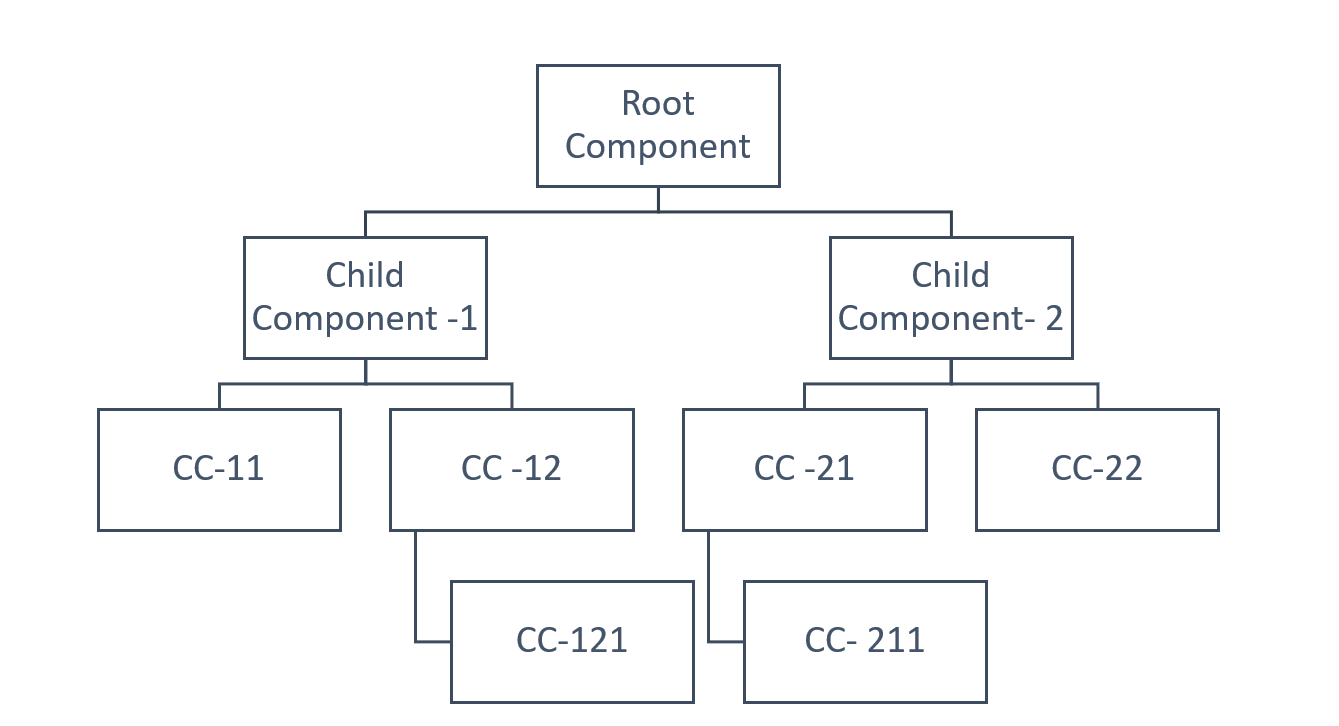
Each component in Angular has its own change detector, and you can see the whole Angular application as a component tree. A component tree is a directed graph, and Angular runs the change detector from top to bottom in the tree.
Logically you can also view the component tree as a change detector tree because each component has its own change detector.
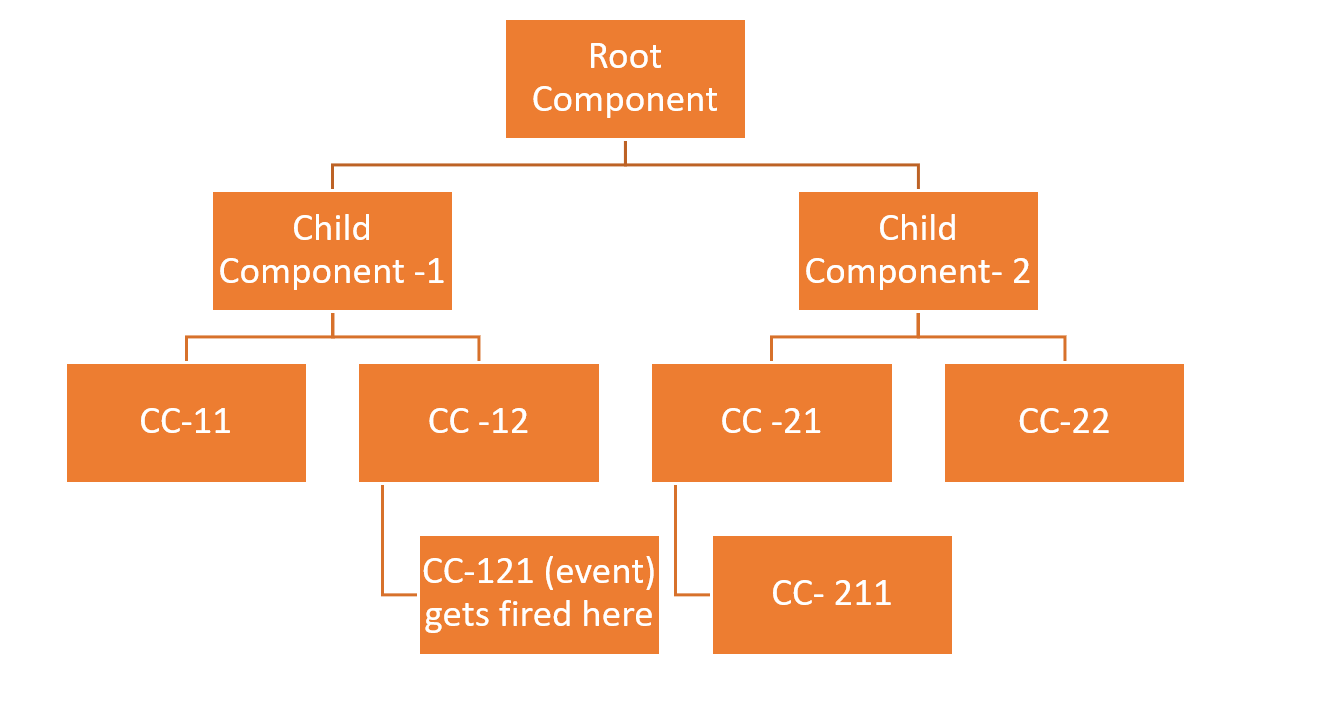
The change detector works from top to bottom in the component tree, and even if an event gets fired in any child node component, Angular always runs the change detector from the root component. For example, in the above change detector tree, if an event gets fired in the component CC-121, which is the bottom node component in the tree, Angular still runs the change detector from the root component node and for all the components.
It may come to your mind that, if for a single event somewhere in the application, Angular runs the change detector for all the components, then perhaps it may have some performance issues. However, that is not true, because of the following reasons:
- Angular component tree is a directed graph, which means there is a unidirectional flow of the change detector from root to bottom. Angular knows in which direction the tree has to be traversed, and there is no circular or bidirectional traversing of the change detector tree.
- After a single pass, the change detection tree gets stable.
- Unlike AngularJS, in Angular, there is no generic function to update the view. Since here every component has its own change detector, JavaScript VM can optimize it for better performance.
So, in Angular, there is no generic function to perform binding, and it generates the change detector class for each component individually at runtime. The definition of the generated change detector class is very particular for a specific component; hence JavaScript VM can optimize it for better performance.
Reducing the Number of Checks
By default, Angular checks each component in the application after any events, asynchronous JavaScript functions, or XHR calls, and, as you have seen earlier, a single event raised somewhere in the tree could cause each node in the component tree to be checked. But there is a way to reduce the number of checks, and you can avoid running the change detector for the whole subtree.
To optimize the number of checks, Angular provides two change detection strategies:
- Default strategy
- onPush strategy
In the Default strategy, whenever any data to @Input() decorated properties are changed, Angular runs the change detector to update the view. In the onPush strategy, Angular runs change detector only when a new reference is passed to the @Input() decorated properties.
Let us understand by having a look at CountComponent:
import { Component, OnInit, Input } from '@angular/core';

@Component({
  selector: 'app-count',
  template :`
  <h3>Count in child = {{Counter.count}}</h3>
  `
})
export class CountComponent implements OnInit {

  @Input() Counter;
  constructor() { }

  ngOnInit(): void {
  }
}
The CountComponent has one @Input() decorated property Counter, which accepts data from the parent component. Also, the CountComponent is used inside AppComponent, as shown in the next code listing:
@Component({
  selector: 'app-root',
  template:`
  <h2>Change Detector Demo</h2>
  <app-count [Counter]='Counter'></app-count>
  <button (click)='incCount()'>Increase Count Value</button>`
})
export class AppComponent implements OnInit {

  Counter = {
    count: 1
  }

  incCount(){

    this.Counter.count = this.Counter.count+ 1;
  }
  ngOnInit() {
    console.log('init life cycle hook');
  }
}
AppComponent is using CountComponent as a child and increasing the value of the count on the button click. So, as soon as the click event gets fired, Angular runs the change detector for the whole component tree; hence you get an updated value of the count in the child node CountComponent.
Also, whenever @Input() decorated properties’ values change, the Angular change detector runs from the root component and traverses all child components to update the view.
So, for the default change detection strategy, you get the output as expected, but the challenge is, even for one event, Angular runs the change detector for the whole tree. If you wish, you can avoid it for a particular component and its subtree by setting ChangeDetectionStrategy to onPush.
The CountComponent is modified to use onPush strategy as shown in next code listing:
@Component({
  selector: 'app-count',
  template :`
  <h3>Count in child = {{Counter.count}}</h3>
  `,
  changeDetection:ChangeDetectionStrategy.OnPush
})
export class CountComponent implements OnInit {

  @Input() Counter;
  constructor() { }

  ngOnInit(): void {
  }
}
The onPush change detection strategy instructs Angular to run change detector on the component and its subtree only when a new reference is passed to the @Input decorated properties.
As of now, AppComponent does not pass a new reference of the Counter object—it just changes the property values in it, so Angular would not run the change detector for the CountComponent; hence view would not show the updated value of the count.
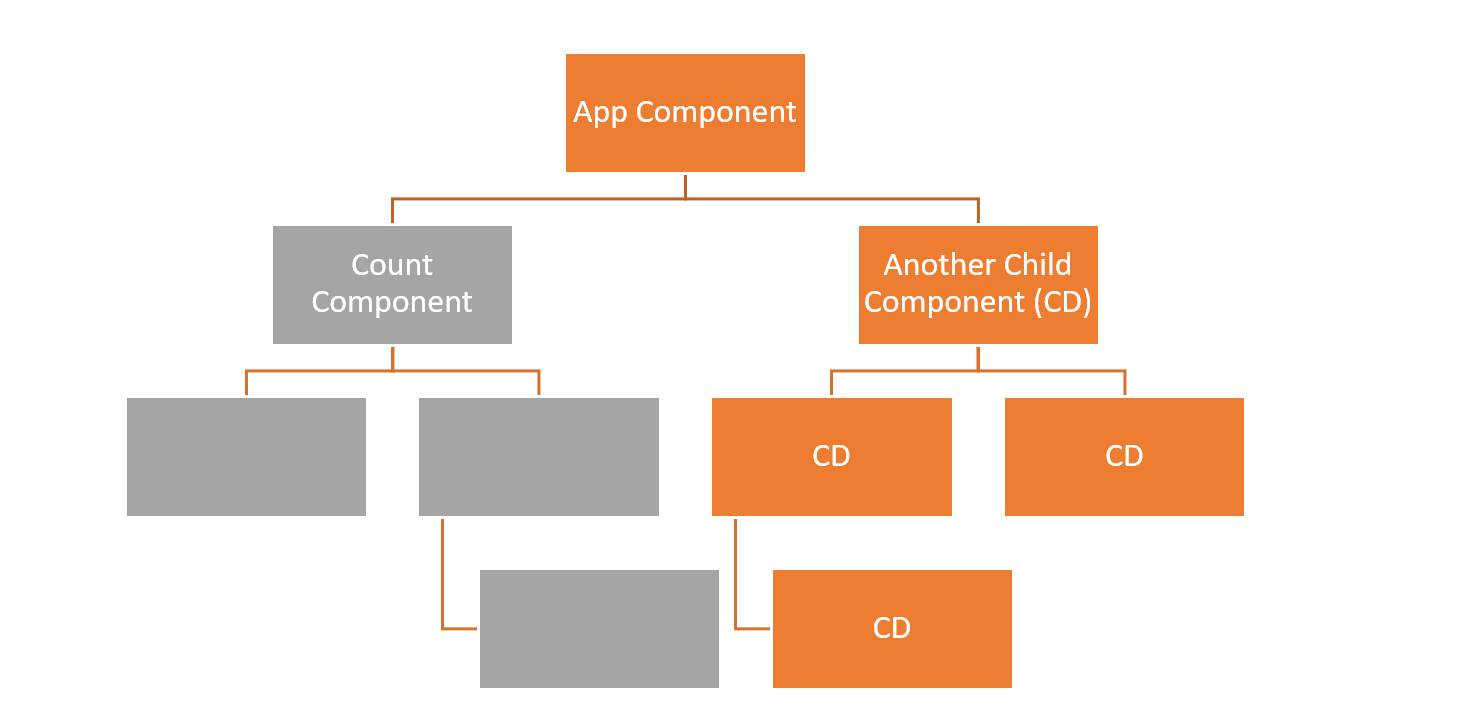
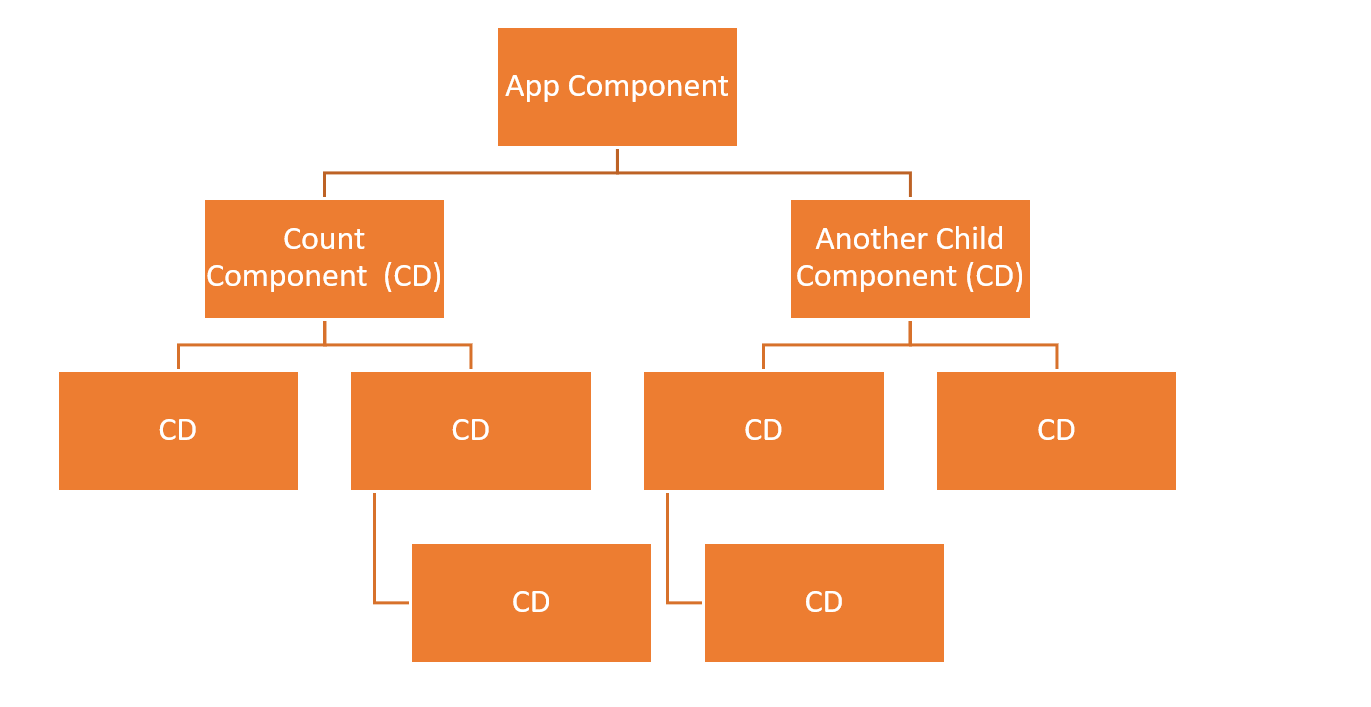
You can understand the above scenario with the below diagram:
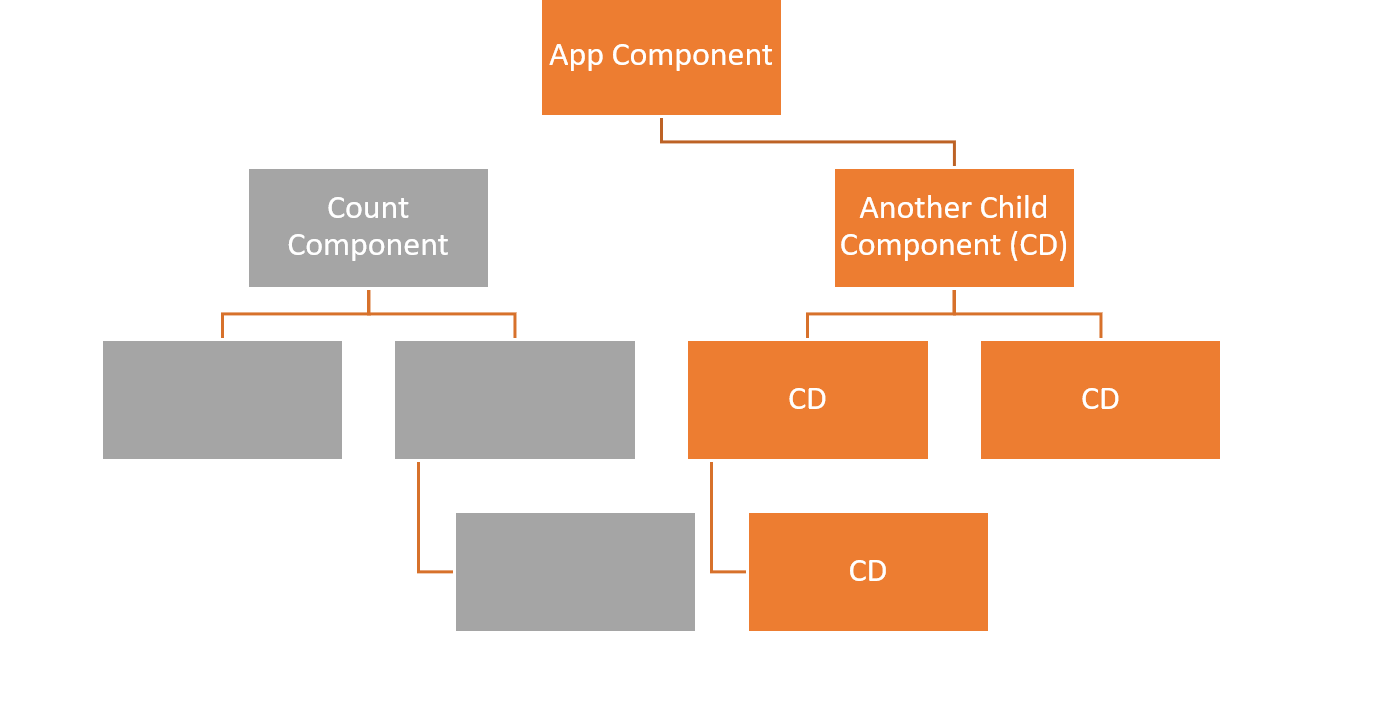
The above diagram assumes that for "Another Child Component" the change detection strategy is set to Default. Hence, due to the button click in the AppComponent, Angular runs the change detector for each node of Another Child Component subtree.
However, for the CountComponent, change detection strategy is set to onPush, and AppComponent is not passing new reference for the Counter property; hence Angular does not run change detection for Count Component and its subtree.
As Angular is not checking CountComponent, the view is not getting updated. To instruct Angular to check CountComponent and run the change detector, AppComponent has to pass a new reference of count as shown in the next code listing:
incCount(){

    //this.Counter.count = this.Counter.count+ 1;
    this.Counter =  {
      count:  this.Counter.count + 1
    }
  }
Now the characteristics of the CountComponent are as follows:
- Its change detection strategy is set to onPush
- Its @Input() decorated property is receiving a new reference of the data
So, Angular runs the change detector for the CountComponent and its subtree, and you get updated data on the view. You can understand the above scenario with the below diagram:
You can opt for either the Default or onPush change detection strategy depending on your requirement. One essential thing you must keep in mind is that even if a component is set to onPush and a new reference is not being passed to it, Angular will still run change detector for it if either of the following happens:
- An event, such as click or submit, gets fired
- XHR call to work with an API
- An asynchronous JavaScript function, such as setTimeOut() or setInterval(), gets executed
A Quiz
Keeping these points in mind, let me give you a quiz:
- For the CountComponent, the change detection strategy is set to onPush
- AppComponent is not passing a new reference to the CountComponent
Now you need to make sure that Angular runs the change detector for the CountComponent and updates the view. How will you achieve this?
To achieve that, you have the either of the following options:
- Run change detector manually
- Perform one of the three operations that always cause change detection to run, such as executing an event
Very simply, you can put a button on the CountComponent to raise an event, hence run the change detector.
@Component({
  selector: ‘app-count’,
  template :`
  <h3>Count in child = {{Counter.count}}</h3>
  <button (click)=’0’>Refresh</button>
  `,
  changeDetection:ChangeDetectionStrategy.OnPush
})
export class CountComponent implements OnInit {

  @Input() Counter;
  constructor() { }

  ngOnInit(): void {
  }
  ngDoCheck(){
    console.log(‘count component CD runs’);
  }
}
Now the CountComponent has a Refresh button. A click on the Refresh button would instruct Angular to run the change detector, and, as a result of that, the view will be updated with the latest value of the counter.
Using Observables
In the above quiz, the other option was to run the change detector manually. But the main question arises: how do you run the change detector manually?
The answer is using observables.
An observable notices a mutation in the object without creating a new reference for it. So, you can subscribe to an observable, and, whenever a change happens, manually run the change detector inside the subscribe method to update the view.
You can modify the AppComponent to pass an observable as follows:
import { Component, OnInit } from '@angular/core';
import { BehaviorSubject } from 'rxjs';

@Component({
  selector: 'app-root',
  template:`
  <h2>Change Detector Demo</h2>
  <app-count [Counter]='Counter'></app-count>
  <button (click)='incCount()'>Increase Count Value</button>`
})
export class AppComponent implements OnInit {
  _count = 1;
  Counter: any;
  incCount(){

   this.Counter.next({
     count: ++this._count
   })
  }
  ngOnInit() {
    this.Counter = new BehaviorSubject({
      count:0
    })
  }
}
You can subscribe to the observable in the CountComponent as shown in the next code listing:
  count : any;
  @Input() Counter : Observable<any>;
  ngOnInit(): void {
    this.Counter.subscribe(data=>{
       this.count = data.count;
       console.log(this.count);
    })
  }
Whenever there is a change in the object, the subscribe method is called, so you should manually run the change detector inside the subscribe method to update the view.
To run the change detector manually:
- Inject ChangeDetectorRef service in the component
- Use markForCheck in the subscription method to instruct Angular to check the component the next time change detectors run
- On the ngOnDestroy() life cycle hook, unsubscribe from the observable
You can modify the CountComponent to subscribe to the observable and manually run the change detector to update the view as shown in the next code listing:
import { Component, OnInit, Input, ChangeDetectionStrategy, ChangeDetectorRef } from '@angular/core';
import { Observable, Subscription } from 'rxjs';

@Component({
  selector: 'app-count',
  template: `
  <h3>Count in child = {{count}}</h3>
  `,
  changeDetection: ChangeDetectionStrategy.OnPush
})
export class CountComponent implements OnInit, OnInit {
  count: any;
  countsubscription: Subscription;
  @Input() Counter: Observable<any>;

  constructor(private cd: ChangeDetectorRef) {

  }

  ngOnInit(): void {
    this.countsubscription = this.Counter.subscribe(
      data => {
        this.count = data.count;
        this.cd.markForCheck();
      },
      err => { console.log(err) },
      () => console.log('complete')
    )
  }
  ngOnDestroy() {
    this.countsubscription.unsubscribe();
  }
}
By using the combination of onPush strategy and observables, you can avoid a greater number of checks in the component tree.
Using the async Pipe
Another alternative of the subscribe method is the Angular async pipe. By using the async pipe, you don't have to manually call the change detector, subscribe to the observable, and unsubscribe to the observable because the async pipe does all these tasks for you.
- For onPush change detection strategy, if an observable data change occurs, the async pipe automatically marks the component for the check
- On component destruction, the async pipe automatically unsubscribes the observable, thereby avoiding chances of any potential memory leak
You can use async pipe in the CountComponent as shown in the next code listing:
@Component({
  selector: 'app-count',
  template: `
  <div *ngIf="Counter | async; let data">
  <h3> {{data.count}} </h3>
  </div>
  `,
  changeDetection: ChangeDetectionStrategy.OnPush
})
export class CountComponent implements OnInit {
  @Input() Counter: Observable<any>;

  ngOnInit(): void {

  }
}
The async pipe is a cleaner approach, and it is recommended to use it while working with observable data and onPush change detection strategy.
Detach the Change Detector
There is one more aggressive way to reduce checks for a component and its subtree, by detaching the change detector from the component:
  constructor(private cd: ChangeDetectorRef){
    this.cd.detach();
  }
You can avoid checking the component and its subtree by detaching the change detector. For a detached change detector:
- Angular will not check the component or its subtree.
- Angular will not update the view and perform the bindings.
You can understand the above scenario with the below diagram:
You can modify the CountComponent to detach and then reattach the change detector as shown in the next code listing:
@Component({
  selector: 'app-count',
  template :`
  <p>{{title}}</p>
  <h3>Count in child = {{Counter.count}}</h3>
  <button (click)='attachcd()'>Refresh</button>
  `,
  changeDetection:ChangeDetectionStrategy.Default
})
export class CountComponent implements OnInit {

  @Input() Counter;
  title = "Detach component";

  constructor(private cd: ChangeDetectorRef){
    this.cd.detach();
  }

  attachcd(){
    this.cd.reattach();
  }

  ngOnInit(): void {
  }
  ngDoCheck(){
    console.log('count component CD runs');
  }
}
Angular will not run the change detector for the CountComponent because its change detector is detached. Besides that, Angular won’t perform the binding on the template, and as an output, you will not get the title and count rendered on the template. When you click on the Refresh button, the change detector is reattached, and you will find the view is updated and rendered all bindings.
You can wisely detach a change detector from a component to reduce the number of checks.
detectChanges and markForCheck
The ChangeDetectorRef has two more methods:
- detectChanges
- markForCheck
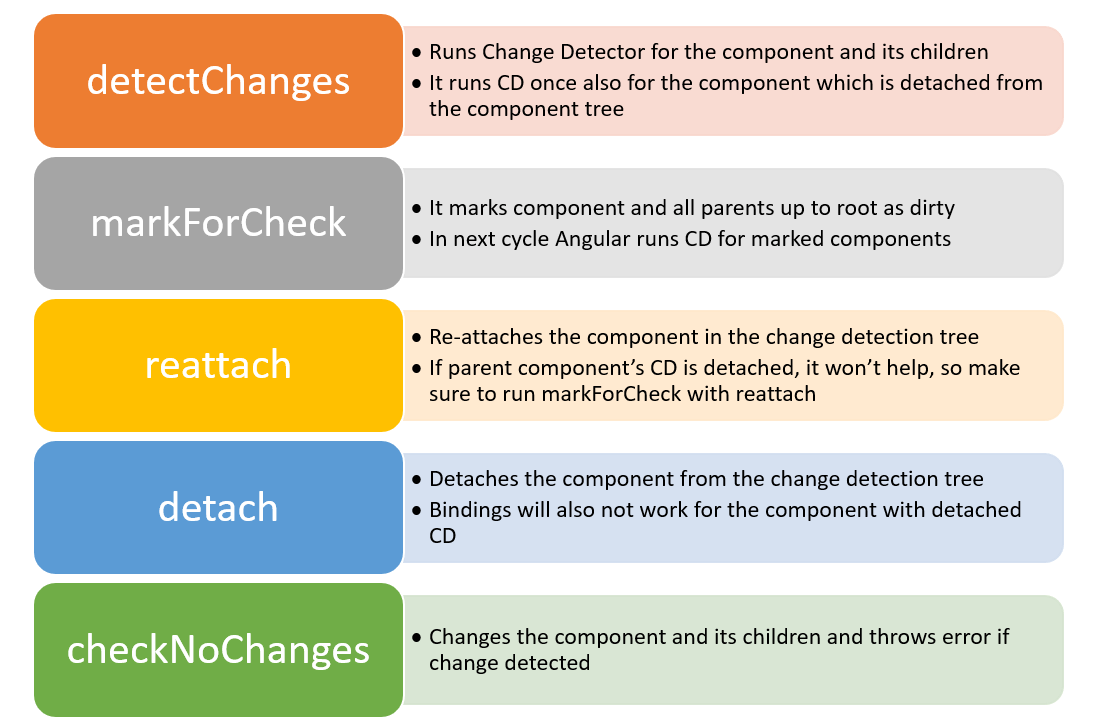
The detectChanges method runs the change detector for the current component and its children. For once, it can even run change detection on a component that has detached change detector without reattaching it.
Considering the above example, instead of reattaching the change detector, you can check the component once and update the view by using the detectChanges.
  attachcd(){
    //this.cd.reattach();
    this.cd.detectChanges();
  }
Here, Angular does not reattach the change detector and it checks the component only the one time. So essentially, the component will not be checked during following regular change detection cycles.
On the other hand, the markForCheck method enables you to check all parent components up to the root component. So, by using the markForCheck method, you can mark all components up to the root component to be checked in the next change detection cycle.
In a real scenario, you can use markForCheck in combination with the reattach method, because the reattach method does not work for a component if its parent component’s change detector is disabled. In that case, you need to use the markForCheck method to make sure Angular enables you to check for all parent components up to the root component.
You can depict the above discussions about the various method in a diagram as below:
Summary
Now, you understand the Angular Change Detection mechanism and various options available with it. You should choose either a Default or onPush change detection strategy depending on the requirement. To reduce the number of checks, you may consider detaching the change detector from a component and using reattach or detectChanges as you need.
I hope you find this article useful, and that it will help you in writing more performant Angular applications.

Dhananjay Kumar
Dhananjay Kumar is an independent trainer and consultant from India. He is a published author, a well-known speaker, a Google Developer Expert, and a 10-time winner of the Microsoft MVP Award. He is the founder of geek97, which trains developers on various technologies so that they can be job-ready, and organizes India's largest Angular Conference, ng-India. He is the author of the best-selling book on Angular, Angular Essential. Find him on Twitter or GitHub.

